OS Installation Extension
About
OS Installation For EasyDCIM extension allows to install operating systems on any existing in EasyDCIM physical server with the help of adequate submodules.
Features
- Install And Configure Multiple OS Automatically
- Create And Customize Predefined OS Installation Templates
- Create/Edit/Synchronize OS Installation Addons:
- Disk Layout
- Post Installation
- First Boot
- Automatic Installation And Configuration Of DHCP Server Based On Module Configuration
- Advanced Integration With IP Address Management Extension
- Legacy BIOS And UEFI Mode Support
- Automatic Device Boot Into PXE Mode Using IPMI
- Automatic Device Restart Using IPMI And PDU
- Display Of Current Operating System Installation Status
- Cache System For Installation Templates
- Record Of Completed Installations Along With Installation Logs
- iPXE Startup File Placed Automatically In Dedicated Server Memory
- IPv4 Support
- Built-in DHCP And TFTP Server
- Definition Of License Key For Windows
- Installation And Configuration Of SAMBA Server
- Run Rescue Mode Both From Back-End And Client Area Sections
- Automation Of Operating System Installation Process:
- Downloading System Files
- Setting System Language
- Setting Time Zone
- Creating Standard User Account
- Setting Password For New User Account
- Hard Disk Partitioning
- Setting Root User Password
- Setting Primary IP Address
- Setting Additional IP Addresses And Network Interfaces
- Installation Of Additional System Packages
- Running First Boot Scripts - CentOS/Debian
- Running Post-installation Scripts
- Finishing Installation
- Sending Confirmation Email To Client And Administrator Along With Login Data
- Supported Linux Operating Systems:
- AlmaLinux 8 (latest)
- AlmaLinux 9 (latest)
- CentOS 8 (latest)
- CentOS 7 (latest)
- CentOS 6 (latest)
- CentOS Stream 9 (latest)
- CentOS Stream 8 (latest)
- CloudLinux 8 (latest)
- Debian Bookworm
- Debian Bullseye
- Debian Buster
- Debian Stretch
- Debian Jessie
- Fedora 36 Server (latest)
- Fedora 27 Server (latest)
- OpenSuse 42.3
- OracleLinux 8 (latest)
- Proxmox VE 8.X
- Proxmox VE 7.X
- Proxmox VE 6.X
- Rocky Linux (latest)
- Scientific Linux 7 (latest)
- Ubuntu 20.04 LTS
- Ubuntu 18.04 LTS
- VMware ESXi 8.0
- VMware ESXi 7.0b
- Supported Windows Operating Systems:
- Windows Server 2022
- Windows Server 2019
- Windows Server 2016
- Windows Server 2012 R2
- Windows Server 2008 R2
- Windows 10 April 2018
- Supported Rescue And Utility Systems:
- SystemRescueCd 8.0.4 - A Gentoo-based live CD distribution for system repairing and data recovery
- Memtest86+ 5.31b - Diagnostic tools for verifying the correct RAM operation
- Hiren’s BootCD 15.2 - A package of special programs for diagnosis, repair, disks, optimization and anti-virus protection
- Clonezilla 2.8.1-12 - Software designed for creating, playing and cloning computer disks
- WIPE HARD DRIVE - Hard drive cleanup script
- GParted 1.3.1 - GParted is a free partition editor for graphically managing your disk partitions
- Hiren’s BootCD PE 1.0.2 - A rescue disk provided as an ISO image, which is based on the Windows 10 PE environment
- R1Soft Backup Server & Agent - Providers a flexible, server-friendly solution that eliminates the pains of running traditional backups
- Supported First Boot Installation Addons - CentOS 7:
- CentOS Web Panel
- cPanel
- DirectAdmin
- Plesk
- Vesta Control Panel
- Supported Disk Layout Addons - CentOS 6/7/8:
- RAID1 with 2 disks
- RAID1 with 4 disks
- RAID1 with 6 disks
- RAID1 with 8 disks
- Test Connection
- Enable/Disable Specific Submodules
- Create Own Submodules
- Manage OS Templates:
- Add/Edit/Delete Templates
- Define Template For Chosen Connection
- Synchronize Templates
Server configuration
In order to configure a new server, simply press Add a Server.
Type in the following data into the form:
- Server Name – your server name
Once the data are filled out, press Add Server to continue. Next, in actions column, find and press edit option of the server.
Remote Provisioning submodule
Submodule enables the automation of installation and configuration processes of operating systems on dedicated servers. One of the most important requirements of the submodule is to create and synchronize a remote agent in EasyDCIM control panel. The Remote Provisioning submodule is based on a remote agents and cannot work properly without it. You can read how to add and configure a remote agents in this section: Remote Agents
Example of use
As was already stated before, EasyDCIM will serve as your main (master) application. Now imagine you run two locations – one in London and the other one in New York. The devices in your London facility work in the 10.10.10.0/24 subnetwork, whilst those in New York in the 192.168.56.0/24 subnetwork. As for both locations you will need separate DHCP and TFTP servers, the next step is to install in each data center a remote agent (slave) that already has DHCP, TFTP and Samba servers built into it. The remote agent works on port 8080 and listens to the master EasyDCIM application for commands (EasyDCIM adds only relevant tasks to its database). An example of such a task may be as follows: “Start X system installation on Y device in London location”. The remote agents set up in New York and London check every five seconds if there are any new orders from EasyDCIM. The New York location will find no instructions to carry on with, but the application in London will immediately begin the process of OS installation soon upon detecting the task. In other words, each slave application has to communicate with the master device only, independently of one another.
Requirements
- Remote Agent has to be launched on a server that has a direct access to the Internet. It is required so as to automatically download the necessary operating system installation files during the process of dedicated server provisioning. Proxy servers are not supported.
- No other DHCP servers can be active in the VLAN network of the remote agent server.
- Dedicated servers on which you want to install the operating system have to be located in the same VLAN network as remote agent server.
- Dedicated servers have to support the Preboot Execution Environment feature (PXE).
- The device in EasyDCIM requires a correctly set ‘MAC Address’ field in order to identify the device in the network.
Operating principle
The installer operates on the basis of ISC-DHCP server and TFTP server. A DHCP server is an essential component of PXE technology, as it needs to assign the IP address to the machine that is loading the PXE boot, as well as provide information about how the boot loader file is named and where it can be downloaded from. Even if static IP addresses are used in the current local network, it will still be necessary to use this server. The TFTP server contains necessary files of network boot loaders.
During the installation of an operating system EasyDCIM automatically performs a number of specific actions:
- Remote Agent generates the configuration file of the DHCP server based on the ‘MAC Address’ field of the device.
- Then it restarts the device using IPMI, PDU or a manual method and puts it into the PXE boot mode.
- Once the PXE boot mode is on, the device sends a request to the DHCP server to assign the IP address set in the EasyDCIM ‘IP Address’ field.
- The DHCP server assigns the appropriate IP address.
- Remote Agent downloads the relevant boot loader file from the TFTP server and uploads it to the memory of the device.
- Based on the uploaded boot loader file, the kickstart file is requested from EasyDCIM containing the configuration of the selected operating system.
- The kickstart file is downloaded from the specified Remote Agent IP address.
- Based on the kickstart file, Remote Agent automatically installs the operating system:
- downloads the required system files
- sets the time zone
- sets the language
- partitions the disk
- creates user accounts and sets a root password
- sets the master IP address
- sets additional IP addresses and network interfaces
- installs additional system packages
- initiates post-installation scripts
- finishes the installation.
- Once the installation is complete, corresponding information is sent to EasyDCIM. This principle of operation applies to most of the installation templates. Some templates may slightly vary, but the fundamentals remain the same.
DHCP server operation
The DHCP server is installed automatically together with the remote agent installation. The configuration file is located in the /opt/easydcim_remote/system/etc/dhcpd.conf directory.
It is generated automatically on the basis of the data stored in the admin panel each time:
- A new subnet is added in the remote agent configuration
- Module settings are saved
- The installation process of the operating system starts
- The installation process of the operating system ends
- The operating system installation process is removed from the queue.
Since this file is generated anew every single time one of the above actions is performed, we do not recommend making any changes because they will be automatically lost along during the next generation process.
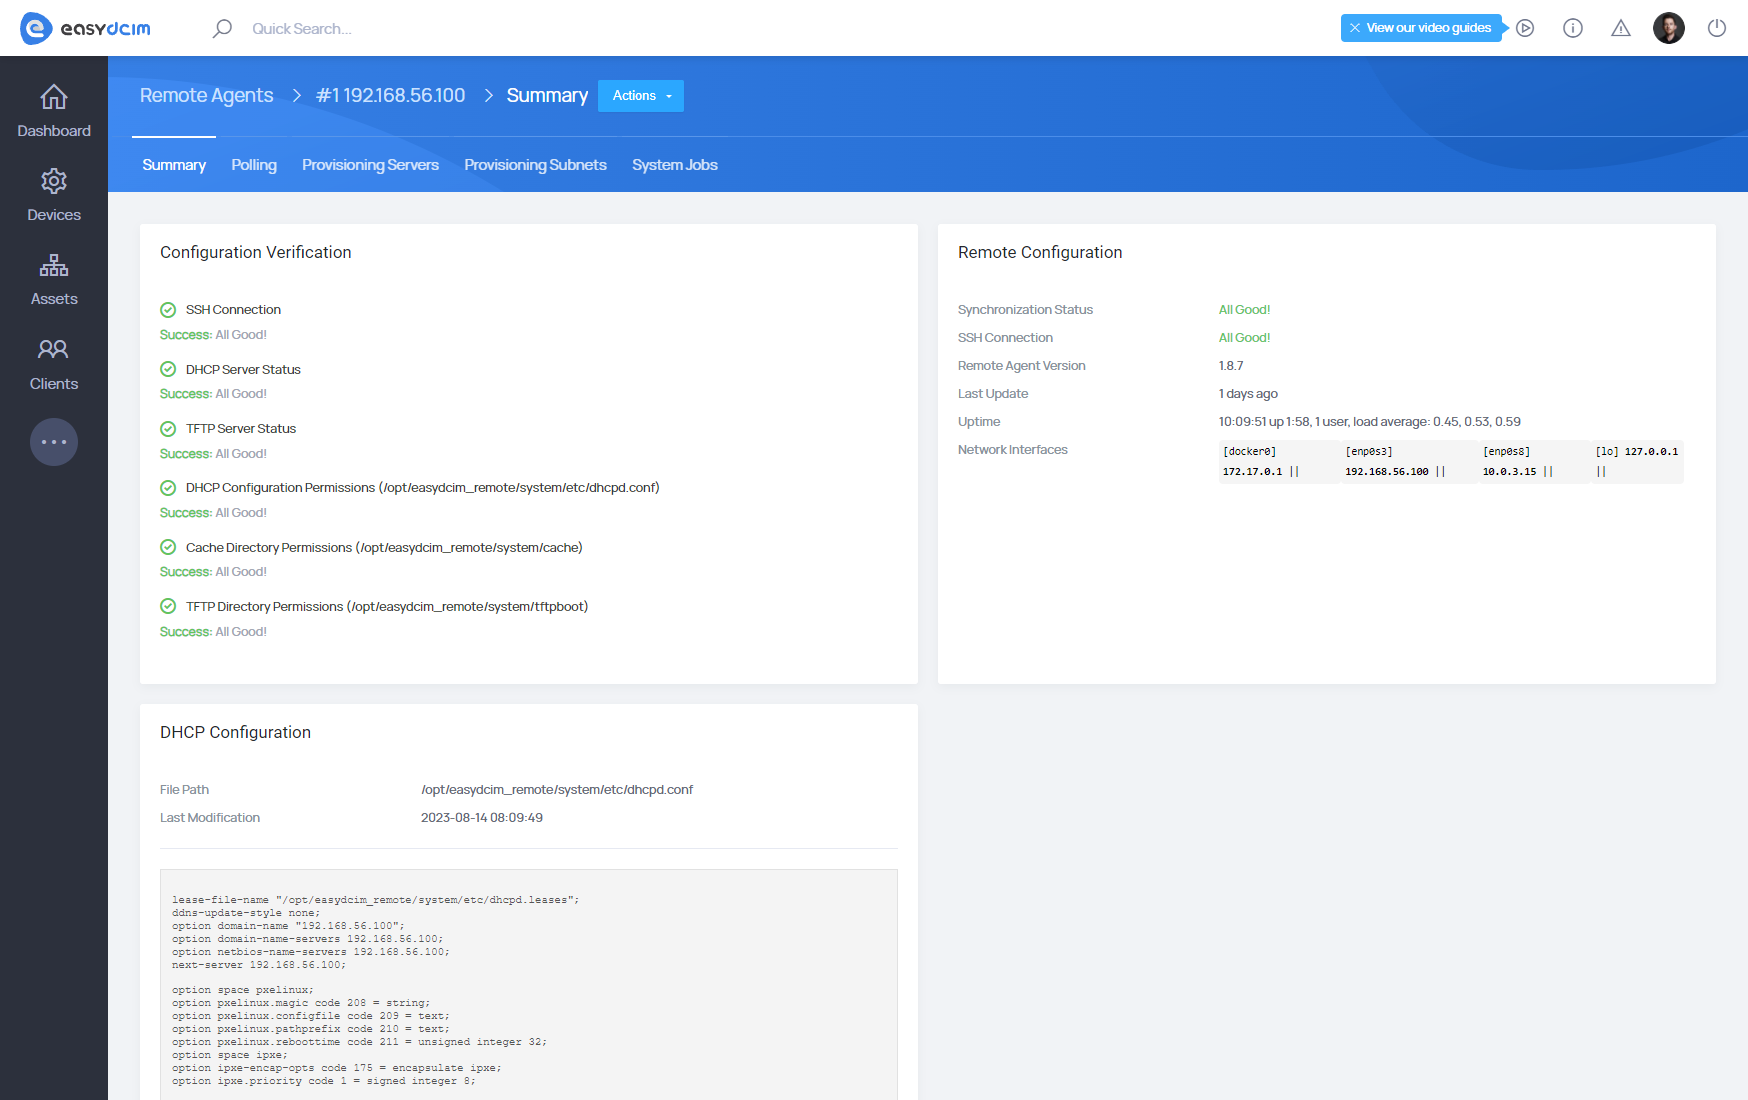
TFTP server operation
The TFTP server is installed automatically with each remote agent installation. The configuration file is located in the /etc/default/tftpd-hpa directory. The directory with TFTP files is located in the following path: /opt/easydcim_remote/system/tftpboot. It contains the bootloader files required to start the installation process. Additional configuration of the TFTP server is not required.
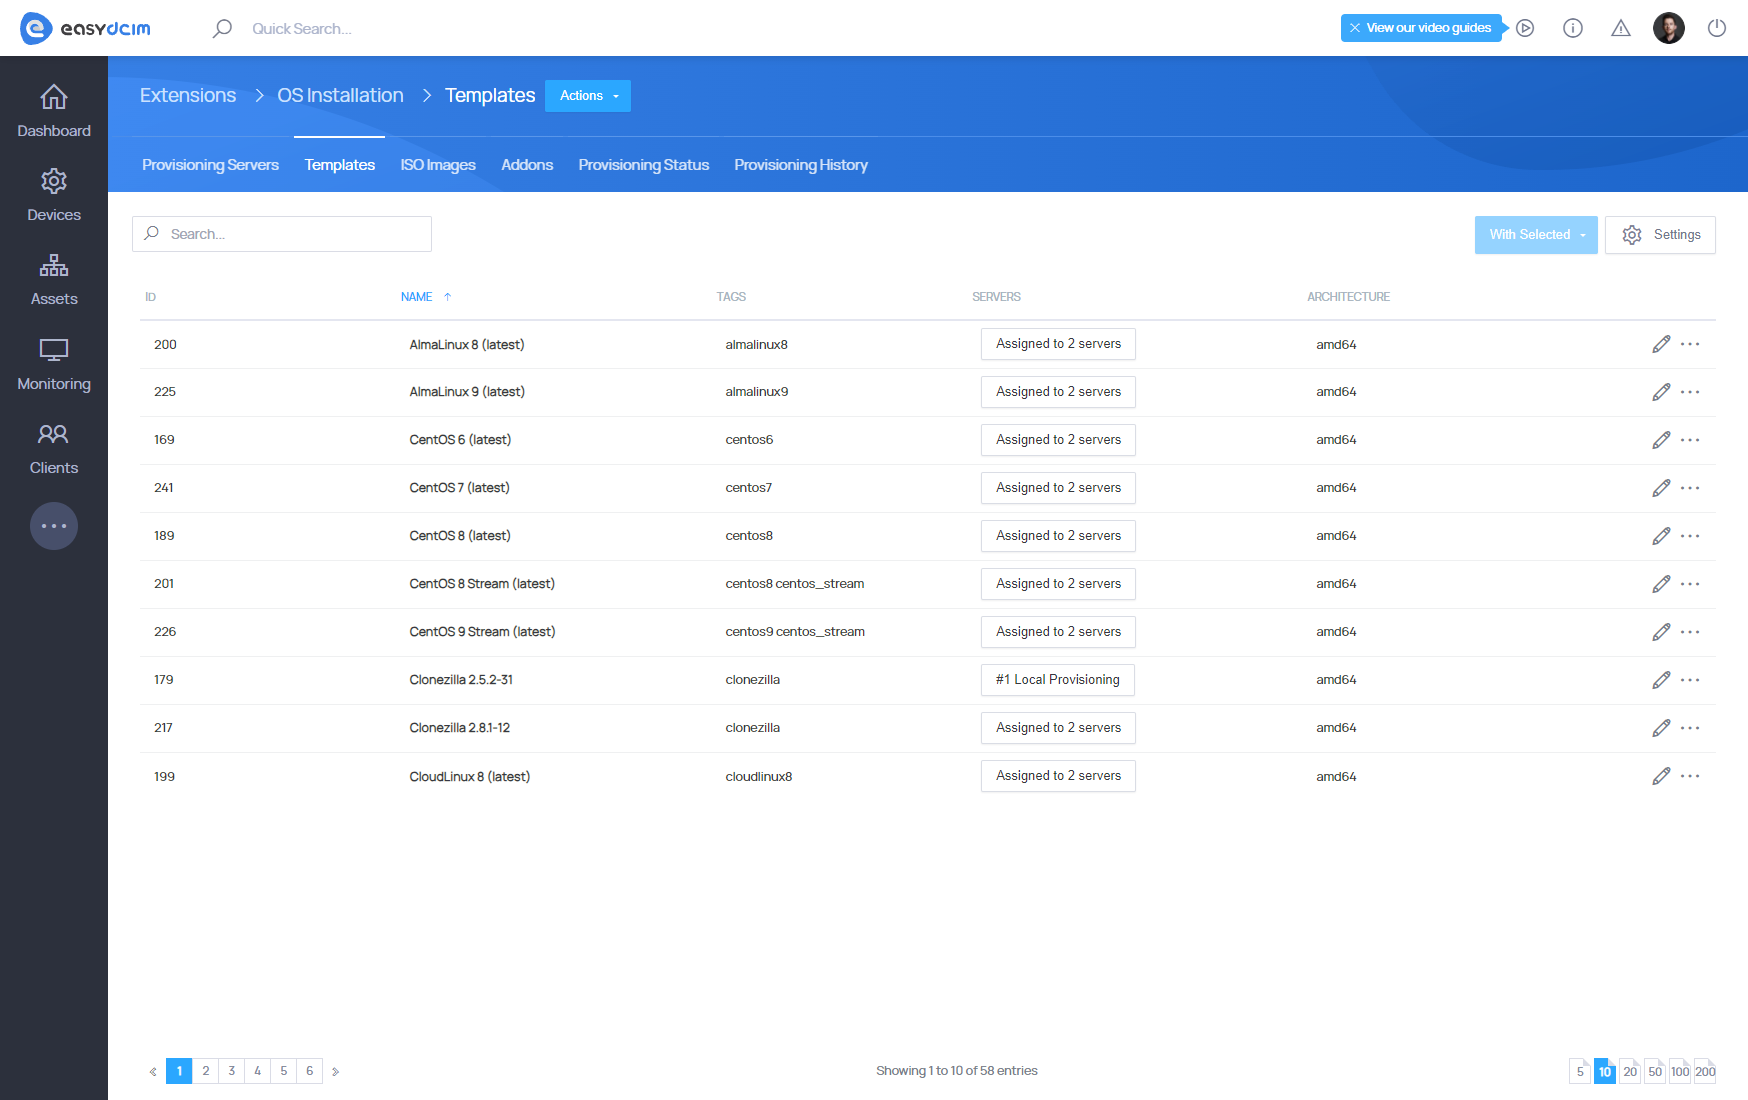
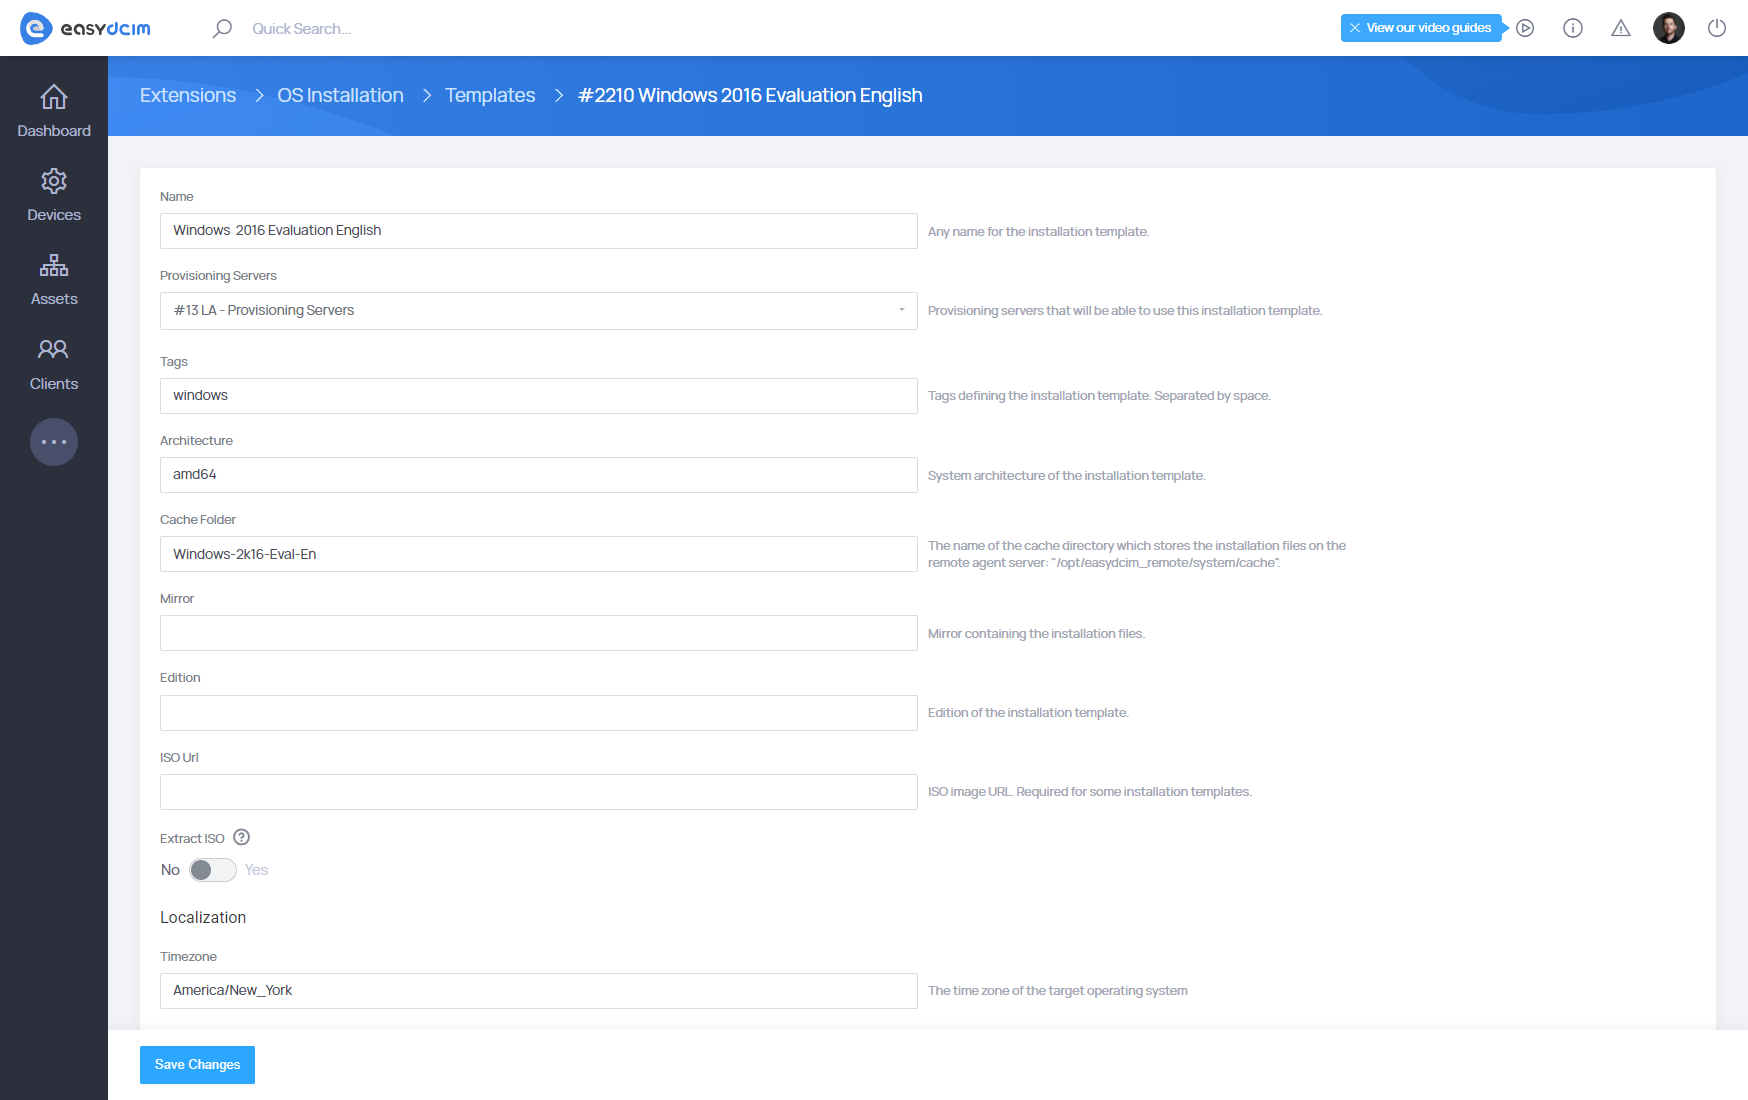
Templates
Templates should be synchronized using the ‘Templates Synchronization’ button from the action menu. You can easily check the list of supported templates in the ′Templates′ section. The system supports installation templates for operating systems as well as applications.
Template matching
The best way to match the template to your needs is to create a copy of the selected template. Owing to this, you will keep the base template. We do not recommend editing basic profiles as well as fields such as:
- Architecture
- Edition
- GPXE Script
As part of the customization of your template, you can freely edit such fields as:
- Mirror - defines the mirror from which the installation files are downloaded. You can change it to the one matching your country.
- Disk Layout - defines the partitioning method of the disk. This script depends on the specific distribution of the relational system.
- Packages - specifies a list of system packages (each in a new line) that will be installed.
- Post Installation Script - specifies the installation script that will be executed after the installation of the operating system.
- Timezone - defines the time zone that will be set during the installation of the operating system
- Language - defines the language that will be set when the operating system is installed.

Templates cache
When you use the template for the first time during the server provisioning process, the required system installation files are downloaded. In order not to download them during each new installation, they will be stored in appropriate catalogs. Each template has its own folder into which the installation files are downloaded. These directories are located in the following path: /opt/easydcim_remote/system/cache. The cache directory of the template can be freely cleaned using the ‘Clear Cache’ mechanism.
Adding Windows family templates
Windows family templates are not predefined in the system and they have to be added manually. Each Windows template must be generated based on the corresponding ISO file. We recommend using the official ISO files distributed by Microsoft. Note that each Windows template can be added for one provisioning server only.
To add a new Windows template, go to the OS Installation extension and then to the Templates section. From the top action menu, select Add Windows and then, from the dropdown menu, select the provisioning server for which you want to add the template. All Windows ISO images should be placed in the /opt/easydcim_remote/system/iso directory of the corresponding provisioning server. Then, follow the instructions displayed on the screen. The entire process will be carried out via the command line using the remote agent SSH.
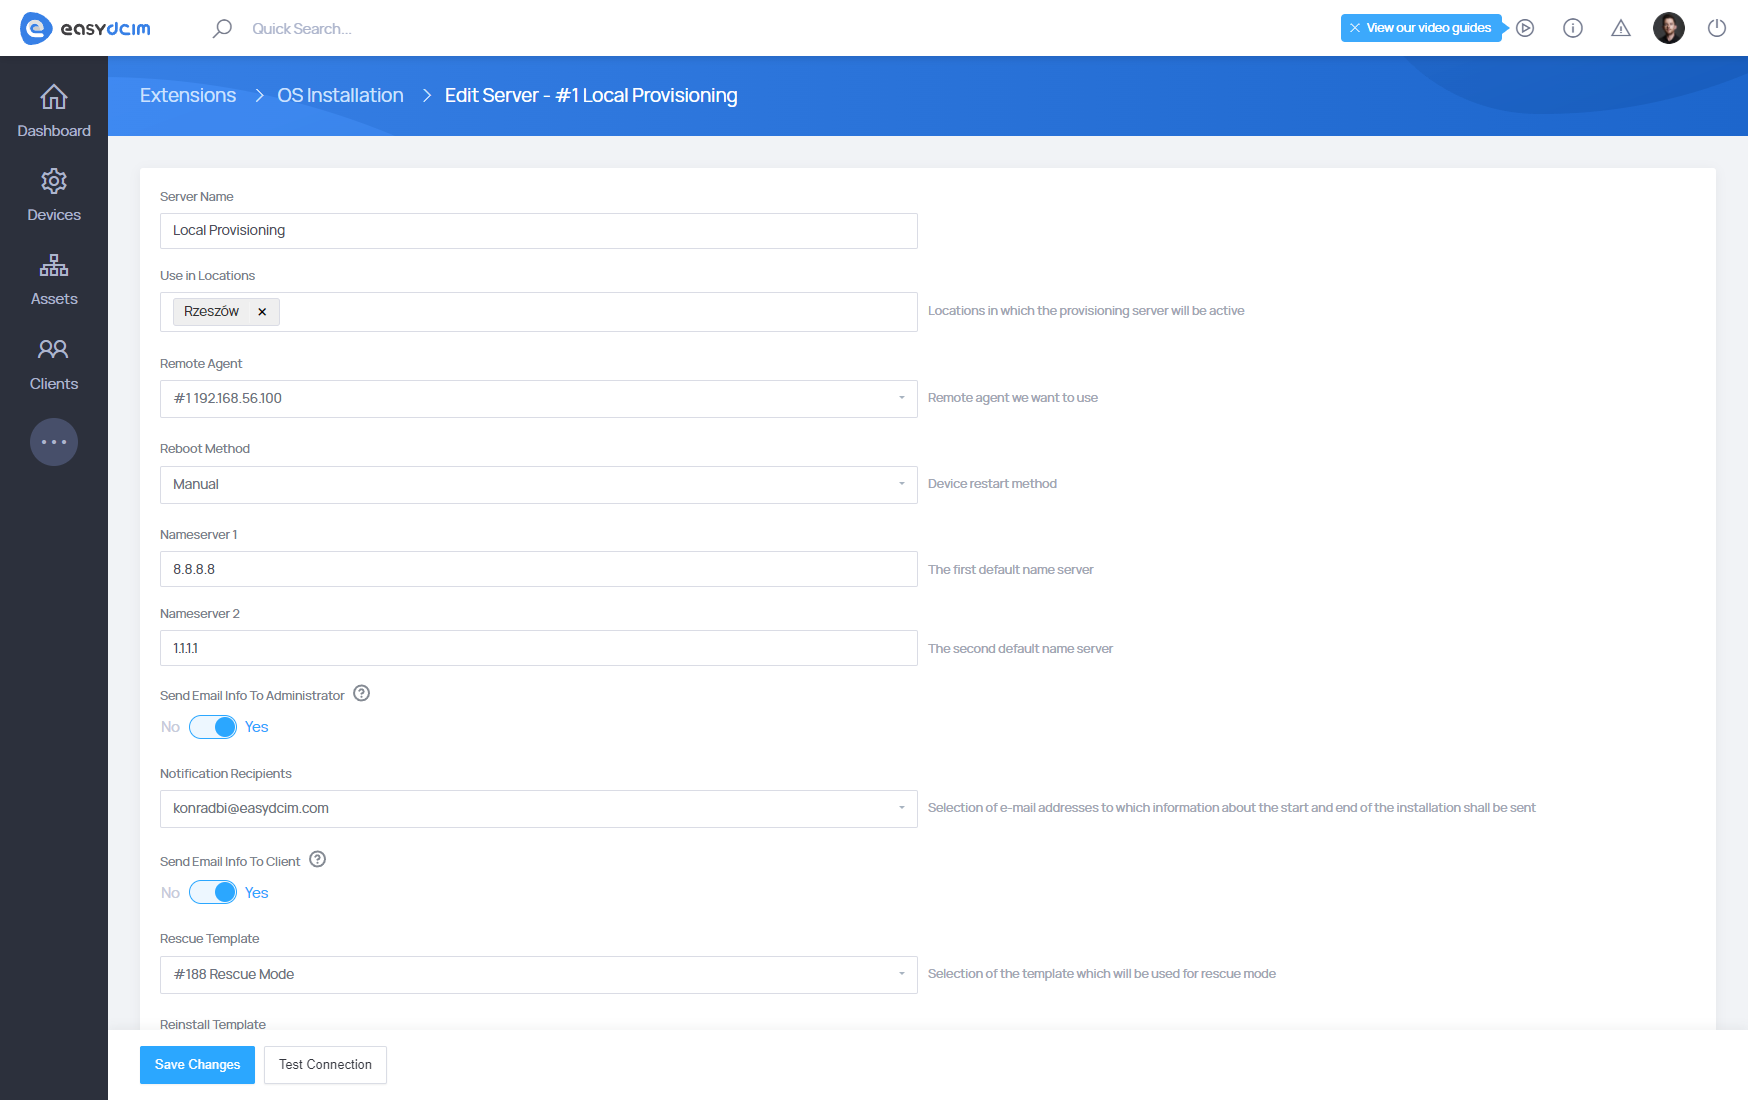
Settings
The module settings are globally applied to all operating system installations.
- Remote Agent - remote agent we want to use
- Reboot Method - device restart method
- Manual - manual restart of the device by an administrator
- IPMI - device restart using IPMI and automatically entering the PXE mode
- IPMI (no PXE) - device restart using the IPMI protocol without entering the PXE mode
- PDU - reset of PDU outlet assigned to the device (for APC and Raritan devices)
- Send Email Info To Administrator - sending information about the start and end of the installation to the email address of the selected administrator
- Notification Recipients - selection of e-mail addresses to which information about the start and end of the installation shall be sent
- Send Email Info To Client - sending information about the start and end of the installation to the email address of the client (owner) of the given server
- Reinstall Template - selection of the template which will be used for reinstallation, during e.g. service termination
- Nameserver 1 - the first default name server
- Nameserver 2 - the second default name server
- Bootloader - the default boot file
ISO Images
ISO images are used to manually install the operating system. If you want to use an ISO image, you cannot perform an automatic OS installation within EasyDCIM. Available ISO images are accessible for end-users when a noVNC session is used. The images will be automatically mounted when creating a noVNC session in the “/home/iso” directory. If the JAVA KVM applet allows mounting ISO images, then the end-user will be able to perform a manual installation of the operating system.
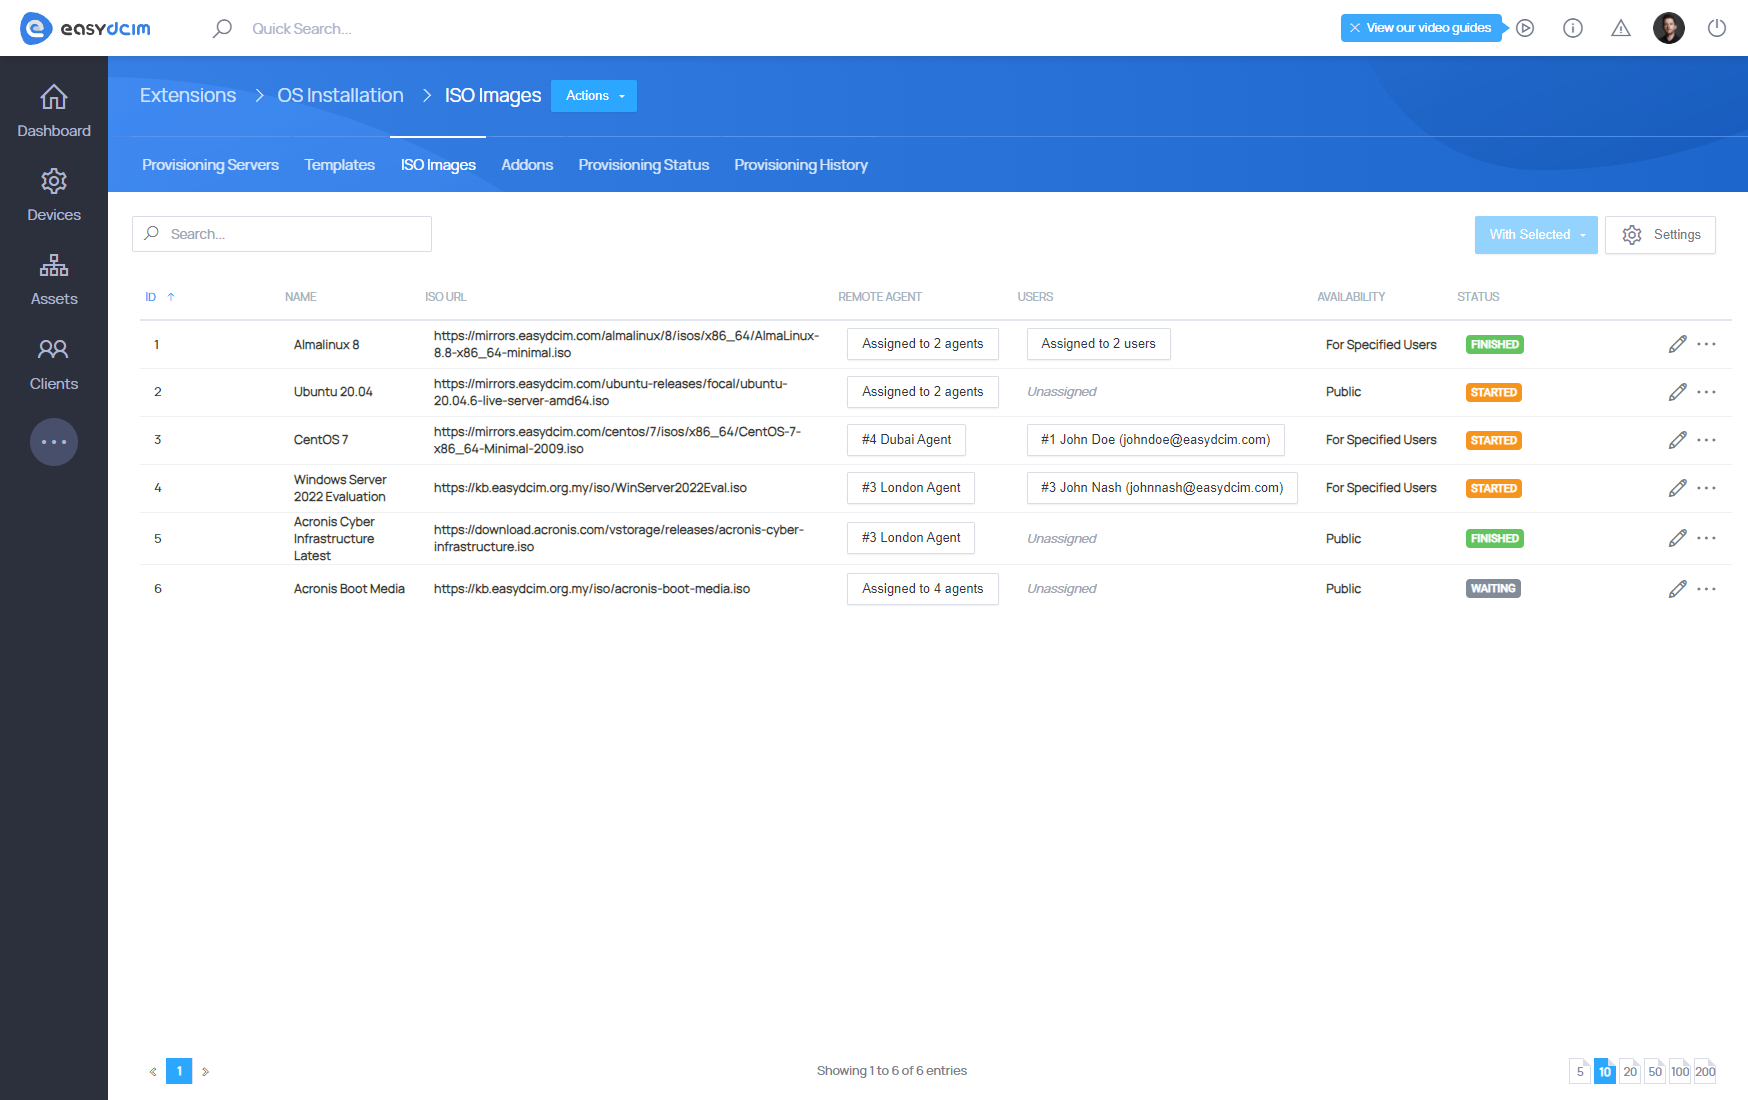
Adding new ISO Image
Select “Add ISO Image” from the action menu to add a new ISO image. The form contains the following fields to fill in: * Name - any name of the ISO image * Remote Agent - the remote agent on which the ISO image will be stored. You can select multiple agents * ISO URL - the ISO image availability * Public - image available to all clients during every noVNC session * For Specified Users - image available to selected clients only during noVNC sessions
After completing the form, the task of downloading the ISO image to the servers of the selected remote agents will be started. The download progress will be available in the table view. The download time depends on the network connection speed and network latency. ISO images are stored in the “/opt/easydcim_remot/sytem/isoimages” directory on the remote agent server.
Deleting ISO images
The existing ISO images can be easily deleted directly from the table view. When deleting an ISO image, a request to delete ISO files from remote agent servers is sent.
Additional ISO settings
To configure additional settings related to ISO images, move to the “Settings” section in the action menu. The form contains the following fields:
- Max ISO Images Per User - a maximum number of ISO images that can be assigned to a particular user
- Auto Remove ISO Images - time interval specifying the time after which the ISO images should be automatically deleted
- Auto Cancel Download Tasks - time interval that specifies after what time the excessive ISO download processes are to be automatically interrupted
Basic module configuration
The OS installation extension needs minimal configuration, depending on the network environment in which it is launched. You can check the requirements for running the module on your network infrastructure in the appropriate section.
First, make sure the extension is working properly. This can be determined using the ′Remote Agent Configuration Verification′ widget that presents information about the status of individual services and configurations
Operating system installation
Each installation module is assigned to the appropriate location in the system. For example, if the installation module works for the ‘New York’ site, then all devices in the system that are assigned to the ‘New York’ site will be supported by this installation module.
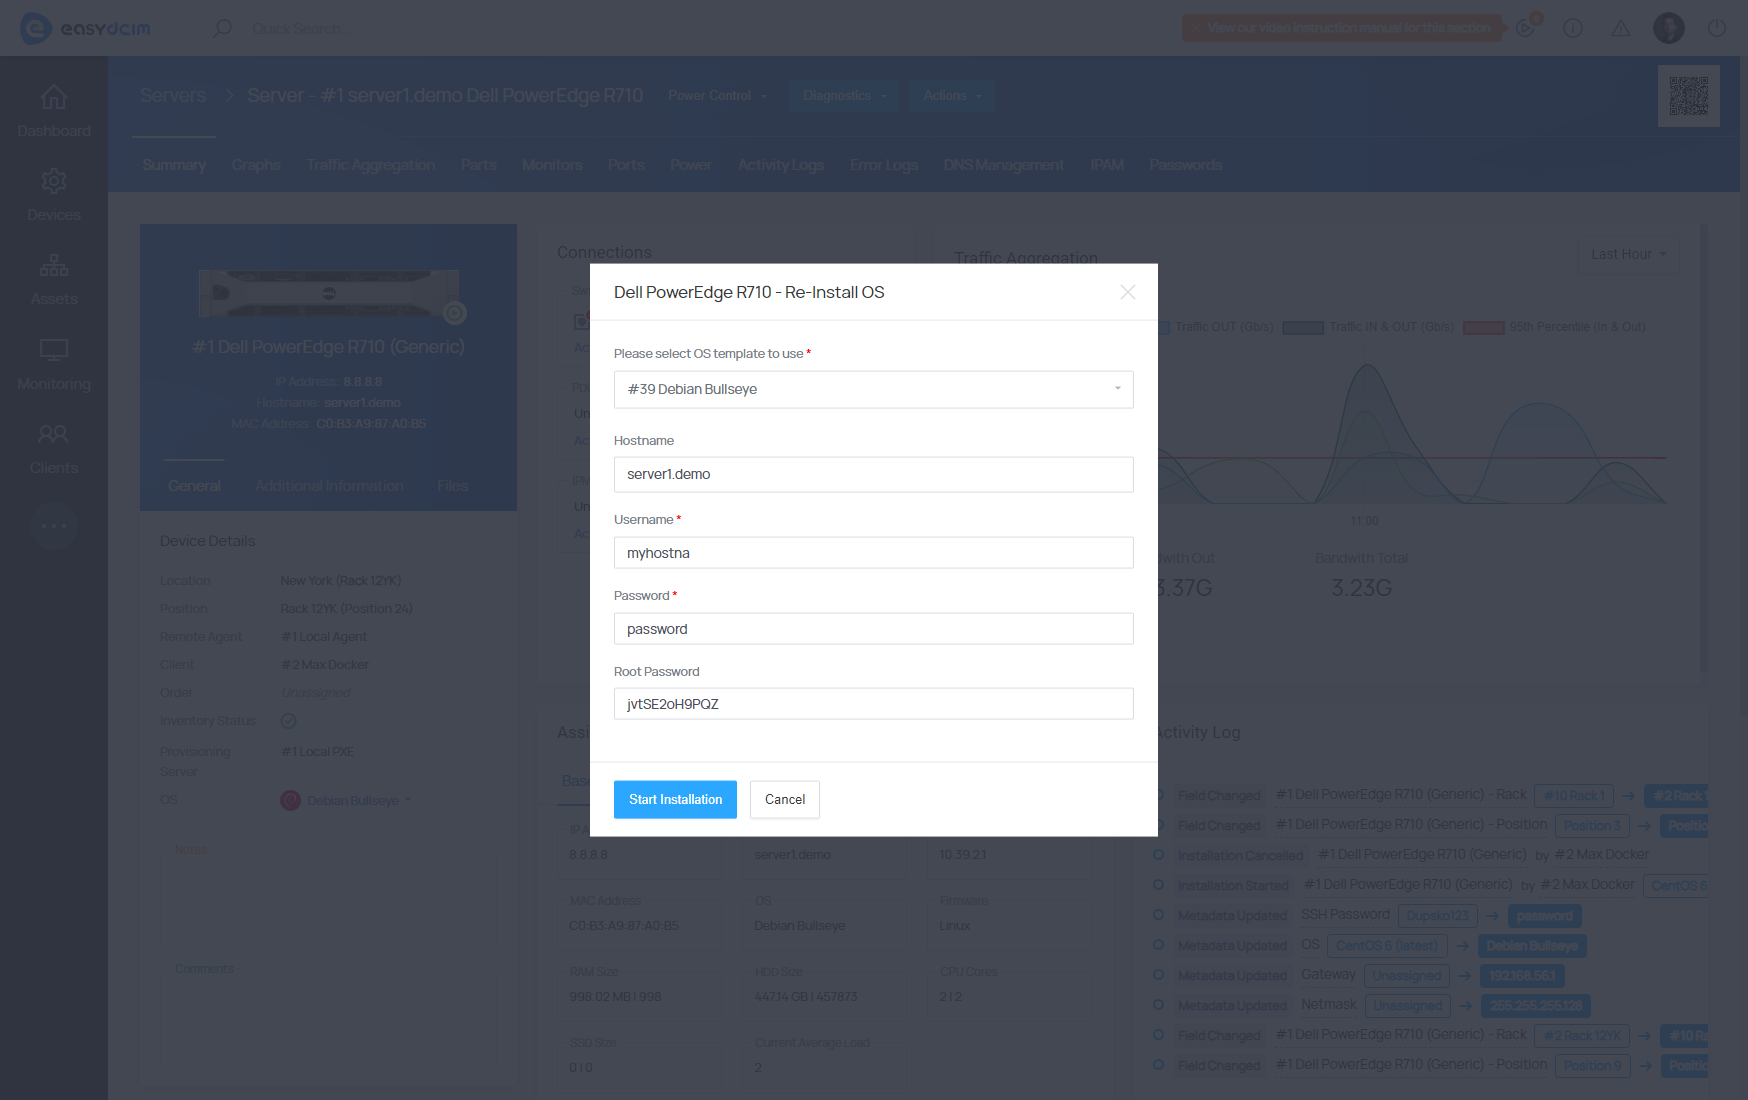
To start operating system installation, choose the ‘Re-Install OS’ option from the action menu. In the configuration fields specify the following:
- OS template - decide which OS instillation template to use (it can be an operating system or a diagnostic tool)
- Hostname - the hostname value is automatically downloaded from the device’s Hostname metadata and can be freely changed. This will be the hostname of the operating system that will be installed on the target server.
- Username - the username value is automatically downloaded from the SSH username of the device and can be freely changed. This will be the name of a standard user of the operating system that will be installed on the target server.
- Password - the password value is automatically downloaded from the device’s SSH Password metadata and can be freely changed. This will be the password of a standard user of the operating system that will be installed on the target server.
- Root Password - the root password value is automatically downloaded from the SSH Root Password of the device and can be freely changed. This will be the root password of the operating system that will be installed on the target server.
- The installation will start soon after clicking on the ′Save Changes′ button.
SSH Keys for OS Installation
During the operating system installation, you have the option to define SSH keys for the user account. It is important to note that these keys will be associated with a standard user account rather than the root account once the OS installation is finished.
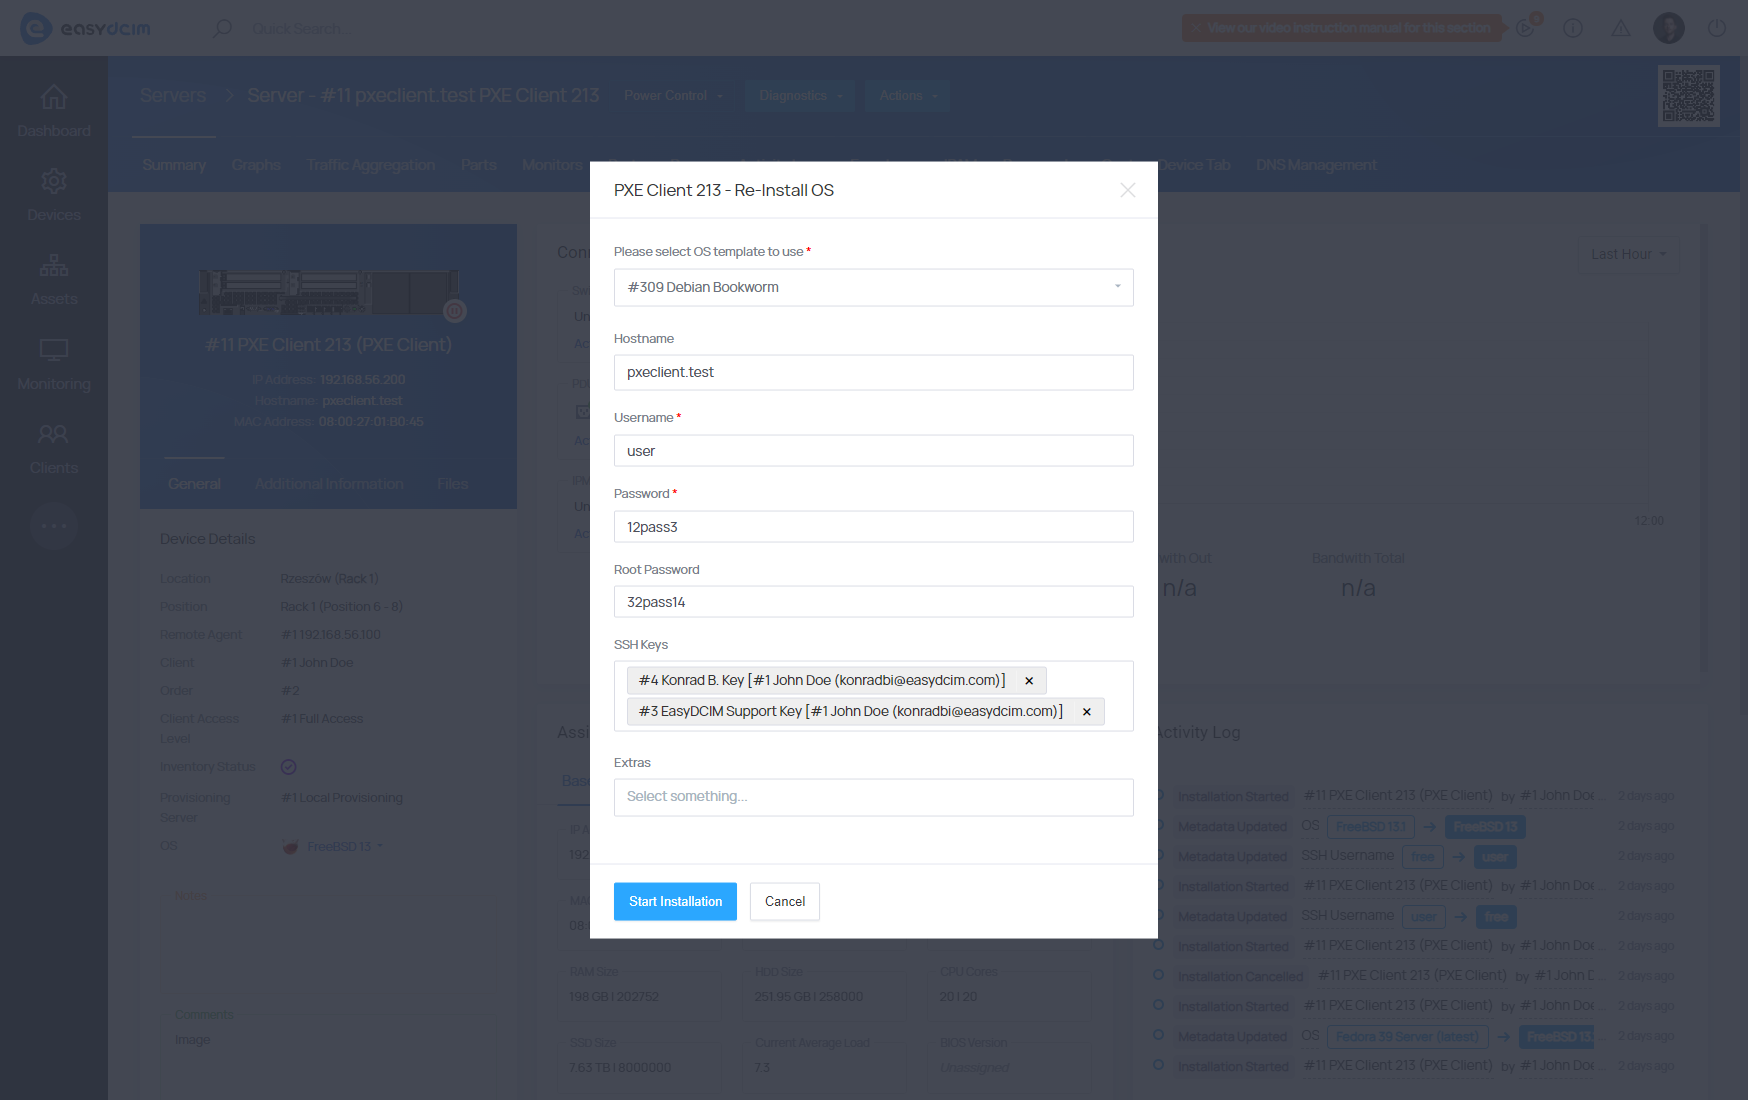
Each administrator and client can manage their public SSH keys. You can add keys in the administrator account summary view as well as in the client details section. To add a new SSH key, proceed to “Clients” → “Client Summary” and then select the “SSH Keys” tab.
The SSH2 public key in the OpenSSH format will start with “ssh-rsa”.
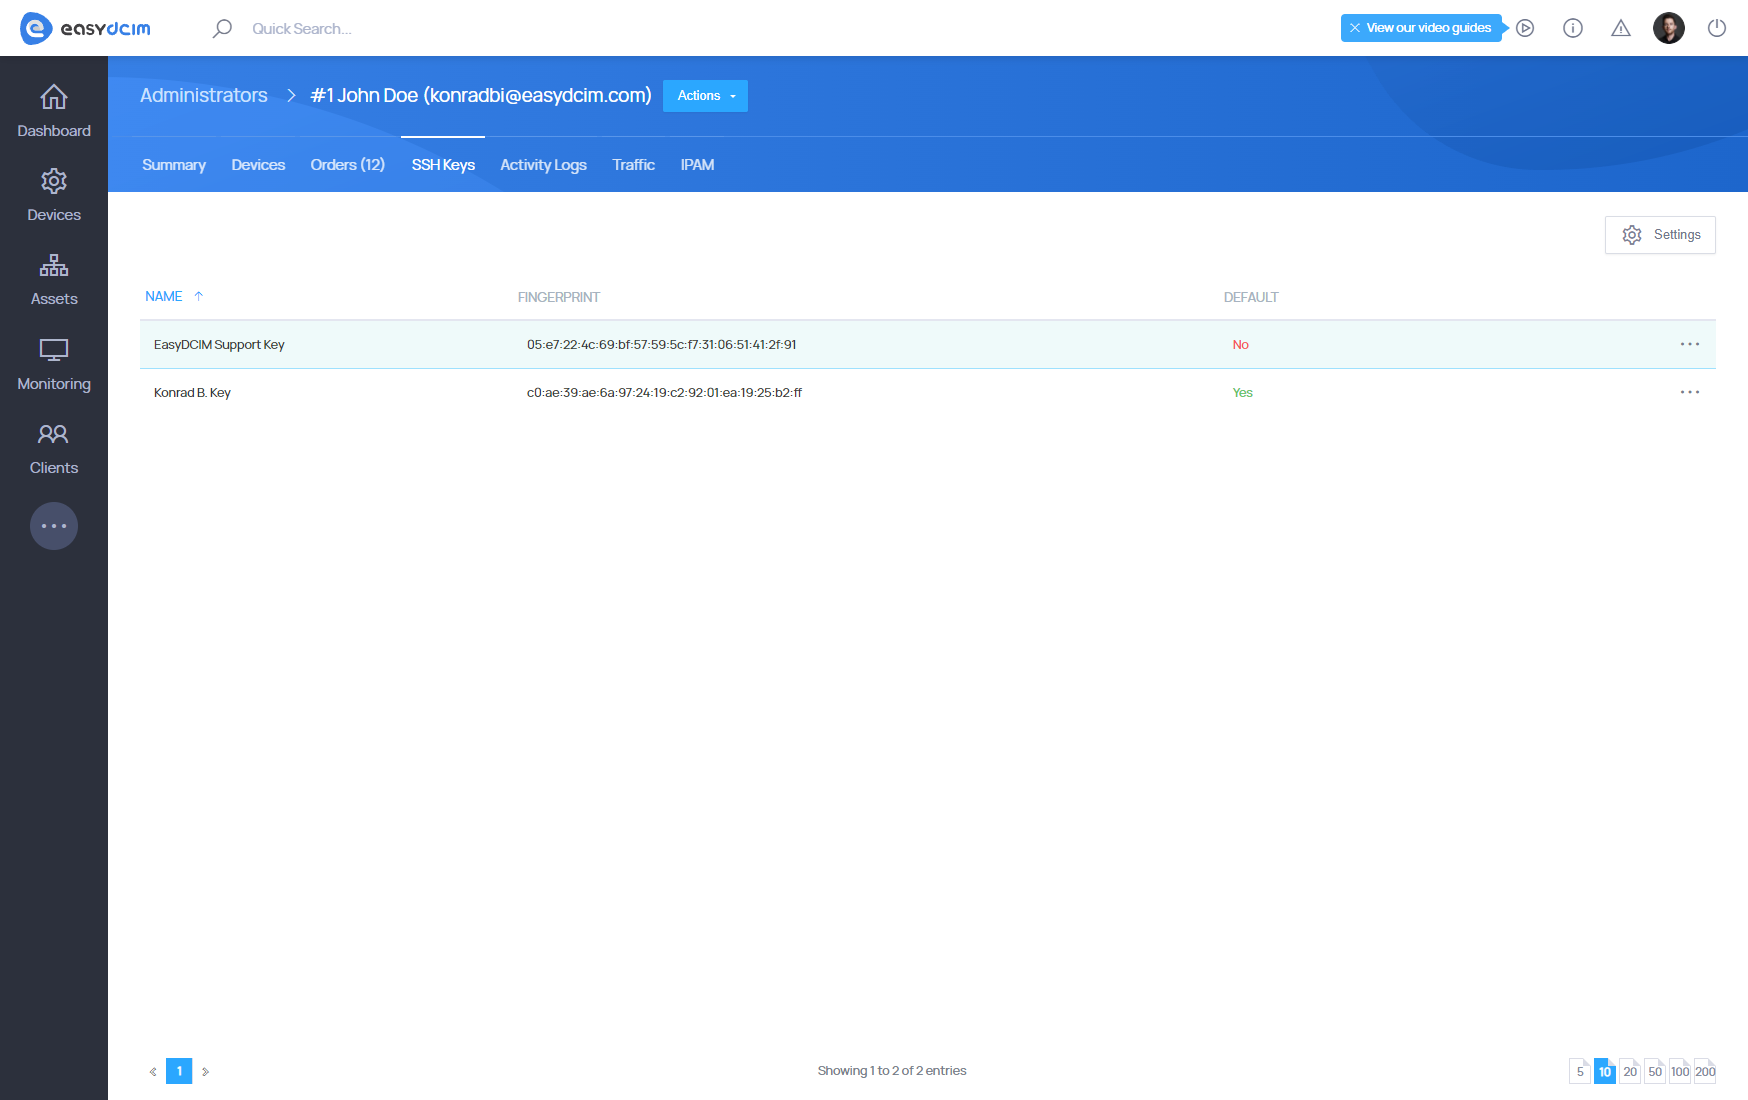
During the OS installation, you can select the previously added keys. Once the OS installation is complete, you can remotely log in to the dedicated server from SSH with a private key. SSH key support has been implemented for most Linux family systems. It is not available for rescue templates and Windows family systems.
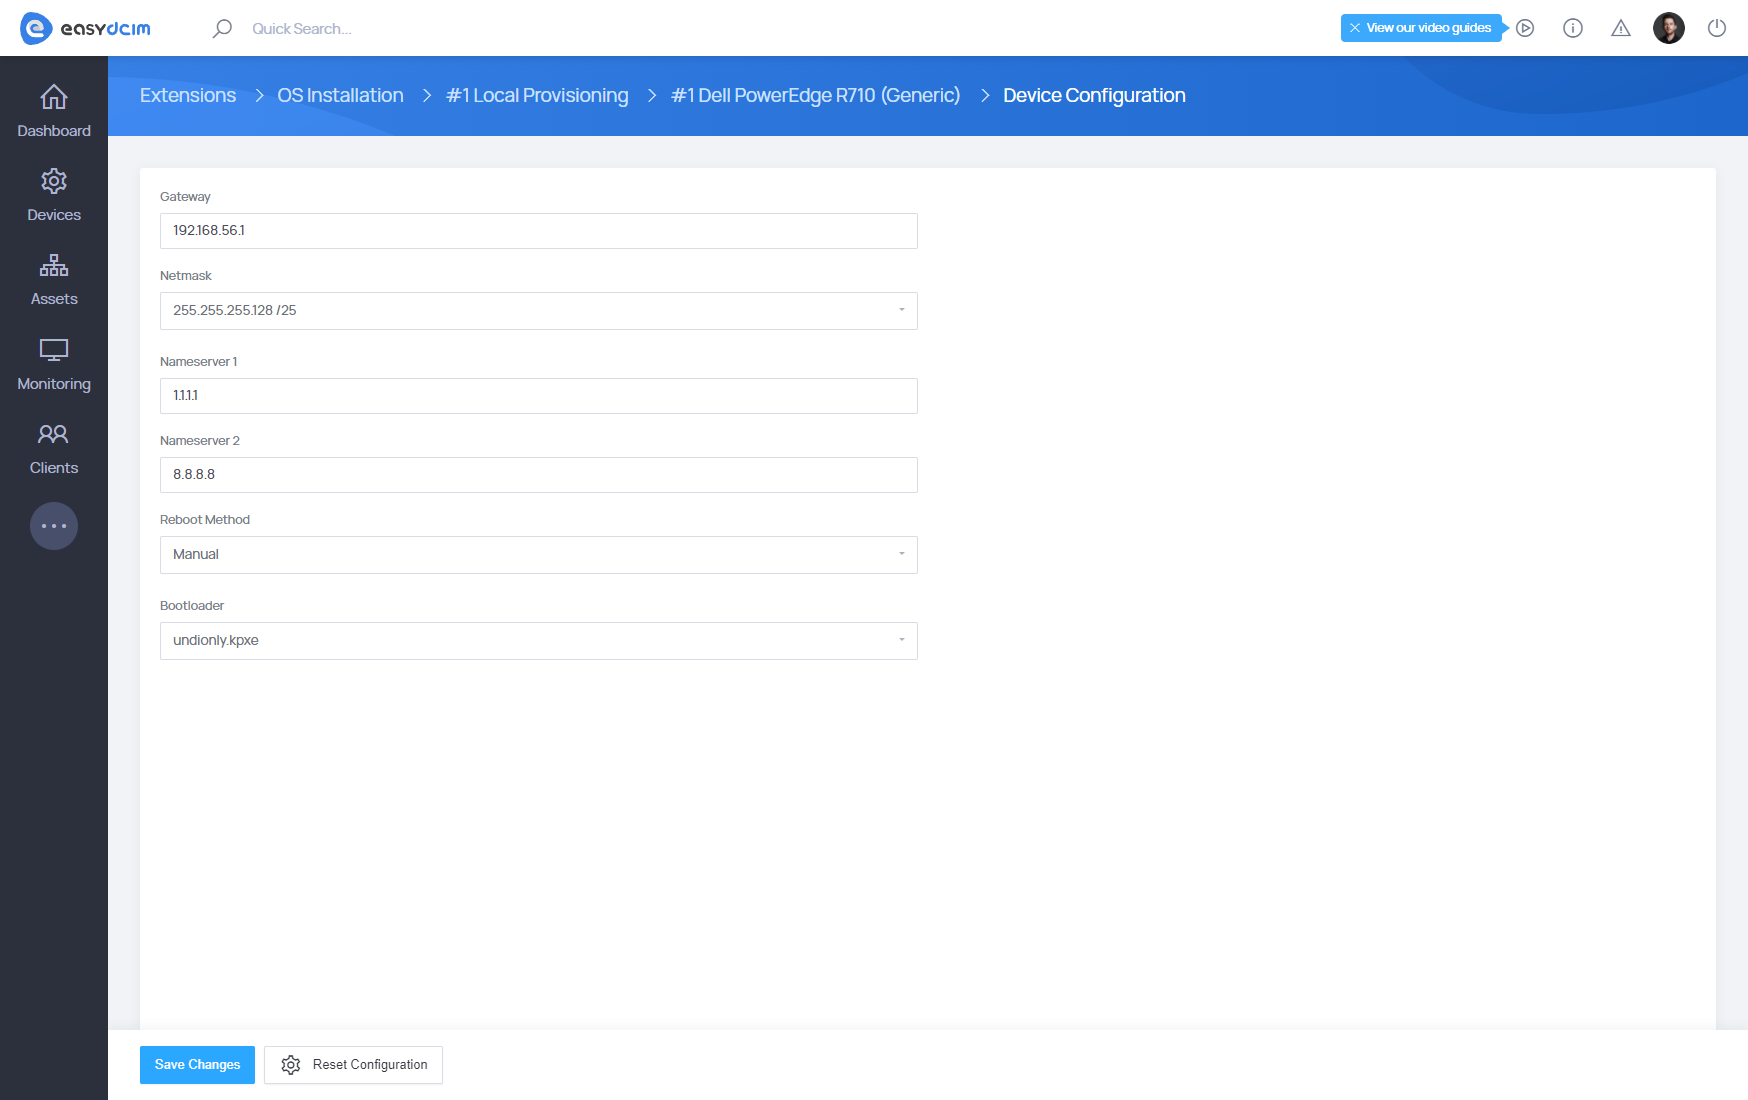
Device configuration
By default, each device uses the global settings of the installation module. However, you can easily adjust the configuration to a particular device. To change the configuration, select ‘Configuration’ from the action menu and specify the following in the configuration fields:
- Gateway - the default gateway that will be used in the configuration of network interfaces on the target server
- Netmask - subnet mask that will be used in the configuration of network interfaces on the target server
- Nameserver 1 - the first name server (if empty, this value will be taken from the global settings of the installation module)
- Nameserver 2 - the second name server (if empty, this value will be taken from the global settings of the installation module)
- Reboot Method - a device restart method downloaded by default from the global settings of the installation module
- Bootloader - a startup file downloaded by default from the global settings of the installation module
Network interfaces
The installer automatically configures network interfaces based on the following variables:
Basic configuration (for IPv4):
- Parent IP address - downloaded always from the metadata of IP Address of the given server
- Additional IP Addresses - downloaded always from the metadata of Additional IP
- Addresses of the given server
- Netmask - taken from device settings
- Gateway - taken from device settings
- Nameserver 1 - downloaded from device settings
- Nameserver 2 - downloaded from device settings
Configuration while the integration with the IP Address Management extension (for IPv4) is enabled:
- Parent IP address - downloaded always from the metadata of IP Address of the given server
- Additional IP addresses - downloaded always from the metadata of Additional IP Addresses of the given server
- Netmask - taken from the subnet settings in the IP Address Management extension. For example, if the metadata value of IP Address is 192.168.56.3, the system will automatically search for the subnet assigned to this device which contains the specified IP address in the IP Address Management extension. If such a subnet is found, the appropriate Netmask value will be set based on this subnet.
- Gateway - downloaded from the subnet settings in the IPAM module. For example, if the metadata value of IP Address is 192.168.56.3, the system will automatically search for the subnet assigned to this device which contains the specified IP address in the IP Address Management extension. If such a subnet is found, the appropriate Gateway value will be set based on this subnet.
- Nameserver 1 - downloaded from the subnet settings in the IP Address Management extension. For example, if the metadata value of IP Address is 192.168.56.3, the system will automatically search for the subnet assigned to this device which contains the specified IP address in the IP Address Management extension. If such a subnet is found, the appropriate Nameserver1 value will be set based on this subnet.
- Nameserver 2 - downloaded from the subnet settings in the IP Address Management extension. For example, if the metadata value of IP Address is 192.168.56.3, the system will automatically search for the subnet assigned to this device which contains the specified IP address in the IP Address Management extension. If such a subnet is found, the appropriate Nameserver 2 value will be set based on this subnet.
Provisioning status
This section displays all operating system installations that are currently launched. Here you will also find details about the device, selected installation template as well as the latest information on the status of the installation. Notifications on the current status of the installation are updated on an ongoing basis using the appropriate scripts. You can freely delete tasks that have been started. Please keep in mind, however, that if you remove the installation task when the installation is in progress, the installation will be automatically interrupted, without the possibility to resume it. Once the installation is completed, each task is automatically transferred to the ′Provisioning History′ section.

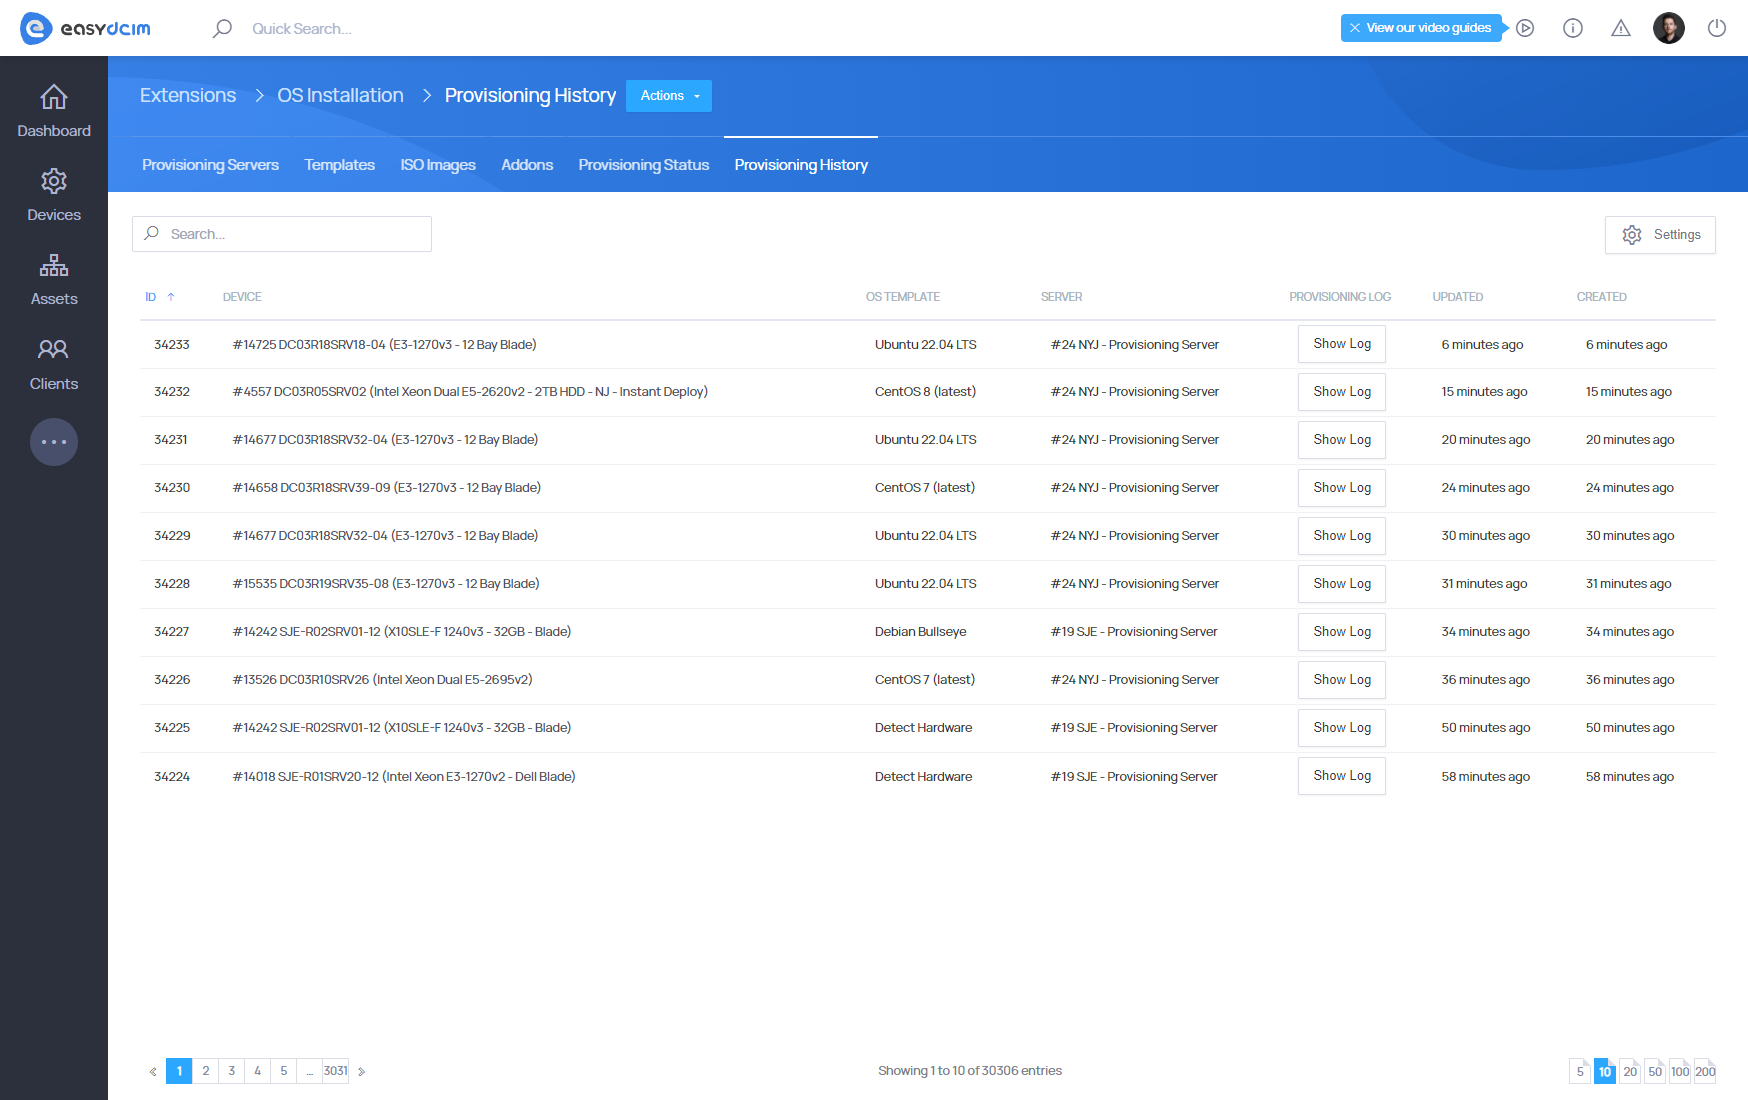
Provisioning history
Here you can preview all operating system installation tasks that have been started and completed (whether successfully or not). You can also verify the logs that were generated during the installation of the operating system within each entry.