EasyDCIM Colocation For HostBill
EasyDCIM Colocation For HostBill is a module that will allow you to provide and manage your EasyDCIM colocation services from the HostBill panel. You will be enabled to, among others, determine the status of each colocation, and your clients - to turn off and on their power outlets remotely.
- Admin Portal Features:
- Create/Terminate/Suspend/Unsuspend Colocation
- Update Order Information
- One Click Login To User Control Panel
- View Service Information
- View Colocation Resource Usage:
- Bandwidth Statistics
- Power Usage Statistics And Graph
- Aggregate Traffic Graph
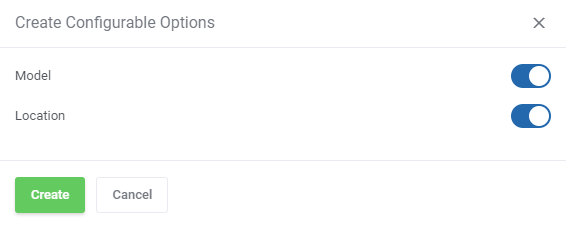
- Configure Default Colocation Options:
- Model
- Location
- Configure Automation Settings:
- Toggle Automatic Order Acceptance
- Block Automatic Suspension/Unsuspension/Termination By HostBill
- Control Service Access Level
- Define Client Portal Features:
- Toggle Service Information:
- Label
- Model
- Location
- IP Address
- General Hosting Information
- Toggle Graphs:
- Aggregate Traffic
- Power Usage
- Toggle Statistics Tables:
- Bandwidth Usage
- Network Ports
- Power Usage
- Allow Server Actions:
- Log Into Panel
- Allow Server Management:
- Traffic Statistics
- Power Usage Statistics
- Power Outlets
- Toggle Service Information:
- Control Service Actions And Email Notifications
- Generate Default Configurable Options
- Client Portal Features:
- View Colocation Information:
- Model
- Label
- Location
- Labeled Rack With Position
- IP Addresses
- One Click Login To User Control Panel
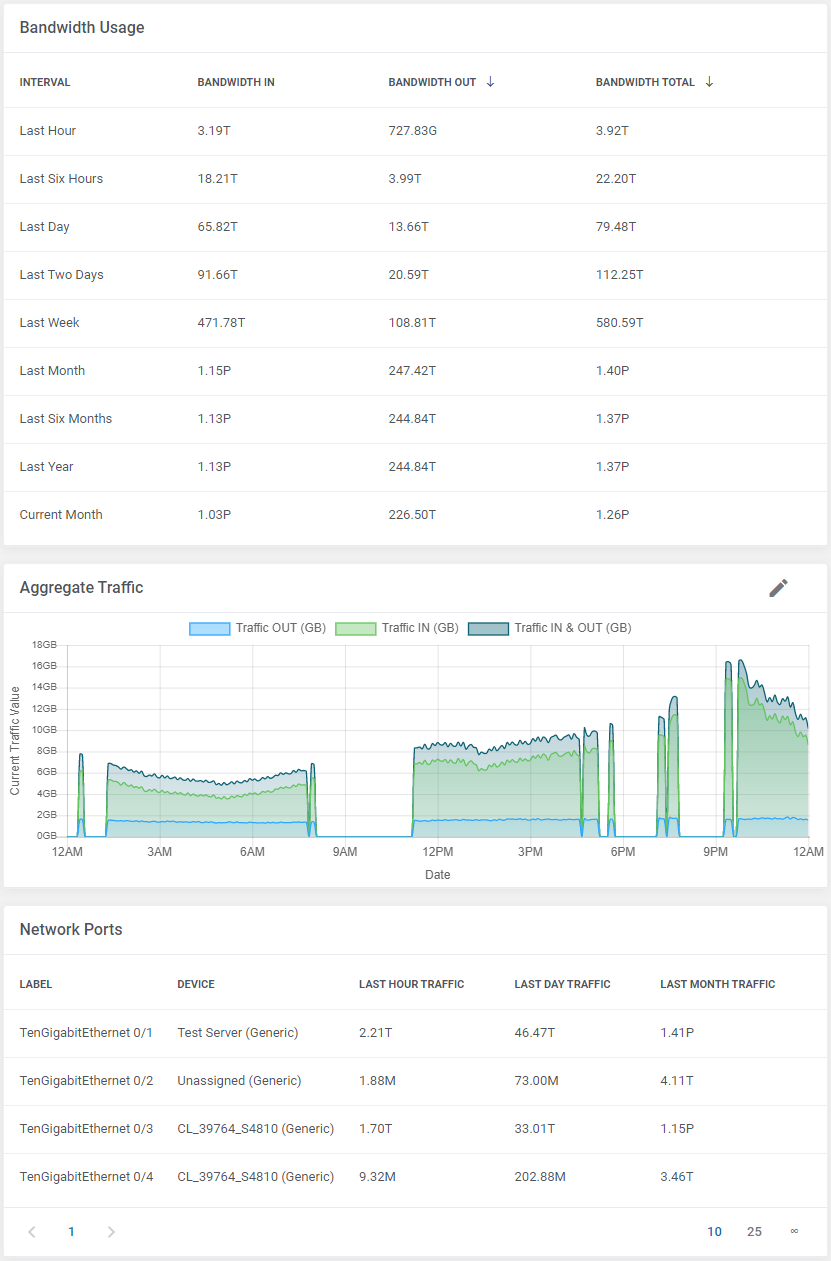
- View Traffic Statistics:
- Bandwidth Usage
- Aggregate Traffic Graph
- Network Ports
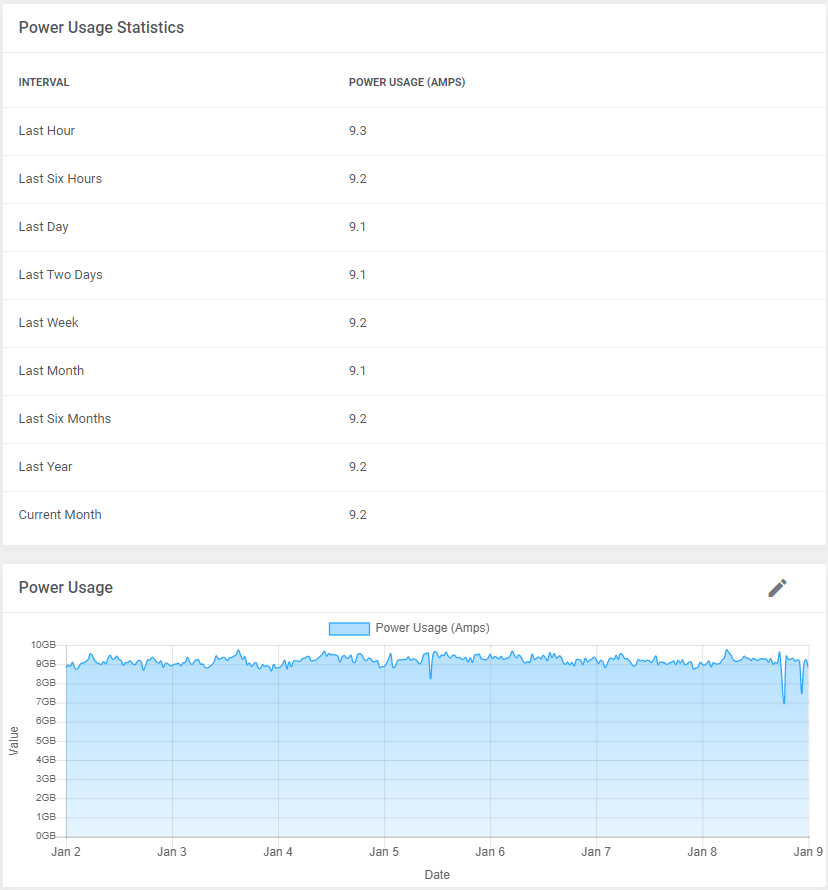
- View Power Usage Statistics:
- In Given Intervals
- As Power Usage Graph
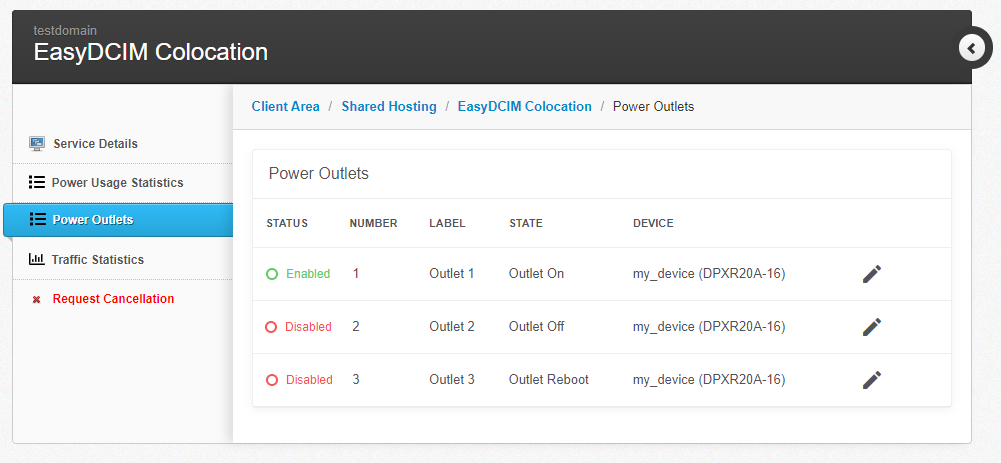
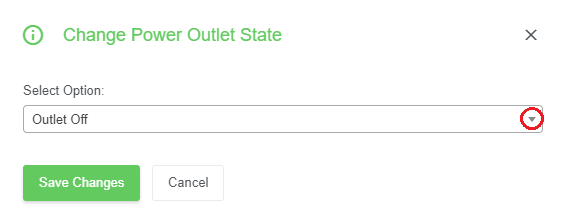
- Enable/Disable/Restart Power Outlets
- View Colocation Information:
- Configurable Options:
- Colocation Model
- Colocation Location
- Supported PDU Manufacturers:
- APC
- CyberPower
- Enlogic
- Raritan
- General Info:
- Multi-Language Support
- Supports EasyDCIM v1.9.6 And Later
- Supports PHP 8.1 Back To PHP 7.4
- Supports HostBill Themes “Nextgen Clean” And “2019”
Installation and configuration
This tutorial will show you how to successfully install and configure EasyDCIM Colocation For HostBill. We will guide you step by step through the whole installation and configuration process.
Installation
- Download your module package directly form our repository. It is highly adviced to always choose the newest version, which is the one at the top of the list.
- Once you have the package, extract the files.
- Copy folder “easydcimcolocation” to
/includes/modules/Hostingdirectory. - Log into the HostBill admin portal.
- Move to Settings → Modules → Hosting Modules, find the EasyDCIM Colocation module and activate it.
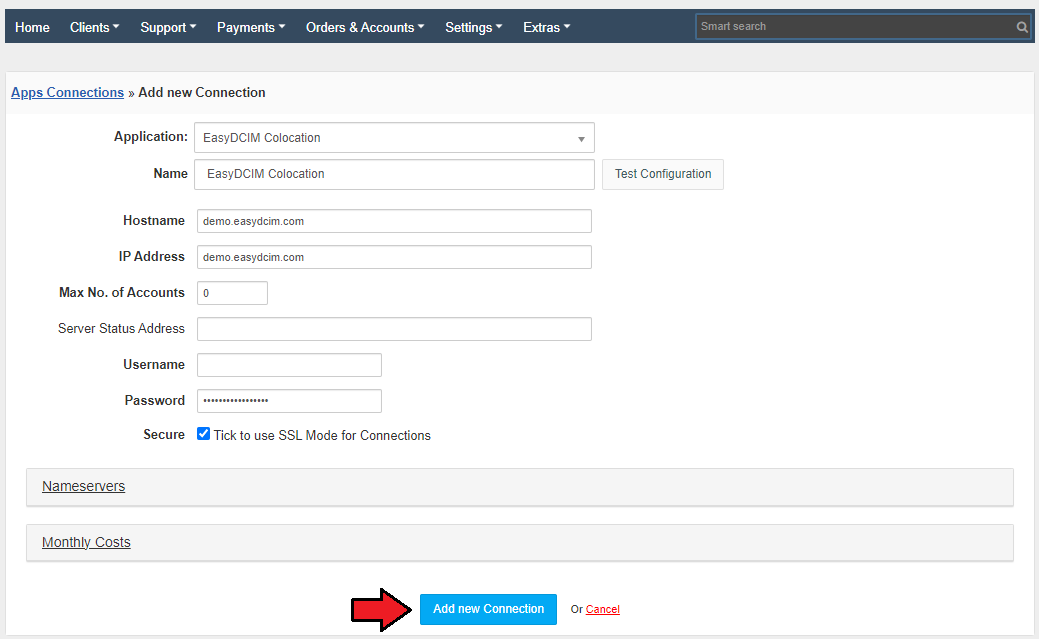
- Next, navigate to Settings → Apps Connections and add a new connection for “EasyDCIM Colocation” application. Fill out the connection details and press the “Add new Connection” button to confirm.
Configuration
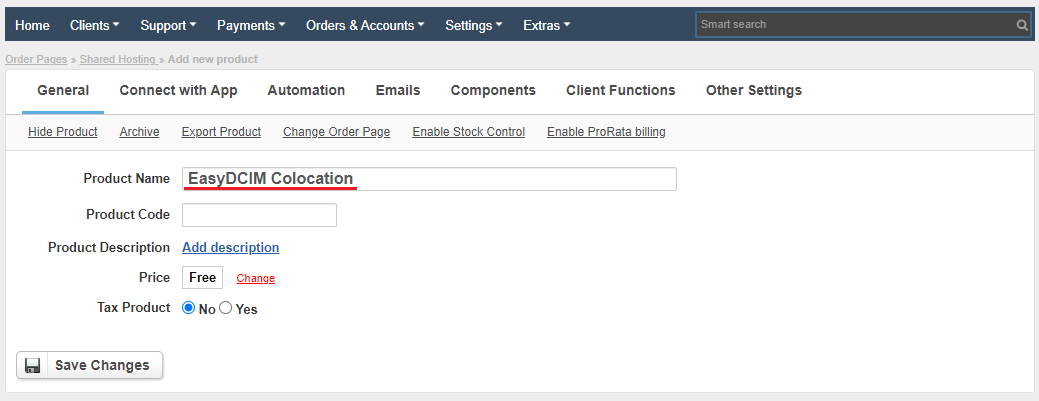
Proceed to Settings → Products & Services → Order Pages. There find “Shared hosting” group of products, open it and add a new product within that group. Fill out the required fields to successfully create a new product.
General:
- Product Name - name your newly created product. (Note that the remaining fields in this section are not required at this step to continue.)
Connect with App:
- App - choose the “EasyDCIM Colocation” application from the dropdown menu.
- App Connection - choose the created in step 5th connection.
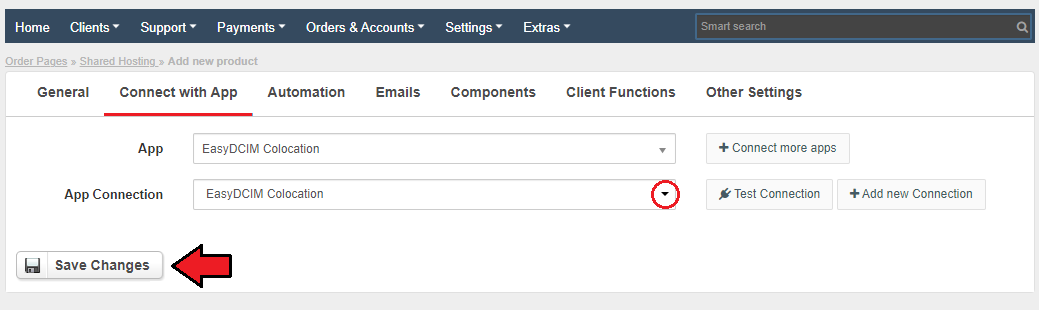
Now, you can save the changes. At this point you are able to configure the module, just proceed again to the created product’s details → “Connect with App” tab. See the screens below to check an exemplary configuration of the product.
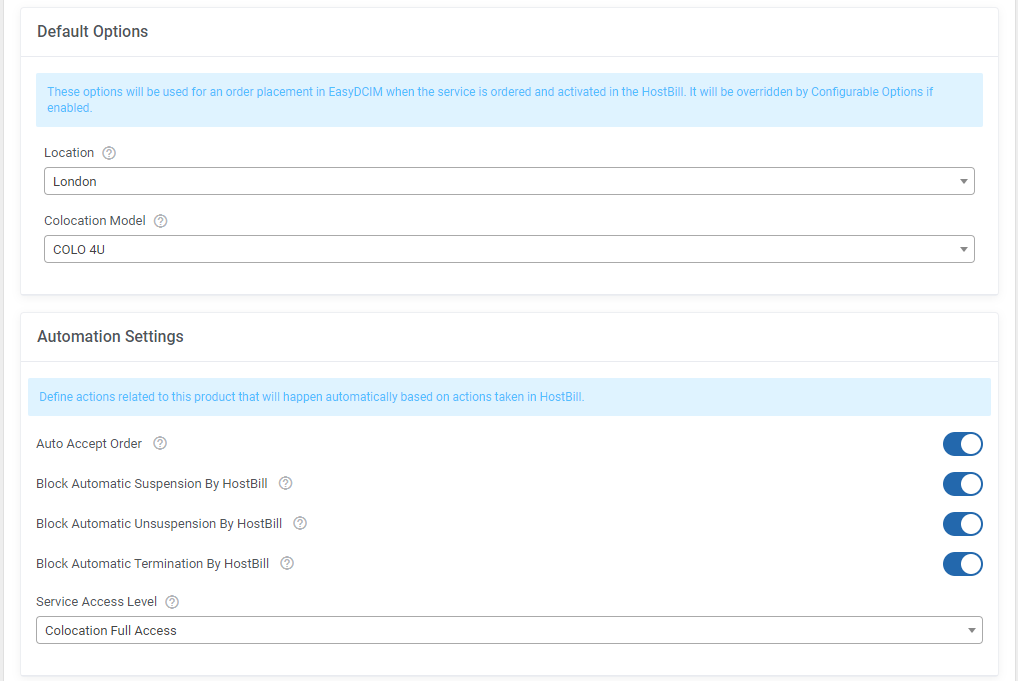
Default Options:
- Location (required) - the desired server location
- Model (required) - the EasyDCIM server model
You may generate the configurable options if you want to use them instead of the ‘Location’ and ‘Model’ features.
Automation Settings
- Auto Accept - automatically run the server matching process after order placement. Use only if you have configured your EasyDCIM to automatically accept services. If you use cron synchronization, you can leave this option unchecked.
- Service Access Level - configure the access level to control the features available to your clients. These levels and features are defined in your EasyDCIM at ‘Clients’ → ‘Services’ → ‘Access Level’ tab.
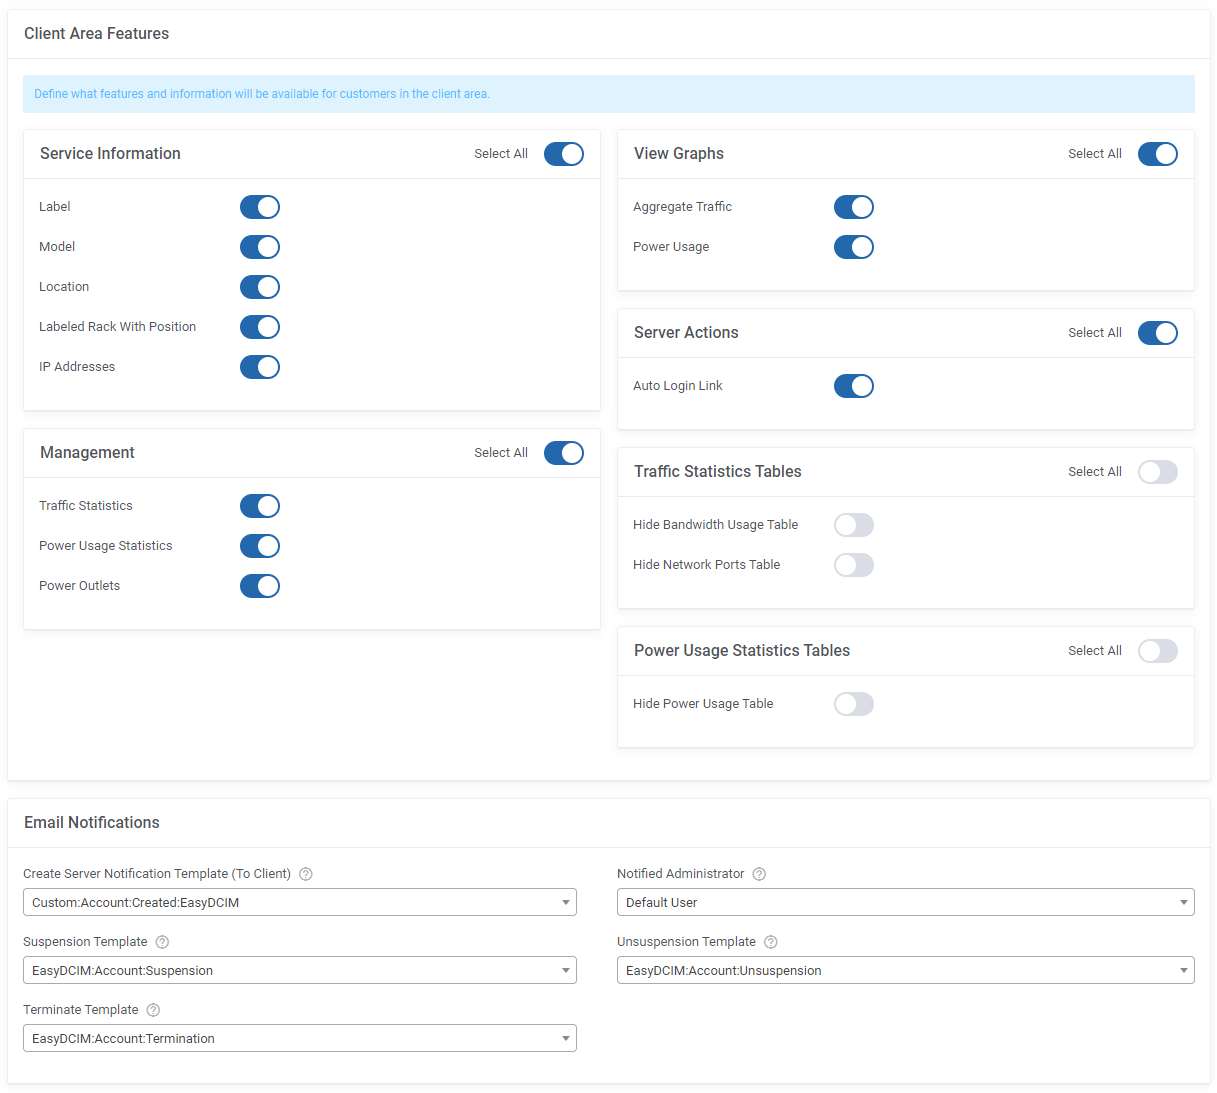
Email Notifications
Choose service actions to send certain email notifications to selected administrators instead of performing provisioning actions immediately. Leave the fields unchecked to perform the default module commands. Choose administrators who will receive the specified service notifications.
Client Portal Features
- Define “Service Information” visibility in the client portal:
- Label
- Model
- Location
- Labeled Rack With Position
- IP Addresses
- Access to “Management” sections:
- Traffic Statistics - display statistics on traffic in the client portal.
- Power Usage Statistics - display statistics on power usage in the client portal.
- Power Outlets - display power outlets in the client portal and allow client to manage them.
- “Graphs”:
- Aggregate Traffic - display statistics on traffic in the client portal.
- Power Usage - display statistics on power usage in the client portal.
- “Server Actions”:
- Auto Login Link
- “Traffic Statistics Tables”:
- Hide Bandwidth Usage Table
- Hide Network Ports Table
- “Power Usage Statistics Tables”:
- Hide Power Usage Table
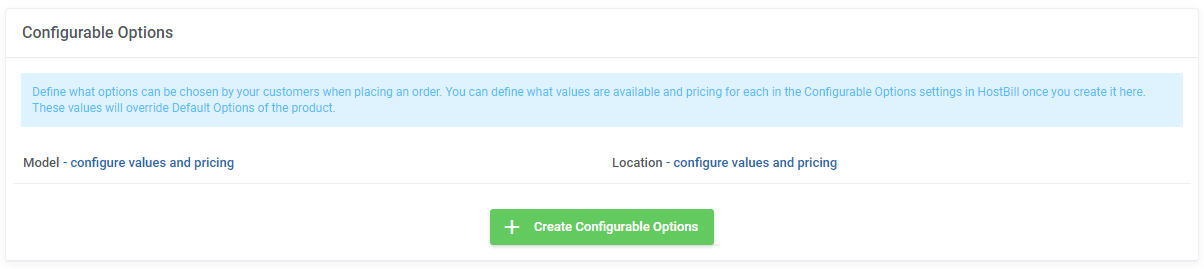
You can also generate the default configurable options to allow your customers place orders tailored exactly to their needs. To do that, go to ‘Setup’ → ‘Products/Services’ → ‘Configurable Options’.
Note: Any configurable option will overwrite its counterpart from the ‘Module Settings’ tab of a product.
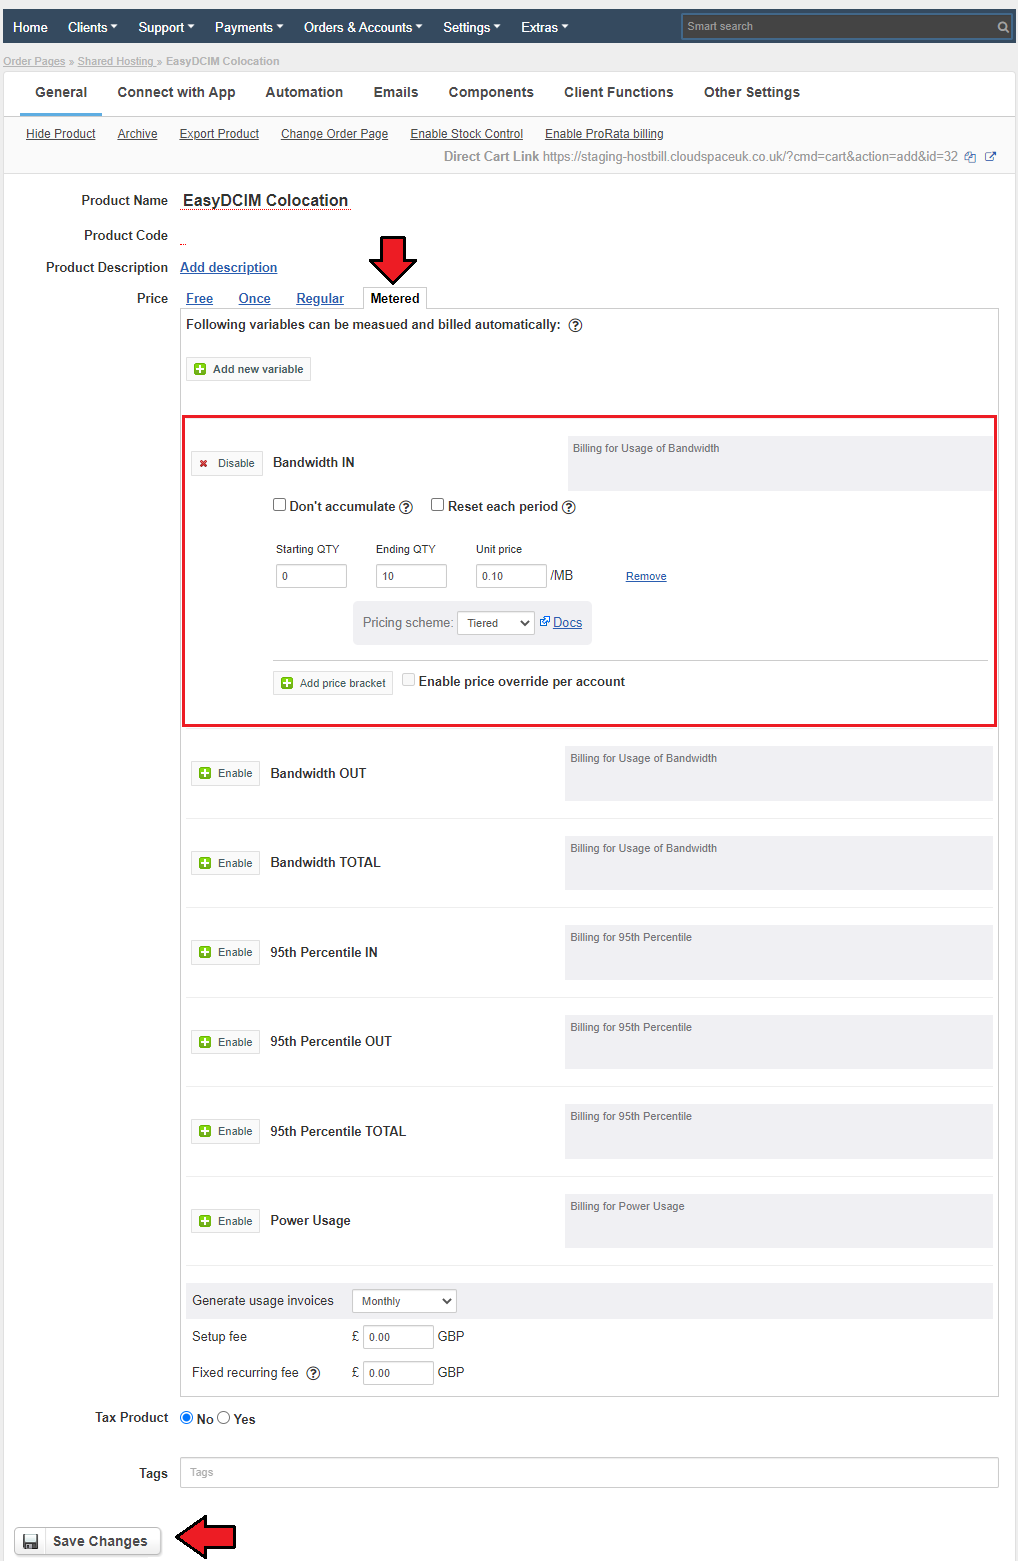
Under the “General” tab you may configure Bandwidth and 95th Percentile billing. Define Price as “Metered”, available options will appear. Enable variables visible on the screen below.
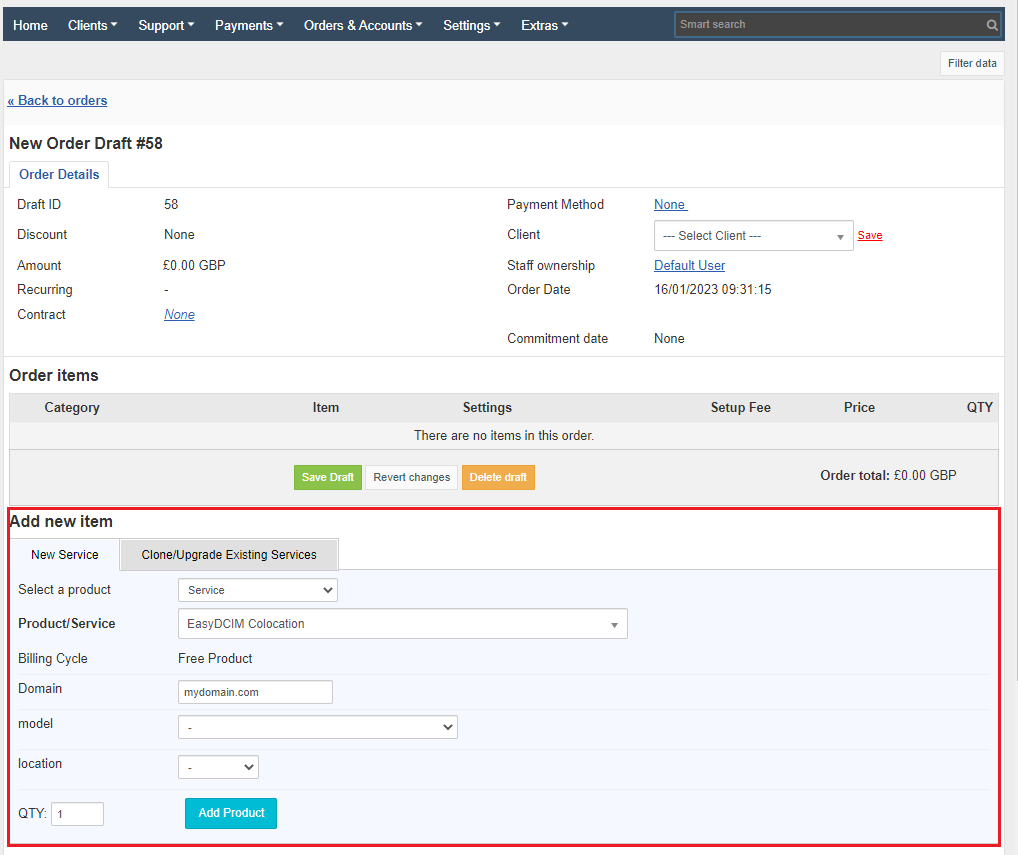
Next, navigate to: Order & Accounts → Orders → Create Order. Find the “Add new item” section:
- “Select a product” - pick “Service”. A new line will appear
- “Product/Service” - choose your previously created product (step 6).
- “Domain” - type in the domain
Press Add Product to complete this step. Complete the order.
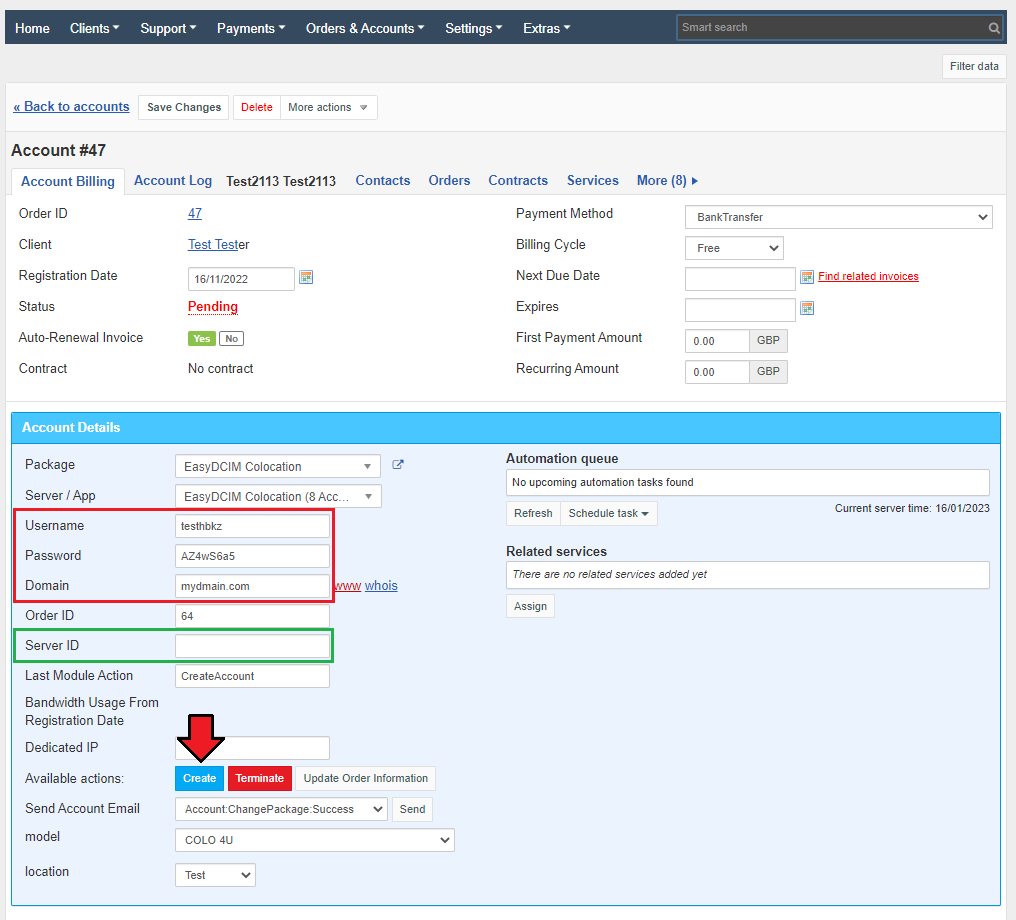
When ready, move to the Order & Accounts → Accounts section and open the account that you have ordered in the previous step.
- In the “Account Details” enter the Username and the Password
- Press “Create” to continue
- Now you will have to wait for the module cron synchronization, the ServerID will be completed automatically and then you will be able manage the service.
Manual Synchronization
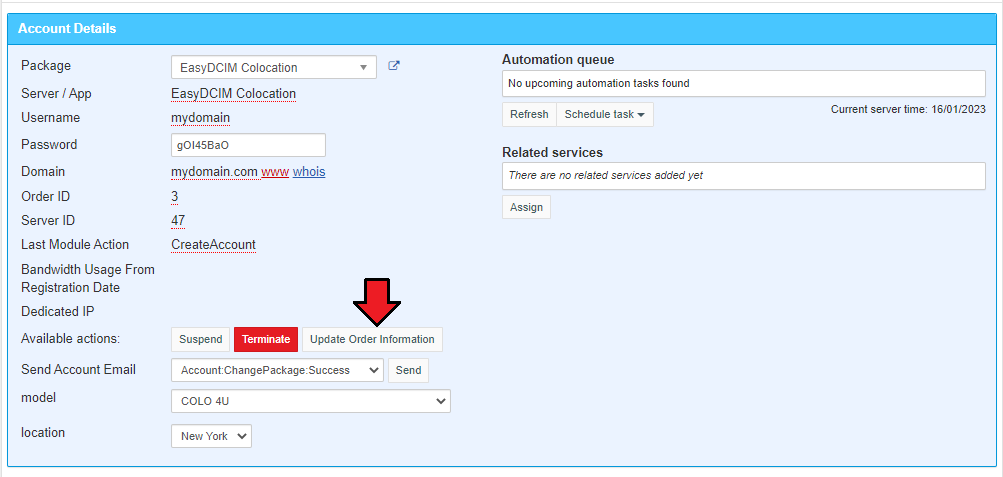
It is possible to perform the synchronization manually, you will not have to wait until the cron is executed. To do that, simply press “Update Order Information” button. That is one of the allowed actions that can be executed on the account, you will find it in the account’s details section → “Available actions”.
Management
In this section we will show you all functionalities of EasyDCIM Colocation For HostBill. The module allows you to offer and manage EasyDCIM colocation service right in your HostBill system.
Admin Portal
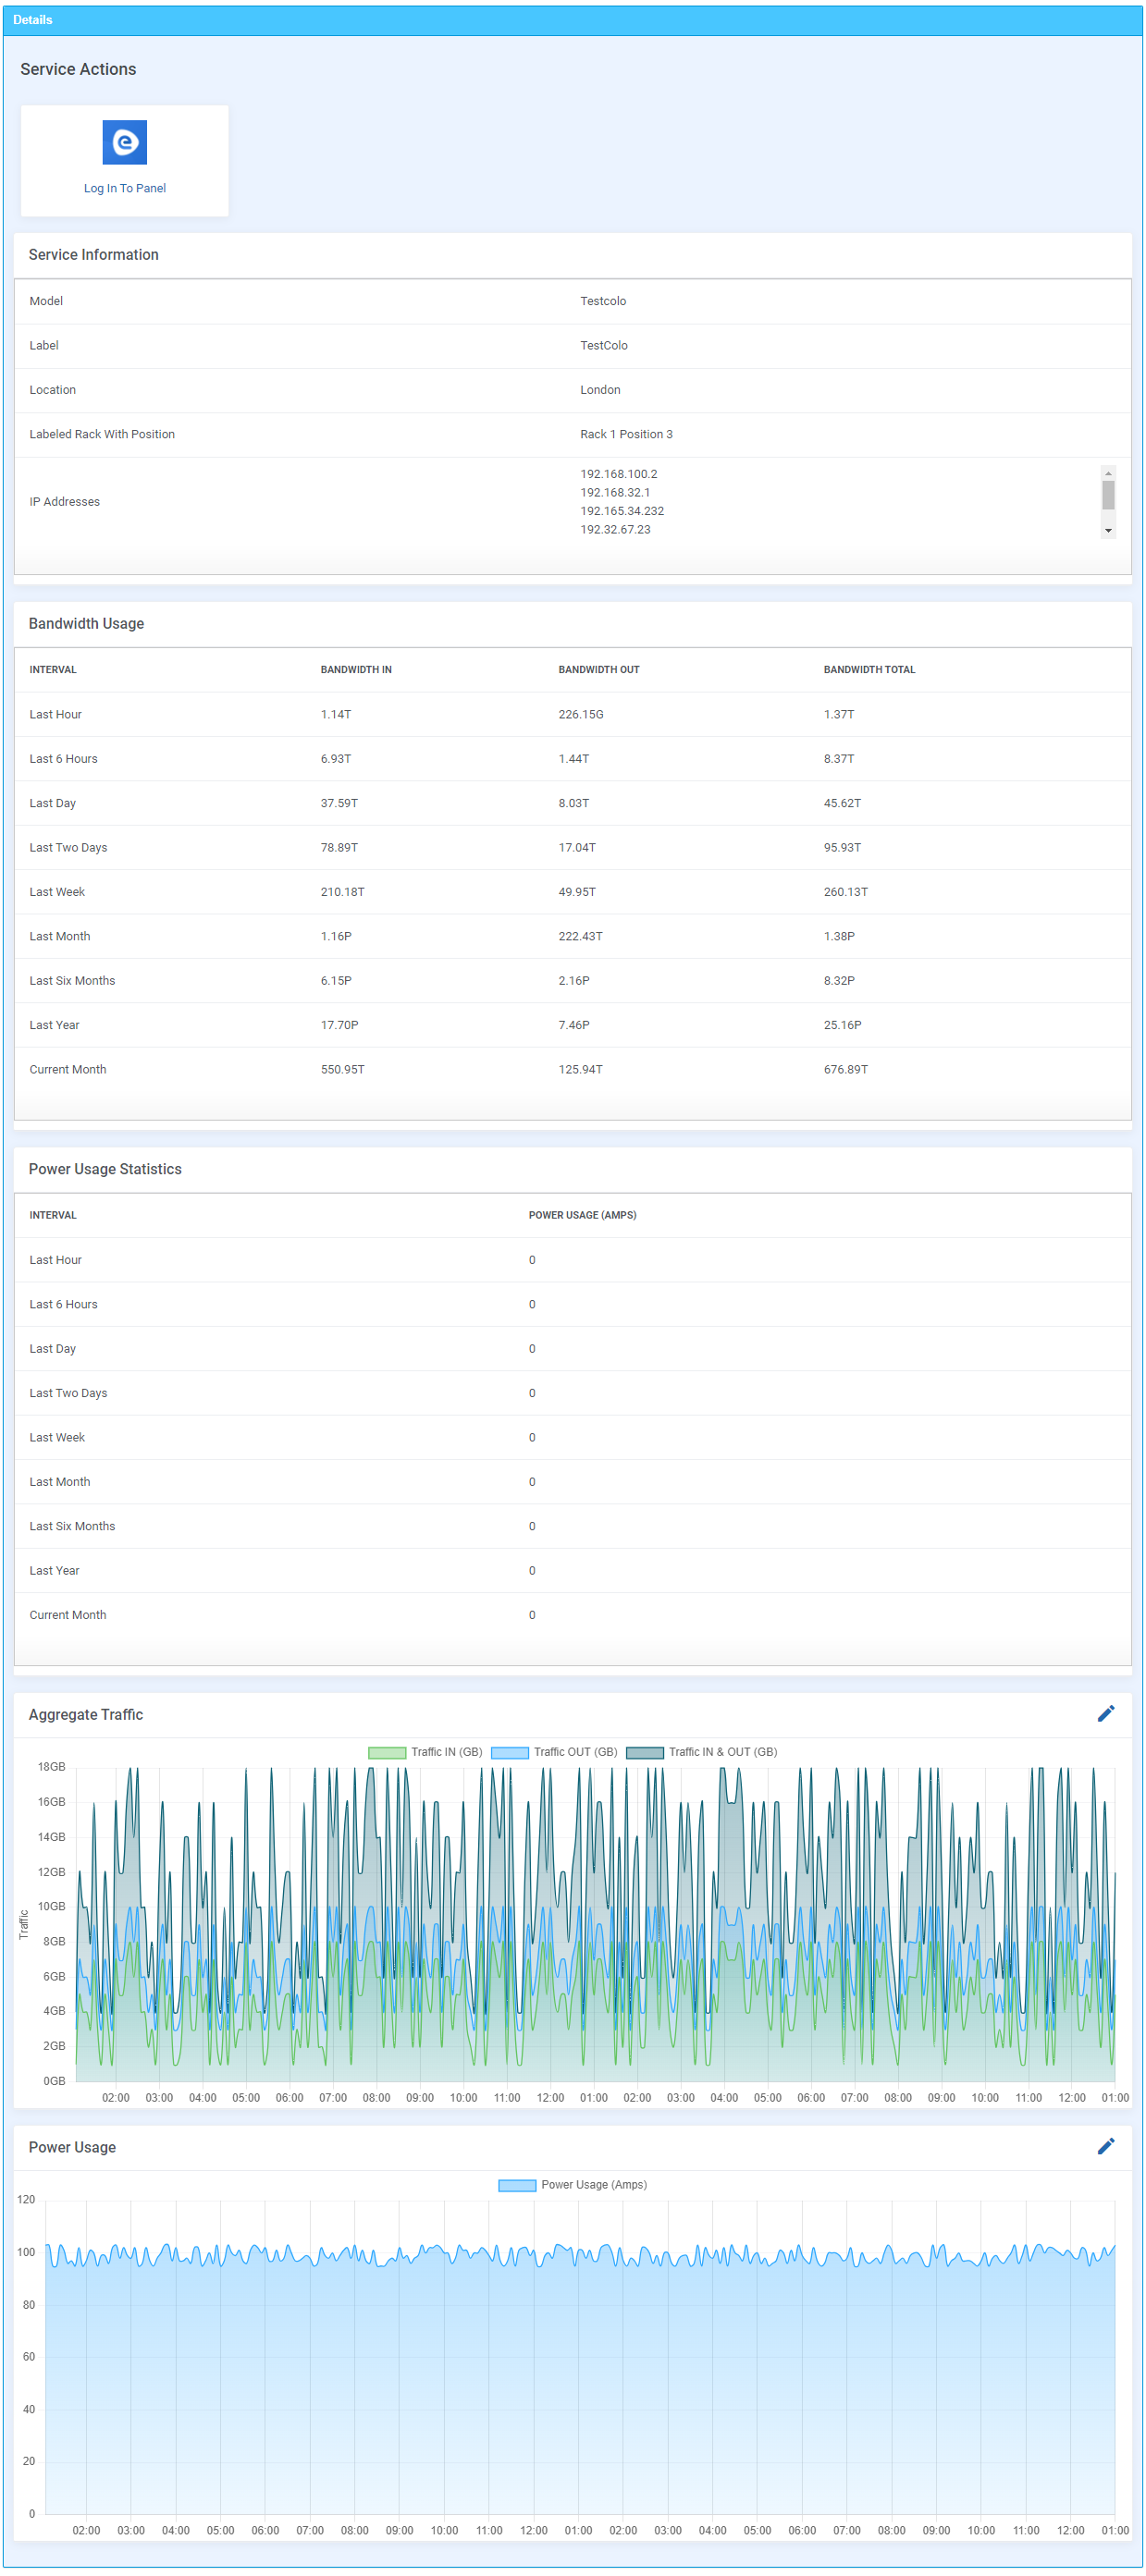
As soon as you set up a server for a client, you can perform various actions and view server details in the HostBill admin panel. After a successful cron synchronization, you will be able to manage and control the service from “Details” section. Take a look at the below screens to see all the available for the admin options.
You can also see the fields with currently assigned “Order ID” and “Server ID” from the EasyDCIM panel.
An empty ‘Server ID’ field means that it has not been automatically assigned by the cron yet (e. g. it may not be activated in the EasyDCIM panel yet). You can also force synchronization by clicking on the “Update Order Information” module command, or enter ID manually and save the settings.
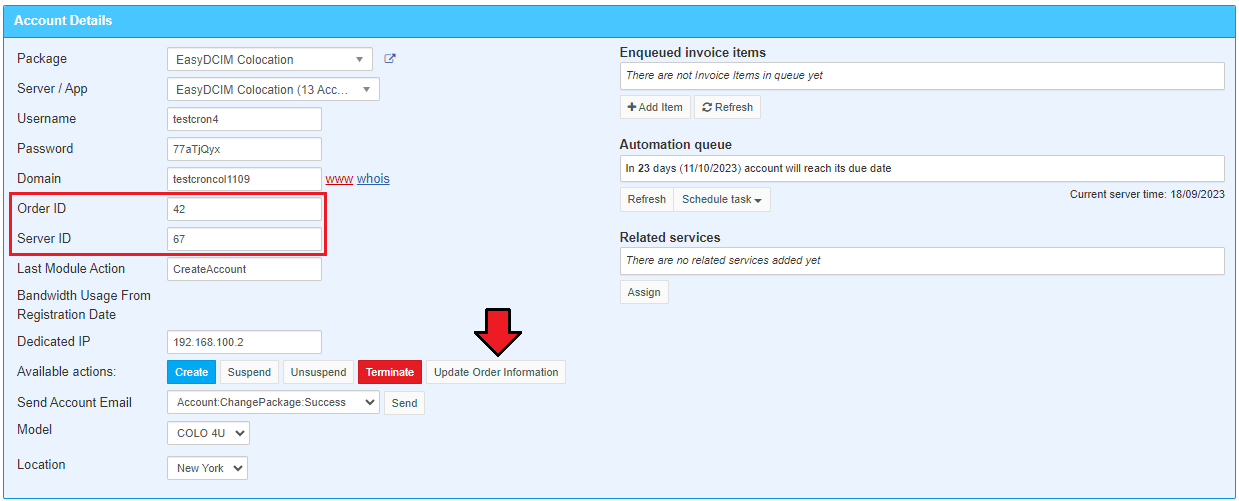
Below these functions you can also view traffic and power usage statistics and even specify the time intervals.
Client Portal
In the main view of the client portal your customers can check basic details of a colocation service as well as log in to their EasyDCIM control panel with a single click.
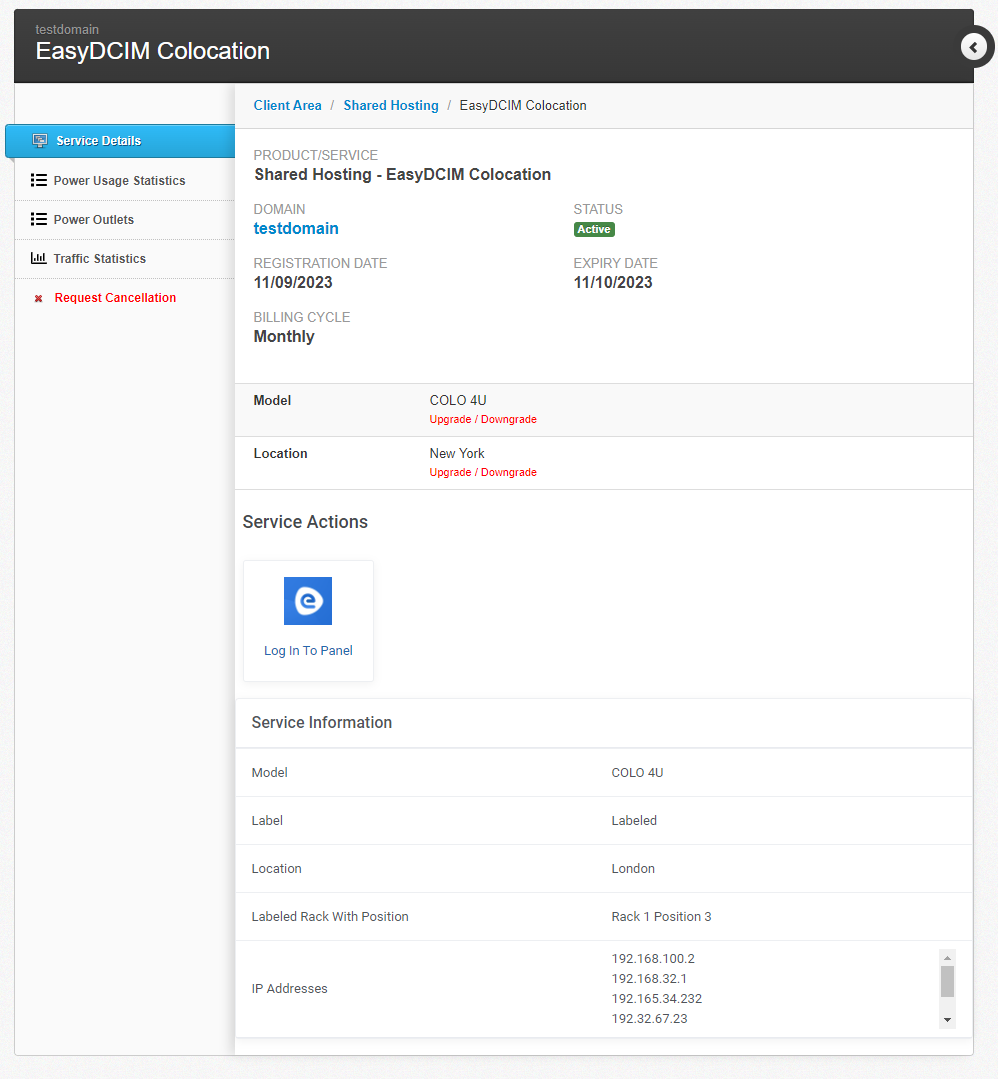
View the graphs with traffic statistics. You may also define the time intervals to show needed information.
Note: Available graphs and time intervals depend on the product registration date.
The same goes for power usage statistics.
Additionally, your clients can see the current state of all power outlets with the possibility to turn them on, off or restart.