Two-Factor Authentication Extension
About
Two-Factor Authentication For EasyDCIM introduces an additional security layer to our system by requiring a second factor token to be provided during the authorization process.
Features
- Several Authentication Submodules Available - TOTP And YubiKey Included
- Separate Configuration For Each Submodule
- Enable/Disable Specific Submodules
- Create Your Own Submodules
- Administrator Sessions Management:
- Verify Login Session Duration
- Check Last Activity Of Administrator Session
- Verify Operating System And Web Browser For Given Session
- Delete Active Administrator Sessions
- Delete Sessions Exceeding Defined Duration
- Force Two-Factor Authentication On All Staff Members
- Log In Using Backup Code Instead Of Second Factor Token
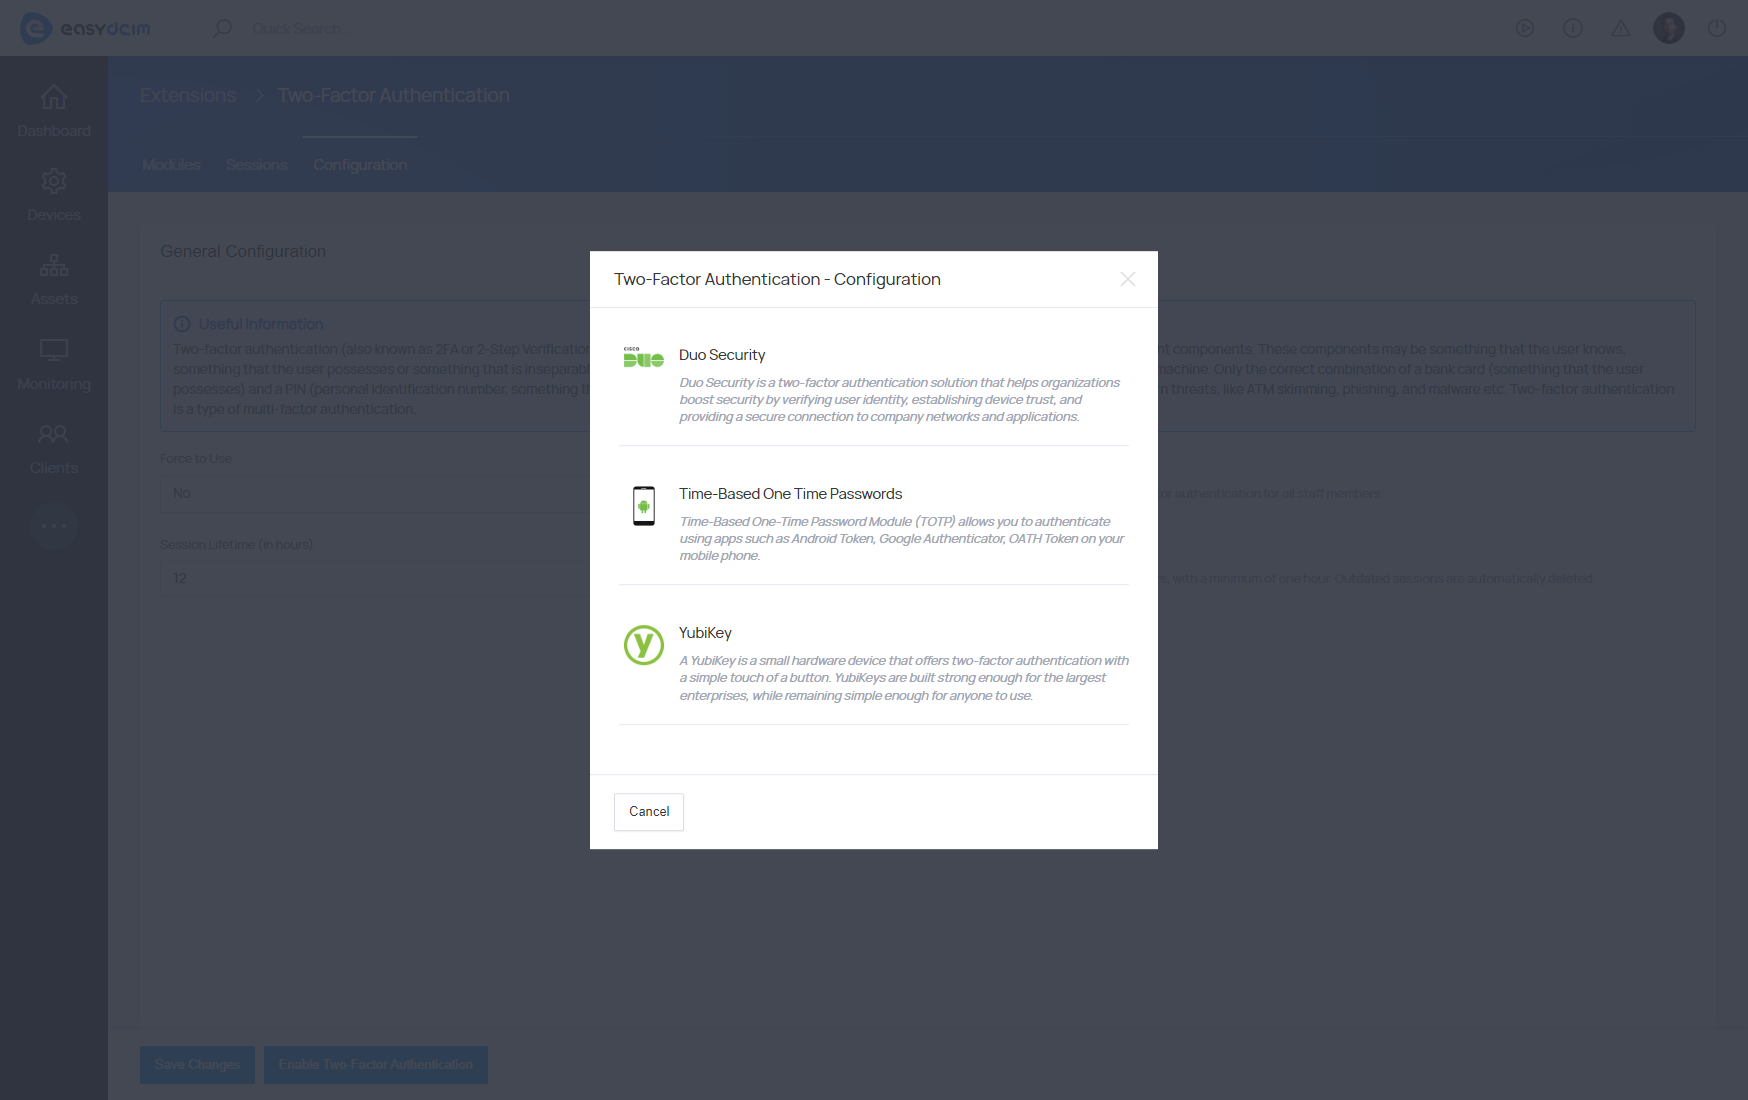
Supported submodules
- Time-Based One Time Passwords (TOTP)
- YubiKey
- Duo Security
Duo Security configuration
Duo.com configuration steps:
- Log into Duo Security panel with your administrator account at duo.com.
- Navigate to “Applications” → “Protect an Application”.
- In the search box, enter “Web SDK” application and then click the “Protect” button next to the found application.
- The new application will be available on the list of “All Applications”. Find it and press to edit.
- On the application details page, you will find the following data; they will be used for connection purposes in the EasyDCIM panel:
- Client ID
- Client secret
- API hostname
Duo.com activation process:
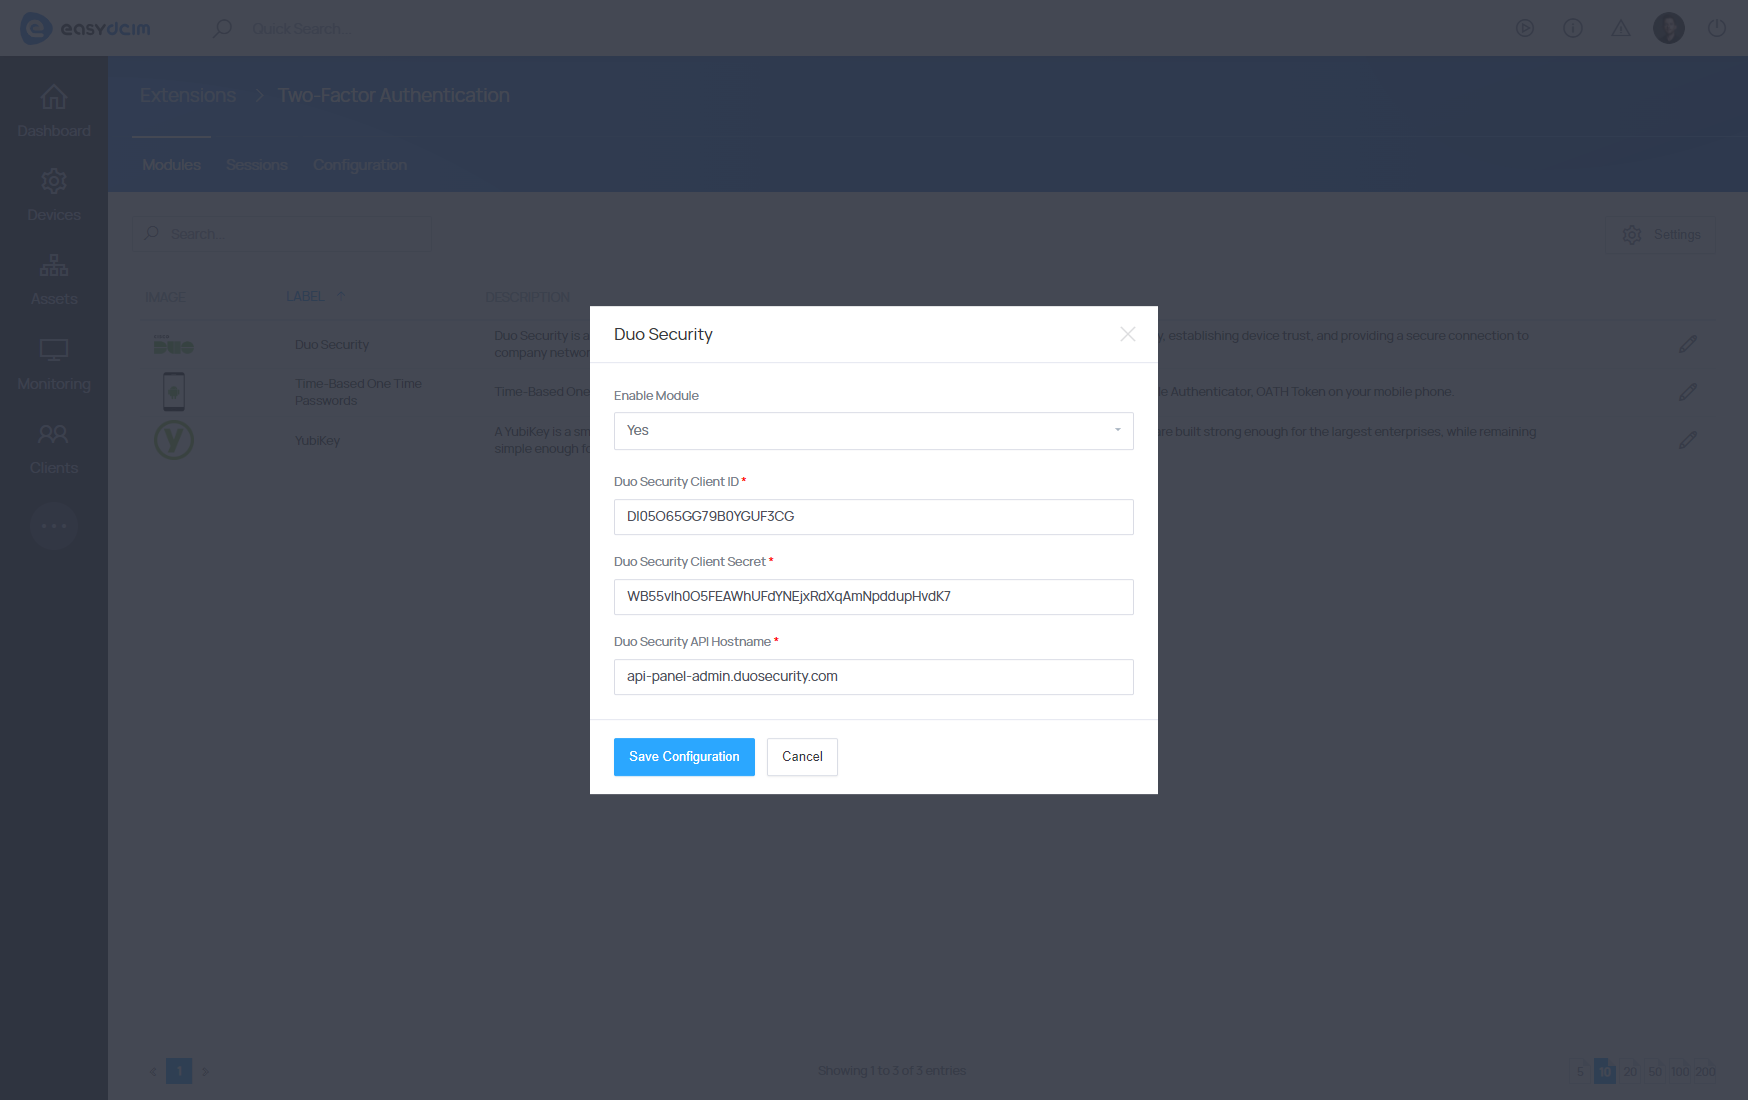
- Navigate to your EasyDCIM panel → Extensions → Two-Factor Authentication. Find “Duo Security” and proceed to its configuration.
- A modal with configuration will appear:
- Enable Module - set it to “Yes”
- Duo Security Client ID - use data generated at point 5 of the “Duo.com configuration” section (see the step above)
- Duo Security Client secret - as above
- Duo Security API Hostname - as above
- Save the configuration. If the provided data is correct and connection is established well, a notification will appear.
- Navigate to “Configuration” section, find the “Enable Two-Factor Auth” button and press it.
- Locate “Duo Security” and press it.
- A new window with further steps on the Two-Factor Authentication configuration will appear.
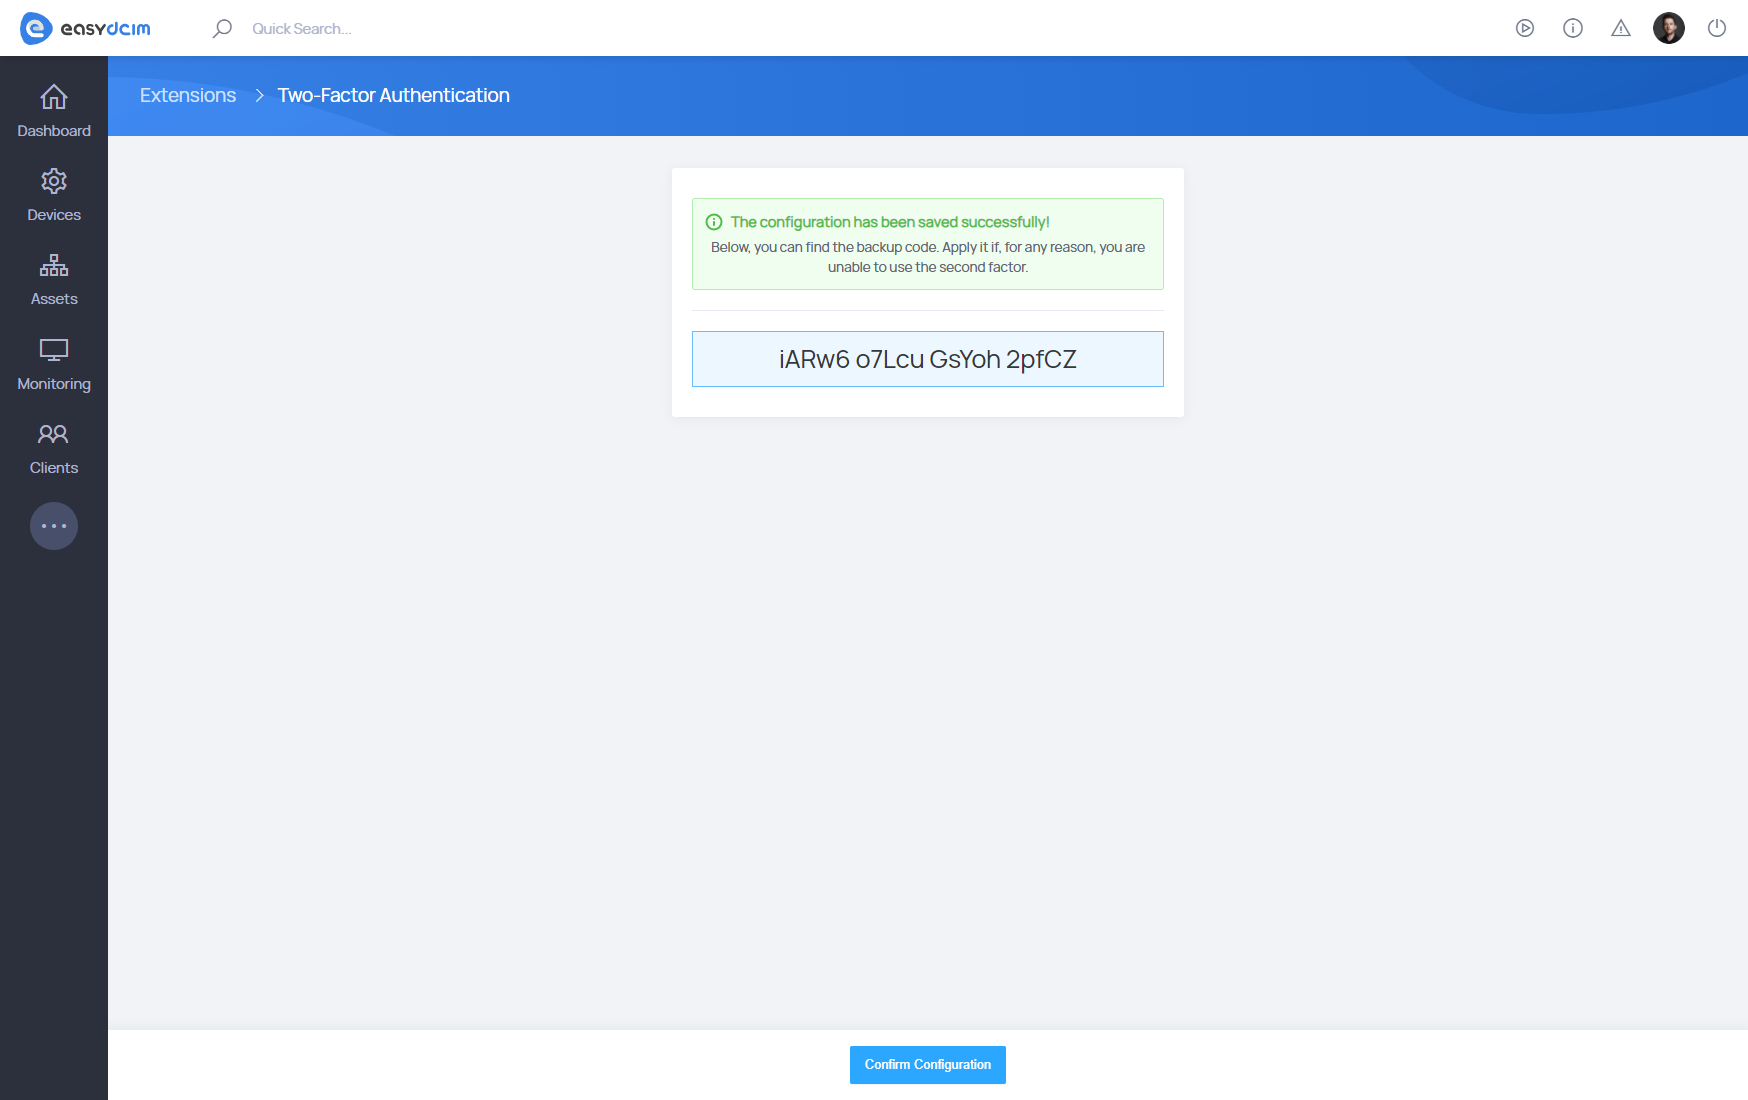
- Once all the configuration steps are completed successfully, an adequate notification will appear, save the changes to finish the configuration.
- You will be redirected to the 2FA confirmation page, save the backup code now in a secure place. It can be used to log into EasyDCIM in case of problems with Duo Security.
- Press “Confirm Configuration” to complete the process.
Login authorization process:
First of all, log into your EasyDCIM panel.
Case One: Two Factor Authentication has already been configured:
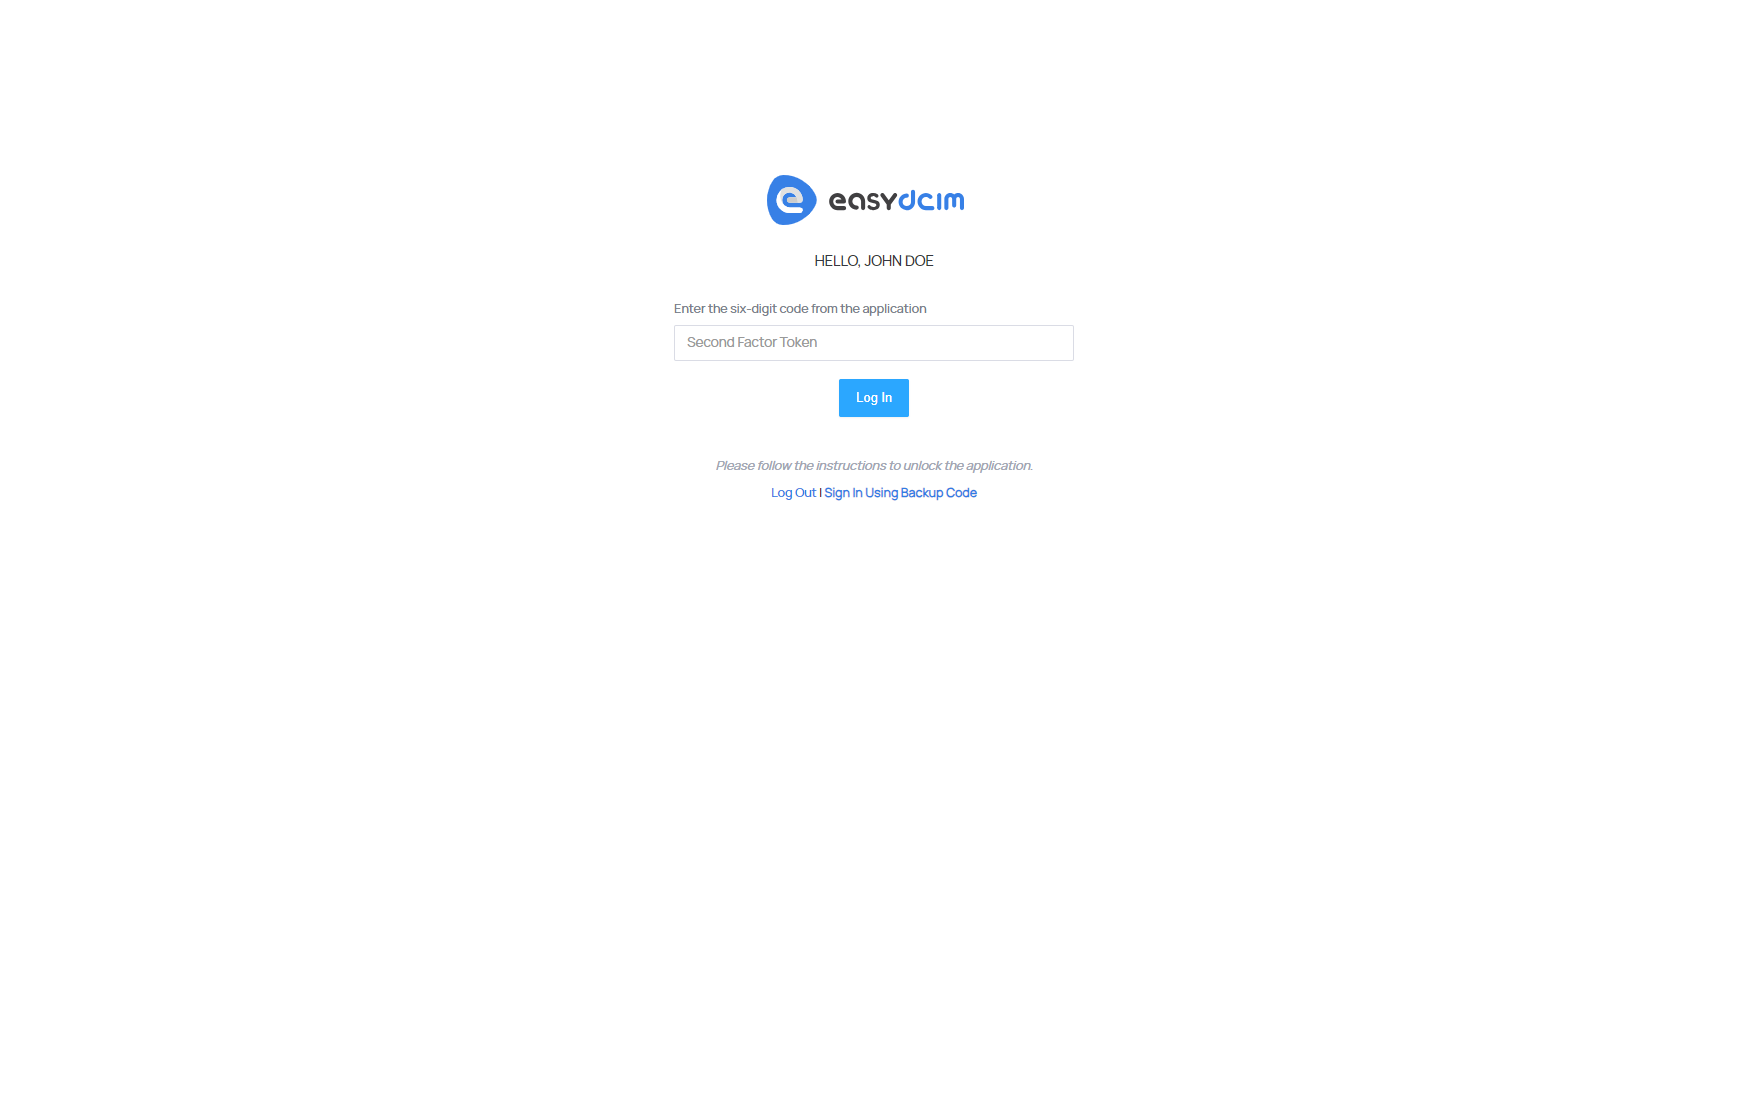
- You will be redirected to the authentication page. Press “Duo Security” to proceed.
- You will be redirected to the Duo Security website. Verify 2FA by confirming “Duo Push” on the Duo Security application. If the verification is successful, you will be redirected to the main page of the admin panel.
Case Two: Two Factor Authentication has NOT been configured, the “Force to Use” 2FA option is enabled:
- You will be redirected to a form where the 2FA you want to configure shall be selected.
- Choose the Duo Security 2FA.
- A form will appear with information on the next steps to configure Duo Security.
- A window will open where you need to complete the configuration.
- Once 2FA has been configured correctly using Duo Security, a corresponding message about the correct configuration will be displayed.
- Save the changes.
- You will be redirected to the 2FA confirmation page, remember to save the backup code here, which will be used to log into EasyDCIM in case of problems with Duo Security.
- Click “Confirm Configuration” to complete the configuration.
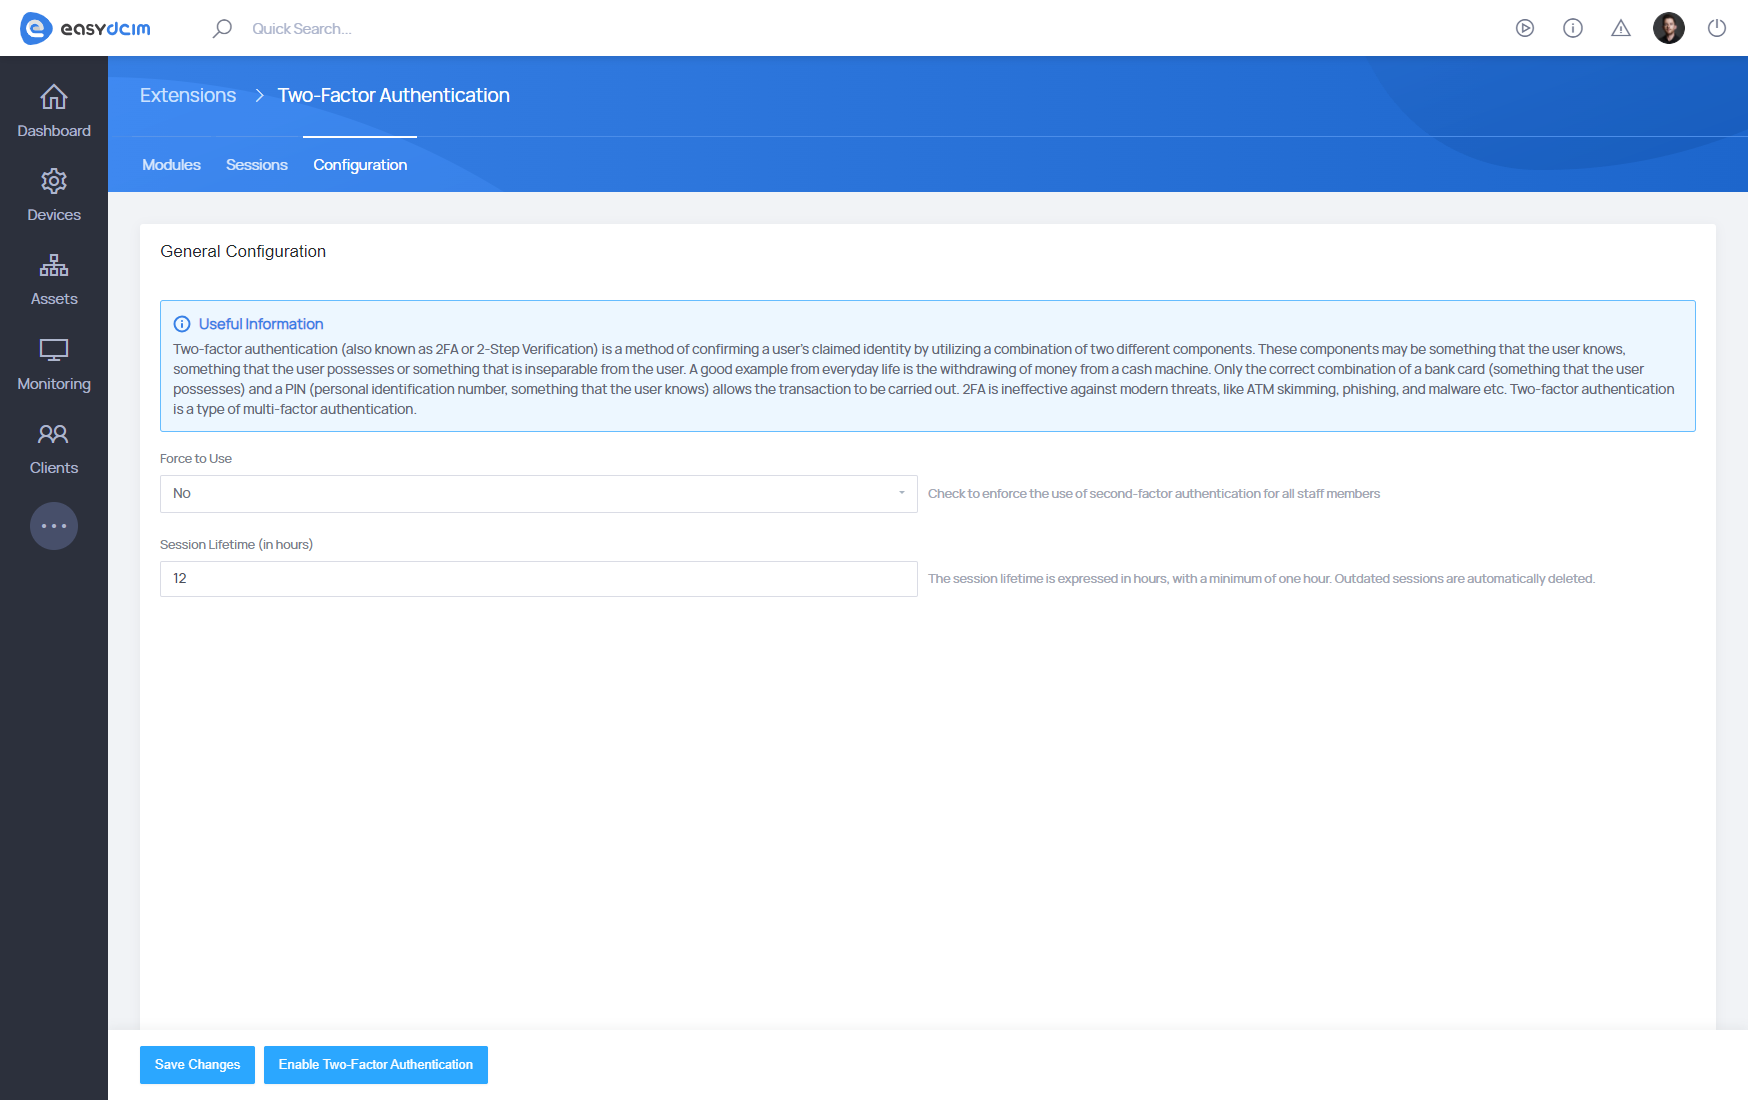
Extension configuration
To configure the additional security layer, go to the main view of the Two-Factor Authentication extension. The list represents the currently available sub-modules.

To activate the submodule, select the “Edit” option and change the “Enable Module” field to the “Yes” value in the form.
Then go to the Configuration tab and select the “Enable Two-Factor Authentication” option from the bottom bar.
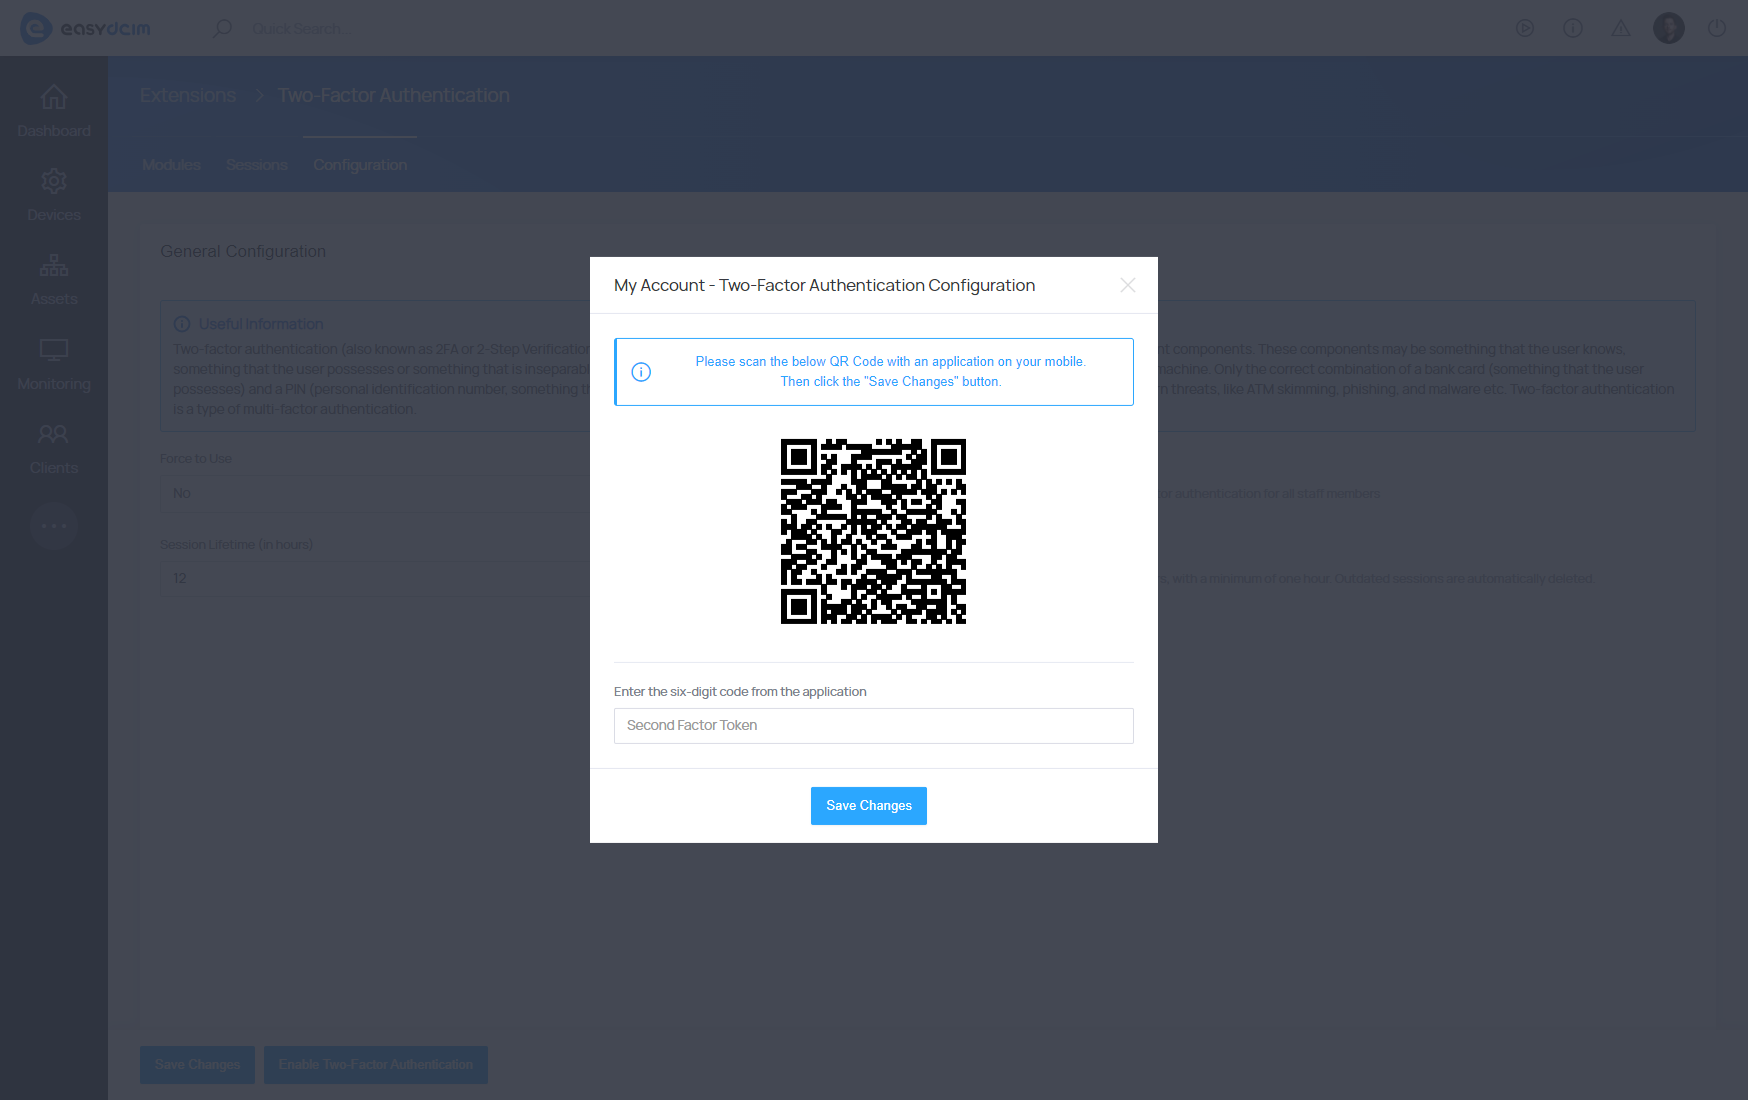
Setting up the “Time-Based One Time Passwords” submodule is simple and involves scanning a QR code using a special “Google Authenticator” app on your phone. Then, after clicking “Save Changes”, you will be transferred to the form confirming the configuration. In the form, you will need to provide an appropriate code generated in the “Google Authenticator” application and then save the Backup Code in a safe place. After saving the data, an additional layer of security will be active for the currently logged in administrator account.
Duo Security configuration
Duo.com configuration steps:
- Log into Duo Security panel with your administrator account at duo.com.
- Navigate to “Applications” → “Protect an Application”.
- In the search box, enter “Web SDK” application and then click the “Protect” button next to the found application.
- The new application will be available on the list of “All Applications”. Find it and press to edit.
- On the application details page, you will find the following data; they will be used for connection purposes in the EasyDCIM panel:
- Client ID
- Client secret
- API hostname
Duo.com activation process:
- Navigate to your EasyDCIM panel → Extensions → Two-Factor Authentication. Find “Duo Security” and proceed to its configuration.
- A modal with configuration will appear:
- Enable Module - set it to “Yes”
- Duo Security Client ID - use data generated at point 5 of the “Duo.com configuration” section (see the step above)
- Duo Security Client secret - as above
- Duo Security API Hostname - as above
- Save the configuration. If the provided data is correct and connection is established well, a notification will appear.
- Navigate to “Configuration” section, find the “Enable Two-Factor Auth” button and press it.
- Locate “Duo Security” and press it.
- A new window with further steps on the Two-Factor Authentication configuration will appear.
- Once all the configuration steps are completed successfully, an adequate notification will appear, save the changes to finish the configuration.
- You will be redirected to the 2FA confirmation page, save the backup code now in a secure place. It can be used to log into EasyDCIM in case of problems with Duo Security.
- Press “Confirm Configuration” to complete the process.
Login authorization process:
First of all, log into your EasyDCIM panel.
Case One: Two Factor Authentication has already been configured:
- You will be redirected to the authentication page. Press “Duo Security” to proceed.
- You will be redirected to the Duo Security website. Verify 2FA by confirming “Duo Push” on the Duo Security application. If the verification is successful, you will be redirected to the main page of the admin panel.
Case Two: Two Factor Authentication has NOT been configured, the “Force to Use” 2FA option is enabled:
- You will be redirected to a form where the 2FA you want to configure shall be selected.
- Choose the Duo Security 2FA.
- A form will appear with information on the next steps to configure Duo Security.
- A window will open where you need to complete the configuration.
- Once 2FA has been configured correctly using Duo Security, a corresponding message about the correct configuration will be displayed.
- Save the changes.
- You will be redirected to the 2FA confirmation page, remember to save the backup code here, which will be used to log into EasyDCIM in case of problems with Duo Security.
- Click “Confirm Configuration” to complete the configuration.
Additional configuration
By default, the module does not enforce an additional security layer for all administrator accounts in the system. To enforce the use of an additional security layer, set the “Force to Use” option to “Yes” in the Configuration tab and then save the changes. With this configuration, each administrator logging into the backend section will be forced to activate an additional security layer.
Disable two factor authentication
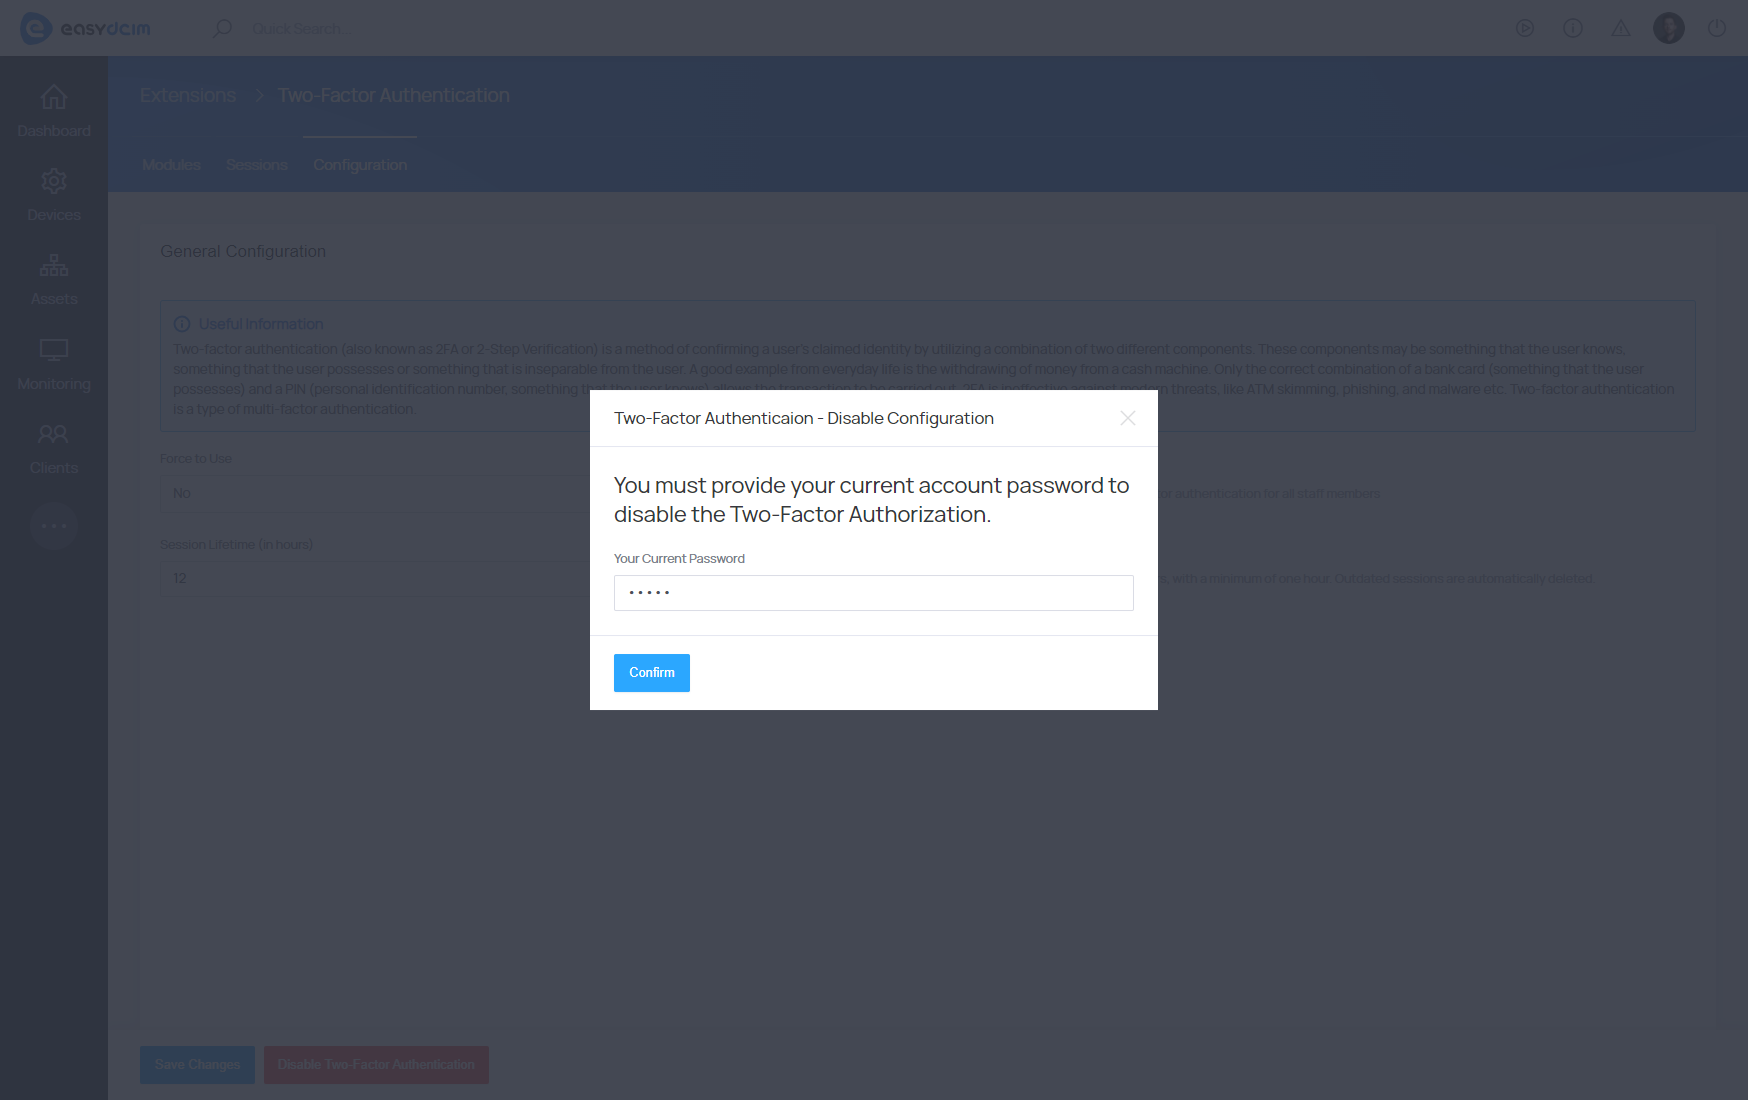
To disable the additional security layer feature for a particular administrator, click on the avatar of your account in the upper right corner and then select “Disable Two-Factor Authentication.” In the form that will appear on the screen, you need to enter your current administrator account password to verify your information. Note that the additional security layer can be disabled only if the “Force To Use” option has been previously disabled.
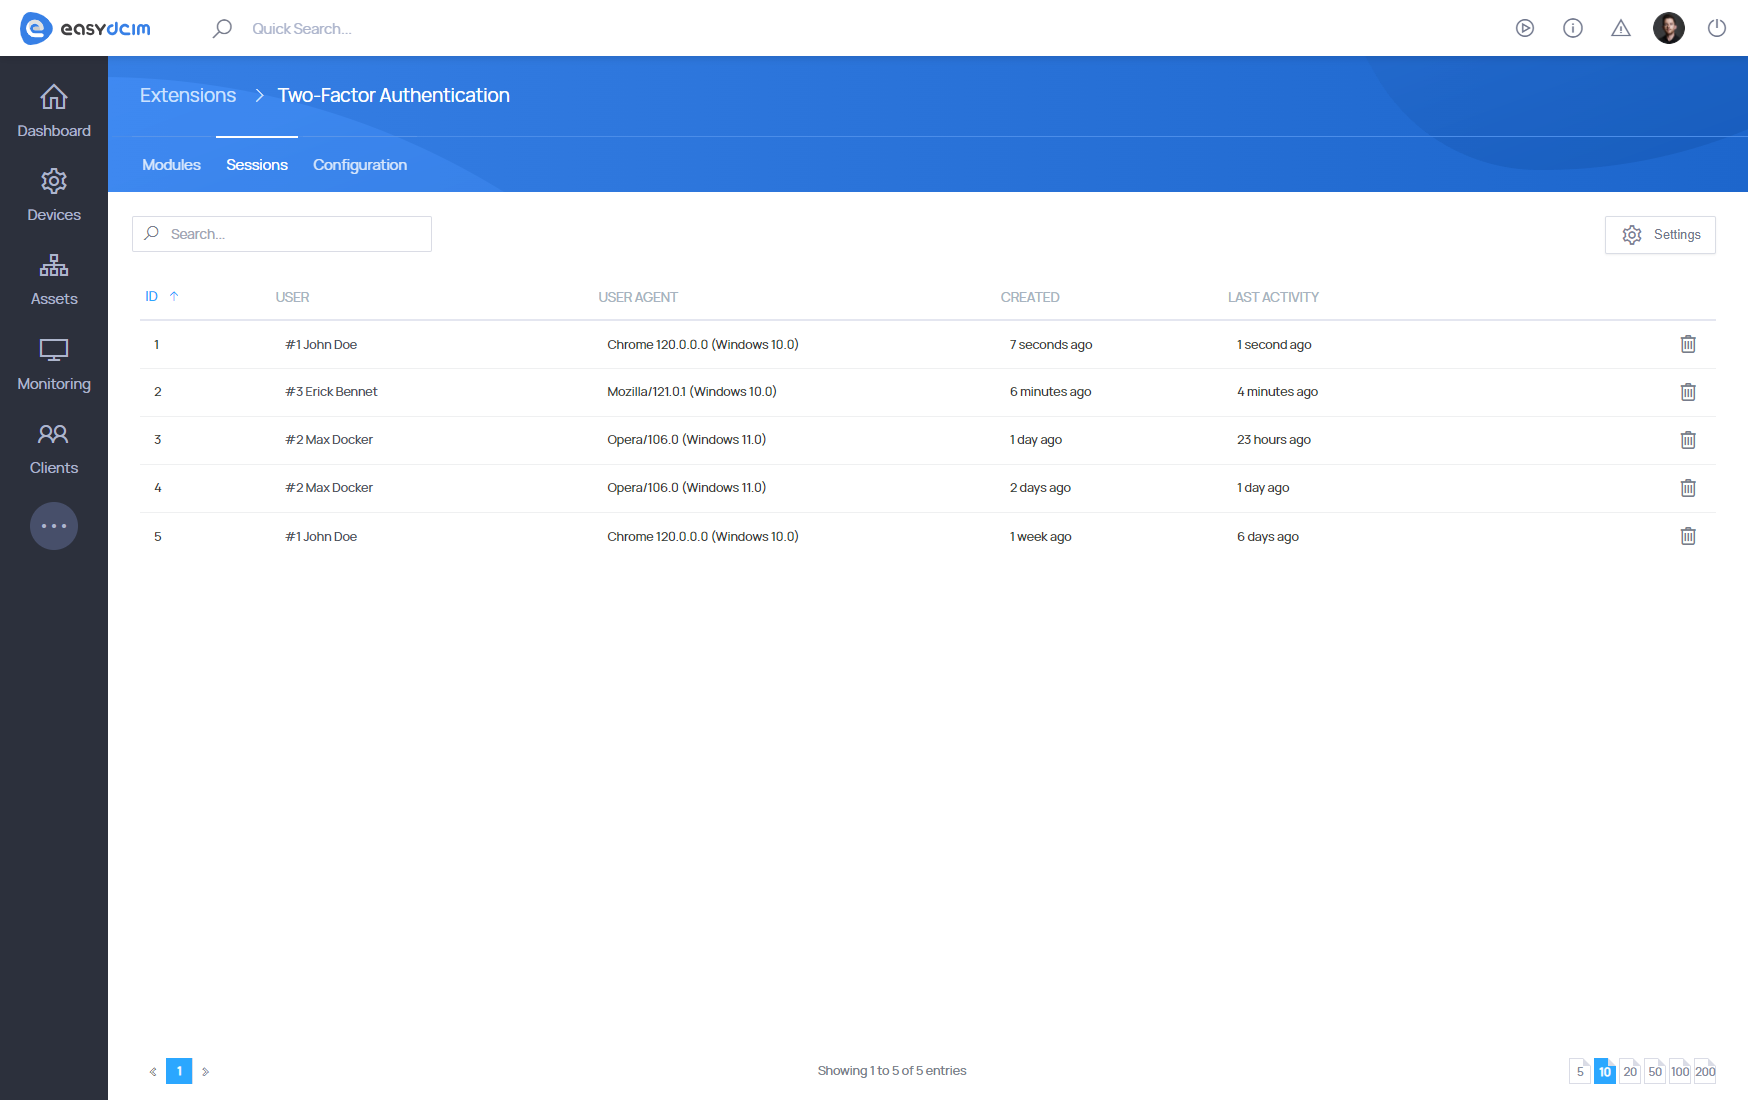
Sessions
The “Sessions” section presents the current login sessions for all administrators in the system. Each session can be manually terminated by the administrator using the appropriate “Delete” option available in the table.
The default duration of each administrator login session is 12 hours. To change this value, go to the “Configuration” tab and, in the “Session Lifetime (in hours)” field, specify the required session duration. The minimum session duration is one hour. When the session duration is exceeded, the system will automatically terminate the outdated login sessions.