Operating Systems Installation
- Operating Systems Installation
- Standard network setup - network without VLANs
- Advanced network setup - network with multiple VLANs
- Known issues
- After starting the OS installation, the server does not enter the PXE mode
- After starting the OS installation, the server enters the PXE mode but the IP address is not assigned by the DHCP server
- After starting the OS installation, the server enters the PXE mode and the IP address is assigned but the installation does not begin
- PXE Error: No Configuration Methods Succeeded
- PXE Error: ARP Timeout
- Provisioning servers
- Provisioning subnets
The extension allows you to automate the process of installing and configuring operating systems on dedicated servers. It is one of the remote agent components and can work only with this remote agent.
Standard network setup - network without VLANs
No special router configuration is required for the standard network setup without a VLAN.
- Make sure that no DHCP servers are active on the network as they may interfere with the provisioning process.
- Check if Spanning Tree Protocol is enabled on switches.
- Verify if portfast is enabled on switch ports connected to servers (not on ports that connect to other switches).
Enabling the portfast feature:
Switch2> enable
Switch2# configure terminal
Switch2(config)# spanning-tree portfast default
Do not configure portfast by default if some of the ports are connected to other switches instead of servers. In this case, you need to set up portfast on each port individually. If the switch does not support portfast, check if it has the Rapid STP protocol or you can disable STP completely.
Advanced network setup - network with multiple VLANs
If you have multiple VLANs, you need to configure the router or L3 switch so that DHCP requests from foreign VLANs are forwarded to the IP address of the EasyDCIM remote agent installation.
For example:
ip helper-address 10.20.30.40
10.20.30.40 - IP address of the EasyDCIM remote agent
In case of doubt, please check your router manual for more information about “DHCP relaying” or “Broadcast forwarding”.
Known issues
The OS installer is universal and uses well-known network protocols. In most cases, encountered problems are connected to the correct configuration of the switch or provisioning server in EasyDCIM.
After starting the OS installation, the server does not enter the PXE mode
Make sure that the BIOS and firmware of the device are up to date. Additionally, verify if PXE booting is enabled in BIOS settings. If your device is running in the UEFI mode, the reboot mode should be set to IPMI UEFI.
After starting the OS installation, the server enters the PXE mode but the IP address is not assigned by the DHCP server
Make sure that the subnets within which the DHCP server should operate are defined in the Provisioning Subnets section. You must declare at least one subnet there for the parent network interface of the remote agent. You can define an unlimited number of subnets within which the DHCP server should run.
After starting the OS installation, the server enters the PXE mode and the IP address is assigned but the installation does not begin
In most of these cases, the problem lies in the wrong switch configuration. If your devices are in the same subnet as the remote agent, you do not need additional switch configuration. If the main IP address of the device is in a different subnet then you need to configure the proper forwarding of DHCP requests to the remote agent.
PXE Error: No Configuration Methods Succeeded
By default, the operating system installer is based on the “undionly.kpxe“ bootloader which is universal for the vast majority of dedicated servers. In case of this problem, you can try to change the bootloader in the network settings of the device.
PXE Error: ARP Timeout
In order for the operating system installer to work properly, you need to:
- enable portfast on the switch port connected to the remote agent server,
- enable portfast on the switch port connected to the test server where the operating system is going to be installed,
- set the switch configuration to forward DHCP requests to the remote agent server,
- add all required subnets on which the DHCP server will operate during the remote agent configuration.
Provisioning servers
This section allows you to add provisioning servers used to automatically install operating systems using a remote agent. More information on installing operating systems can be found here: Remote Provisioning Submodule
Each provisioning server can be assigned to more than one location and have its own installation templates. In order to add a new operating system, you need to find and use the “Add OS Provisioning Server” option in the action menu. The form includes the following fields:
- Provisioning Server Name – name, it can be any name that will allow to distinguish the provisioning server
- Use in locations - specifies locations among which the provisioning server shall work.
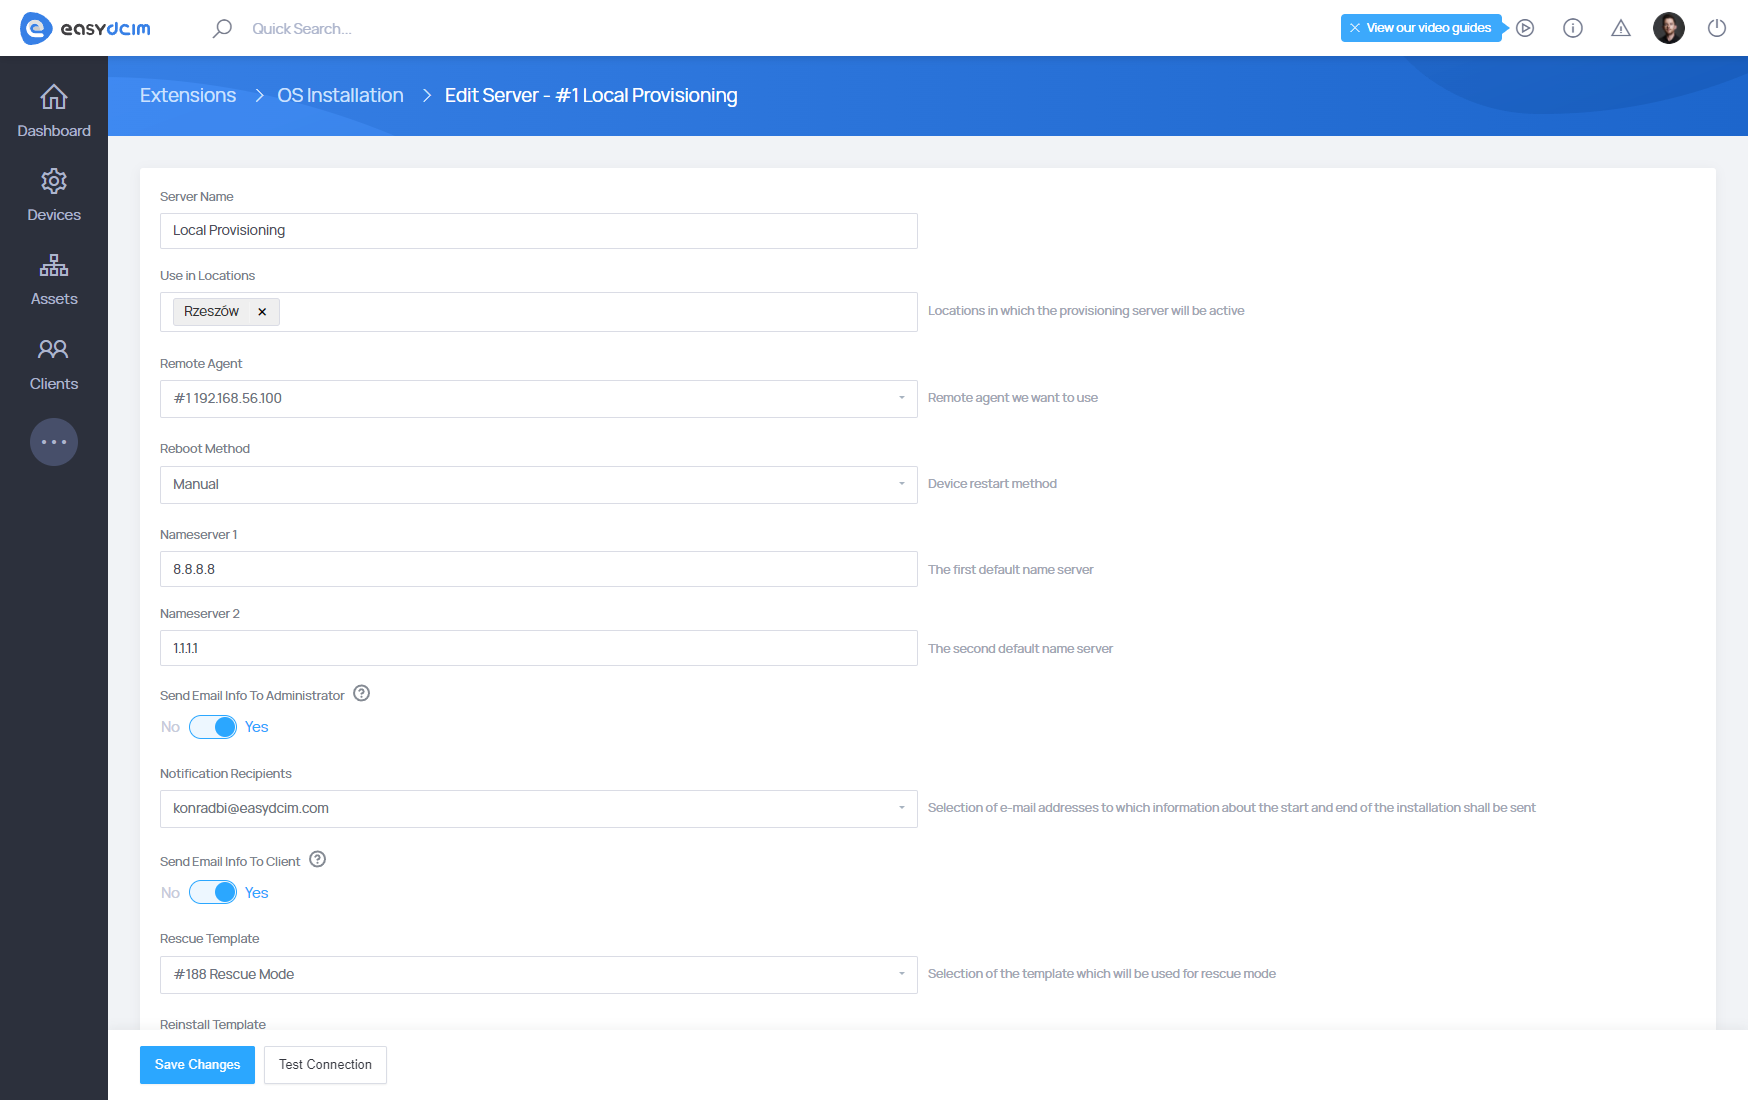
Next, you will be redirected to the advanced configuration view that includes below described fields:
- Remote Agent - the remote agent you want to use
- Reboot Method - device restart method
- Manual - manual restart of the device by an administrator
- IPMI - device restart using IPMI and automatically entering the PXE mode
- IPMI (no PXE) - device restart using the IPMI protocol without entering the PXE mode
- PDU - reset of PDU outlet assigned to the device (for APC and Raritan devices)
- Send Email Info To Administrator - sending information about the start and end of the installation to the email address of the selected administrator
- Notification Recipients - selection of e-mail addresses to which information about the start and end of the installation shall be sent
- Send Email Info To Client - sending information about the start and end of the installation to the email address of the client (owner) of the given server
- Reinstall Template - selection of the template which will be used for reinstallation, during e.g. service termination
- Nameserver 1 - the first default name server
- Nameserver 2 - the second default name server
- Bootloader - the default boot file
Once the provisioning server is successfully configured, you will need to define the subnets for the DHCP and TFTP servers to work.
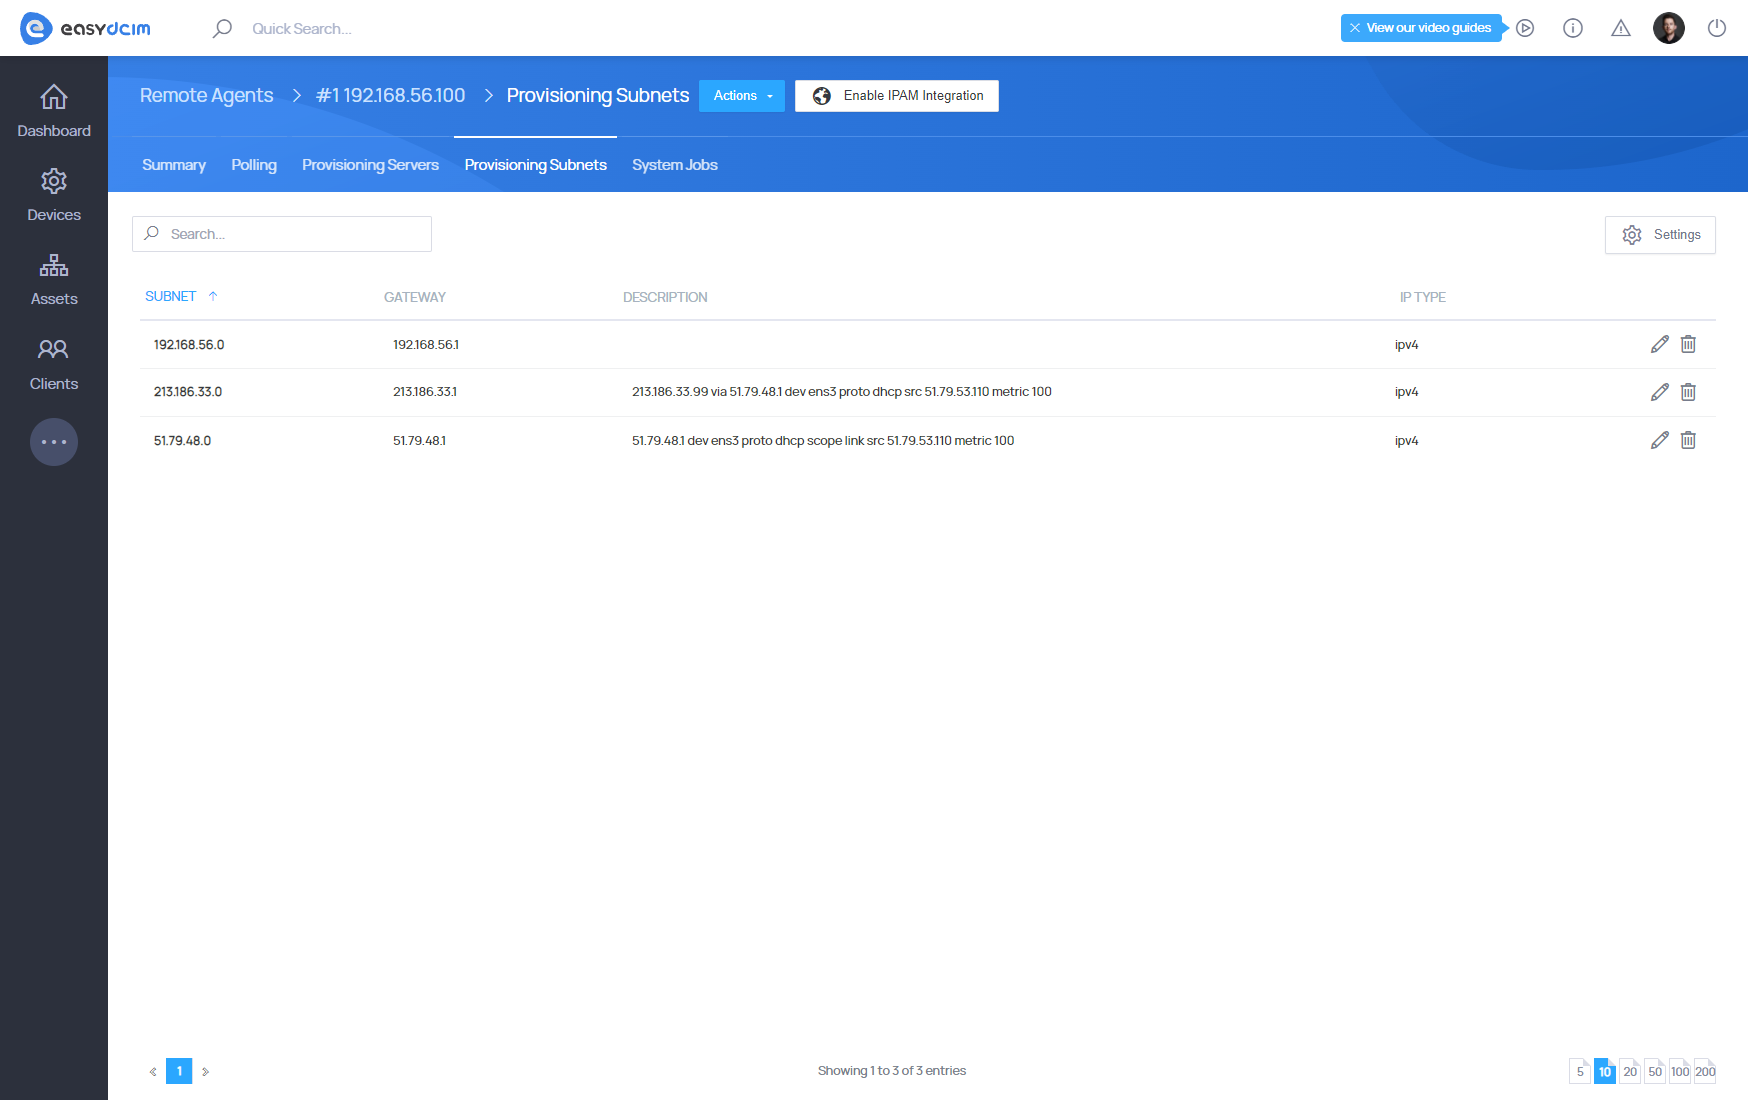
Provisioning subnets
In the next step, go to the “Provisioning Subnets” section and configure the appropriate subnets within which the DHCP server will run. Please note that the DHCP server requires at least one subnet for its NIC interface in the system. For example, our remote agent (that is the DHCP server) works on the enp0s8 interface with the IP address 192.168.56.2. Therefore, you must add a subnet in the ′Provisioning Subnets′ section corresponding to this address, e.g. 192.168.56.0/24.
The basic configuration involves adding at least one subnet for your NIC interface. The DHCP server can house an unlimited number of subnets and currently, it provides support for IPv4.
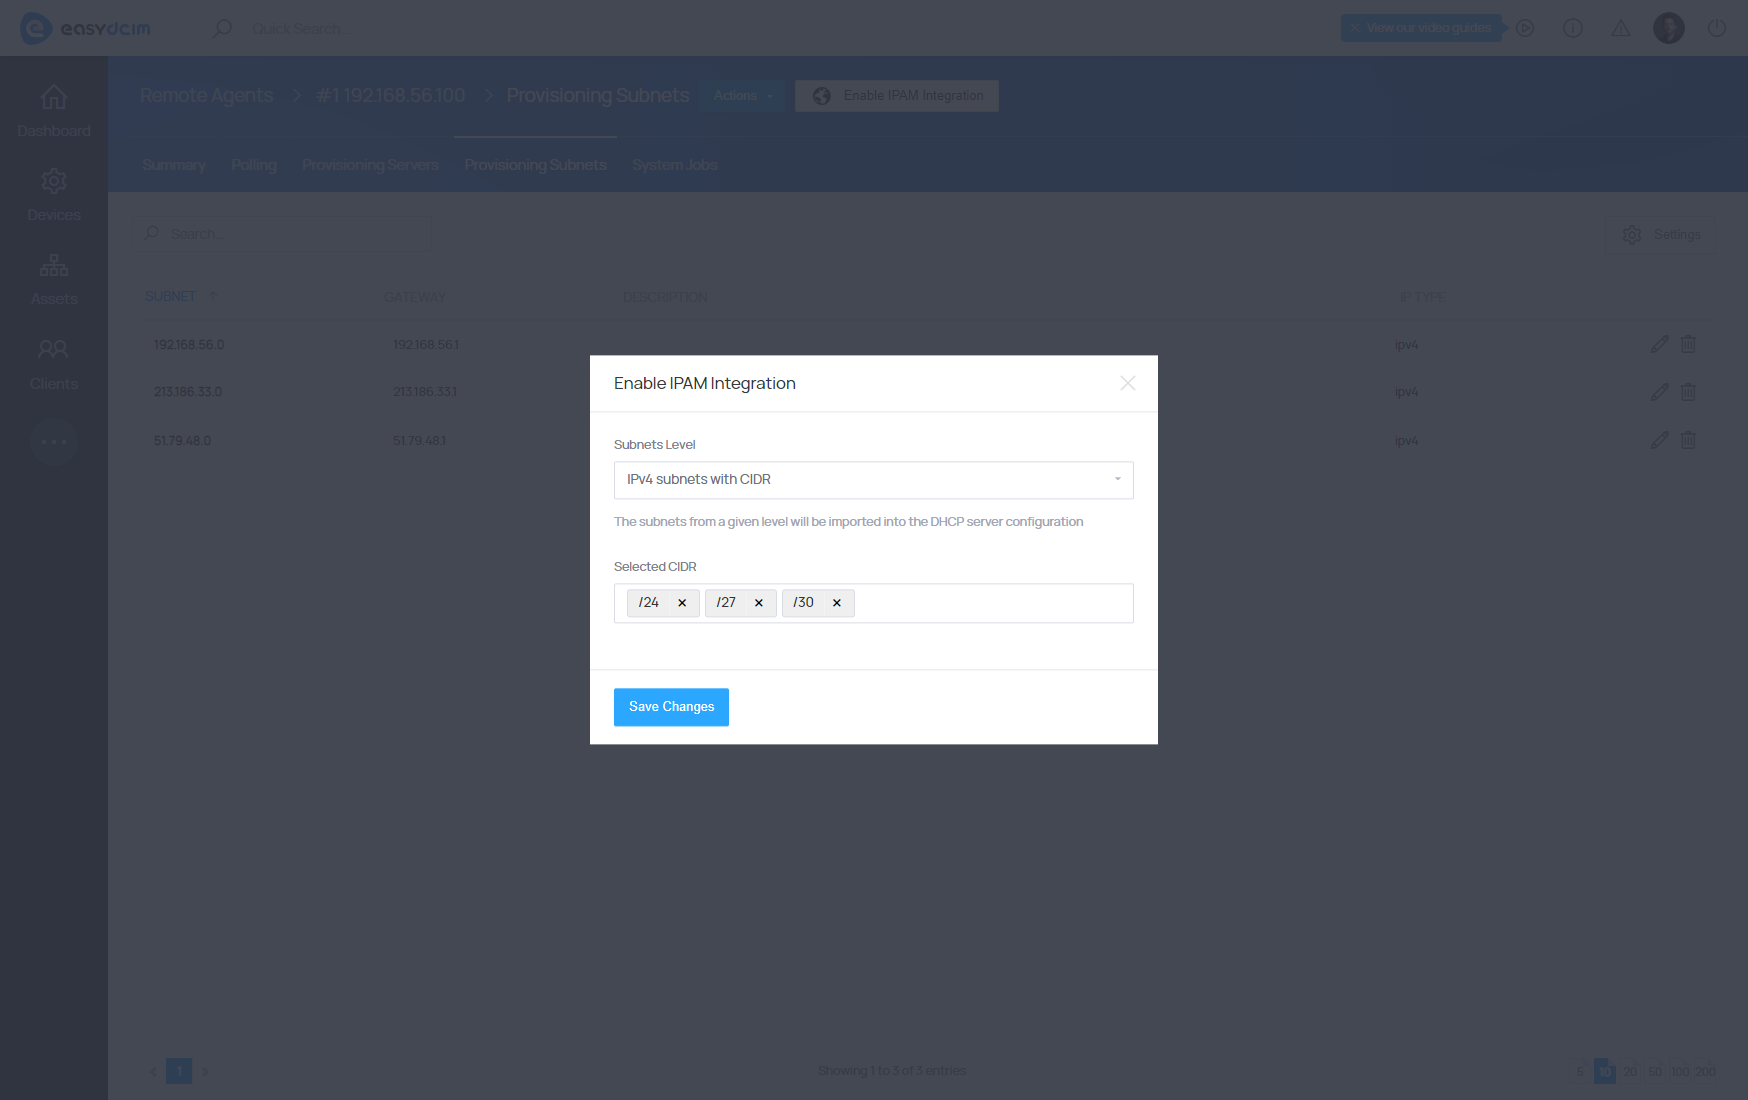
Integration with the IP Address Management For EasyDCIM extension
Integration with the IP Address Management extension replaces the basic configuration of the subnet. To enable this integration, use the “Enable IPAM Integration” button. Then, all parent IPv4 subnets (subnetworks without a parent) will be automatically imported into the OS Installation extension. Any changes that will be made within a given subnetwork will be applied in both the IP Address Management extension and DHCP server configuration.