EasyDCIM Dedicated Servers For HostBill
EasyDCIM Dedicated Servers For HostBill module enables you to move the provisioning and management of EasyDCIM servers directly to your HostBill panel. This module grants you the ability to effectively control all essential elements of the created servers, including monitoring their status and managing the SSH password. Concurrently, your customers will be able to overview their servers, access KVM console, manage rDNS records and more, all without leaving your website.
- Admin Portal Features:
- Create/Terminate/Suspend/Unsuspend Server
- Start/Stop/Reset/BMC Cold Reset Server
- Toggle Rescue Mode
- Access KVM Java Console (Dell And Supermicro Servers)
- Access noVNC KVM Console (AMI, Dell, HP And Supermicro)
- One Click Login To User Control Panel
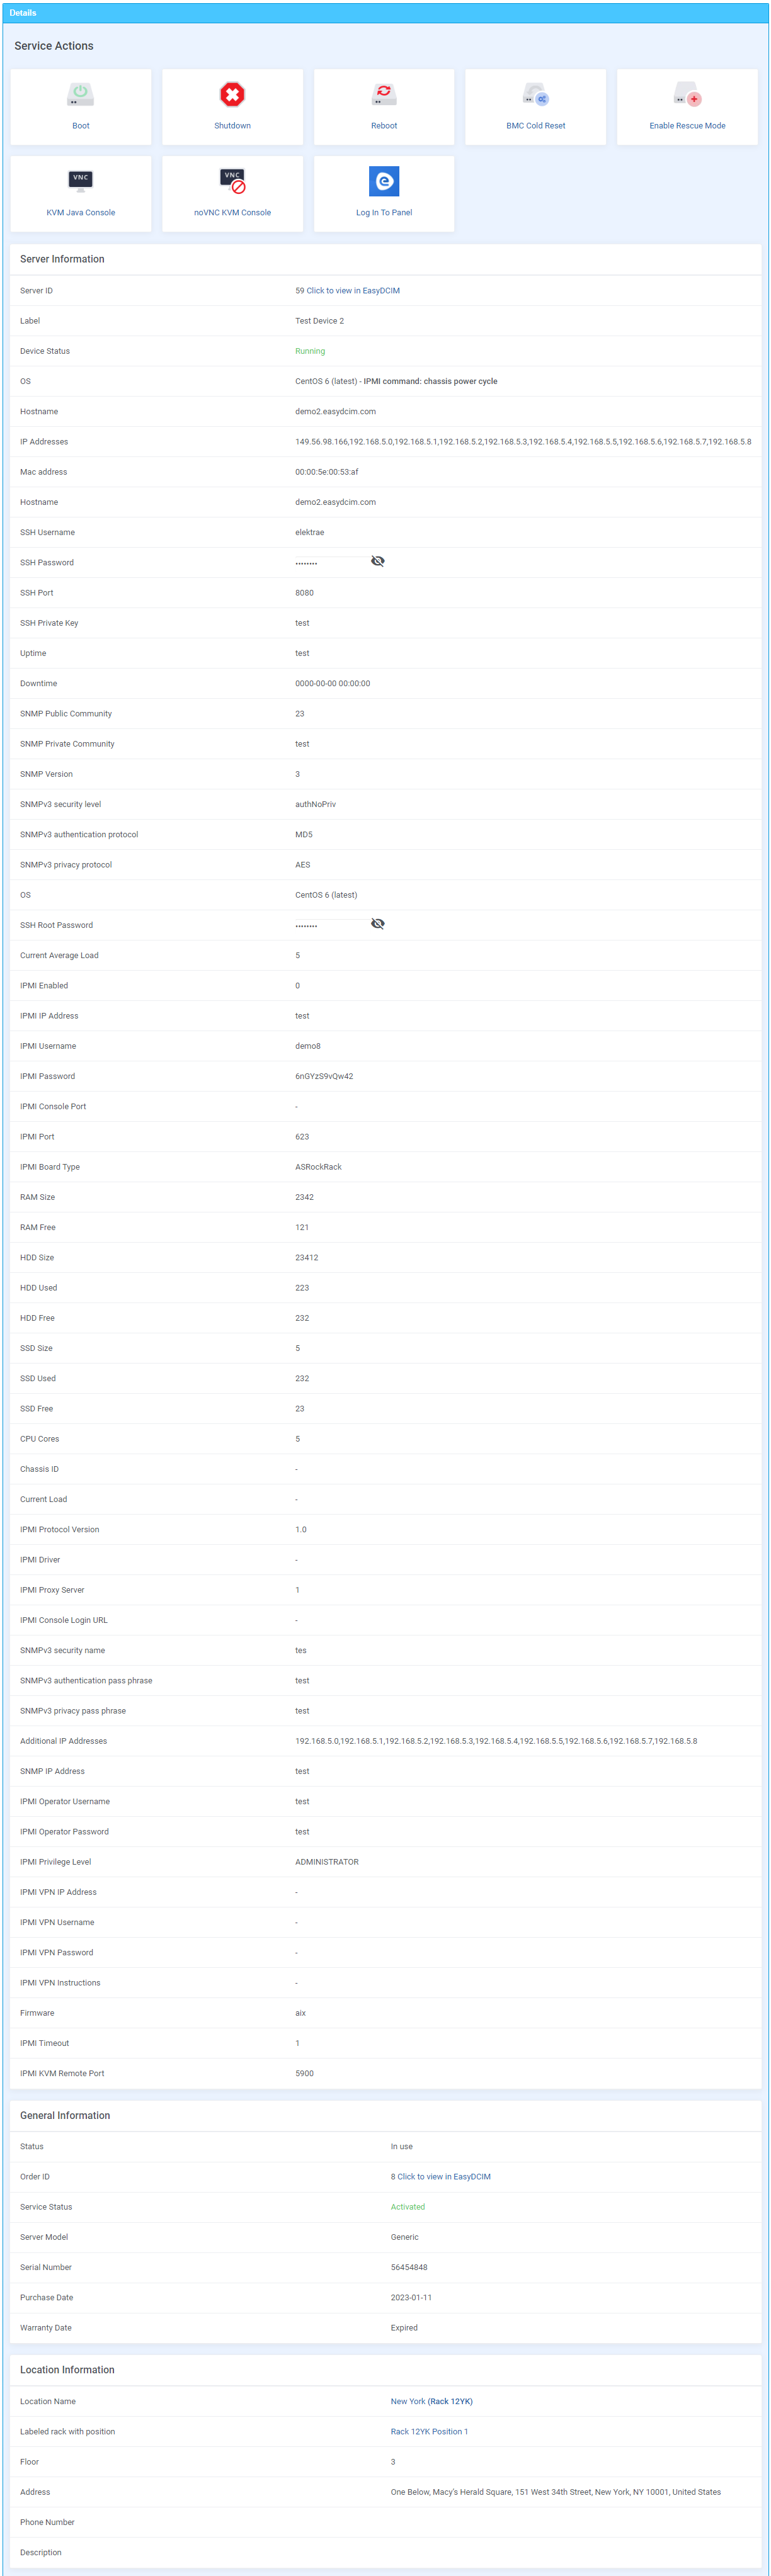
- View Server, General And Location Information:
- View Server ID And Order ID In EasyDCIM Panel
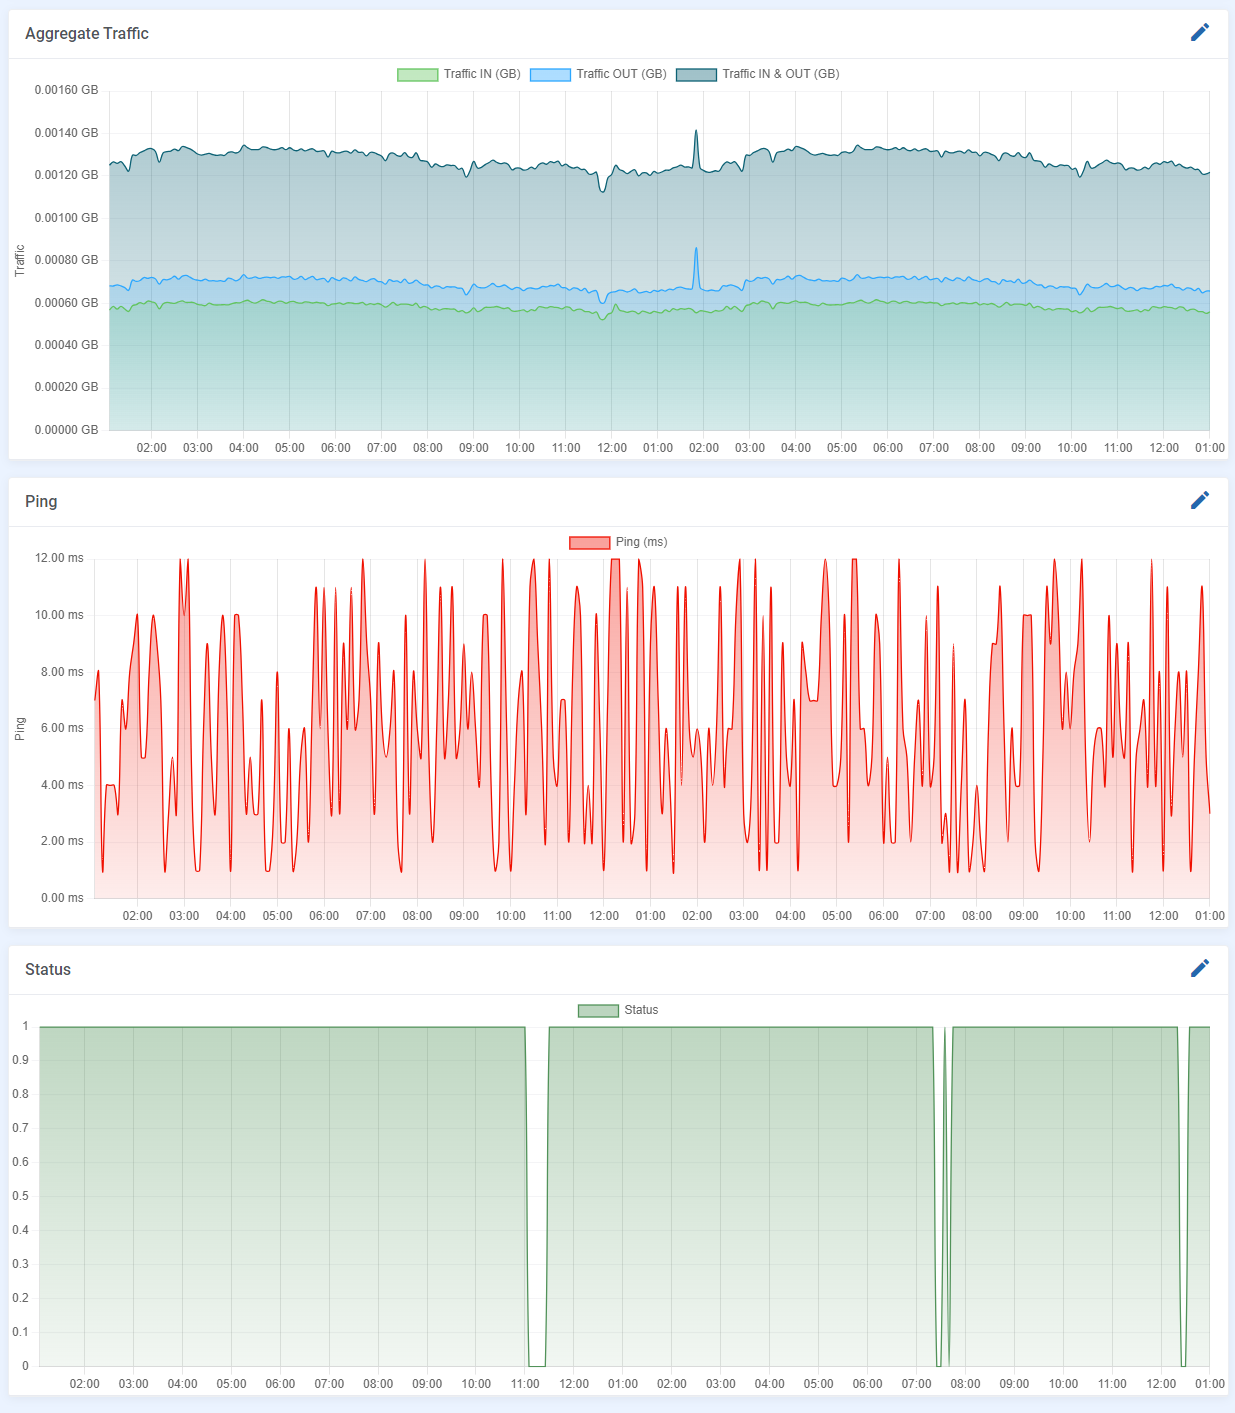
- View Server Resource Statistics:
- Bandwidth Usage
- Aggregate Traffic
- Ping
- Status
- Configure Product Details:
- Default Server Options:
- Server Model
- Server Location
- OS Template
- Number Of Additional IP Addresses
- Disk Layout
- Extras
- Automation Settings:
- Automatic Order Acceptance And Server Matching
- Define Required Devices:
- PDU
- Switch
- Block Automatic HostBill Suspension/Unsuspension/Termination
- Define Bandwidth Notification Limit
- Control Service Access Level
- Define Additional Part Requirements:
- HDD Models
- SSD Models
- RAM Models
- CPU Models
- Define Additional Metadata Requirements
- Define Client Portal Features
- Service/General/Location Information
- Graphs
- Server Actions
- Overview Tables
- Extensions Access
- OS Installation Actions
- Available OS Templates For Rebuilding
- Control Service Actions And Email Notifications
- Generate Default And Additional Parts Configurable Options
- Default Server Options:
- Determine Monthly Interval Of Bandwidth Usage
- Define Percentile Billing Of Bandwidth Overages
- Use EasyDCIM Merge Fields In Email Templates
- Client Portal Features:
- Start/Stop/Reset/BMC Cold Reset Server
- Receive Email Notification On Complete Server Creation
- Toggle Rescue Mode
- Access KVM Java Console (Dell And Supermicro Servers)
- Access noVNC KVM Console (AMI, Dell, HP And Supermicro)
- One Click Login To User Control Panel
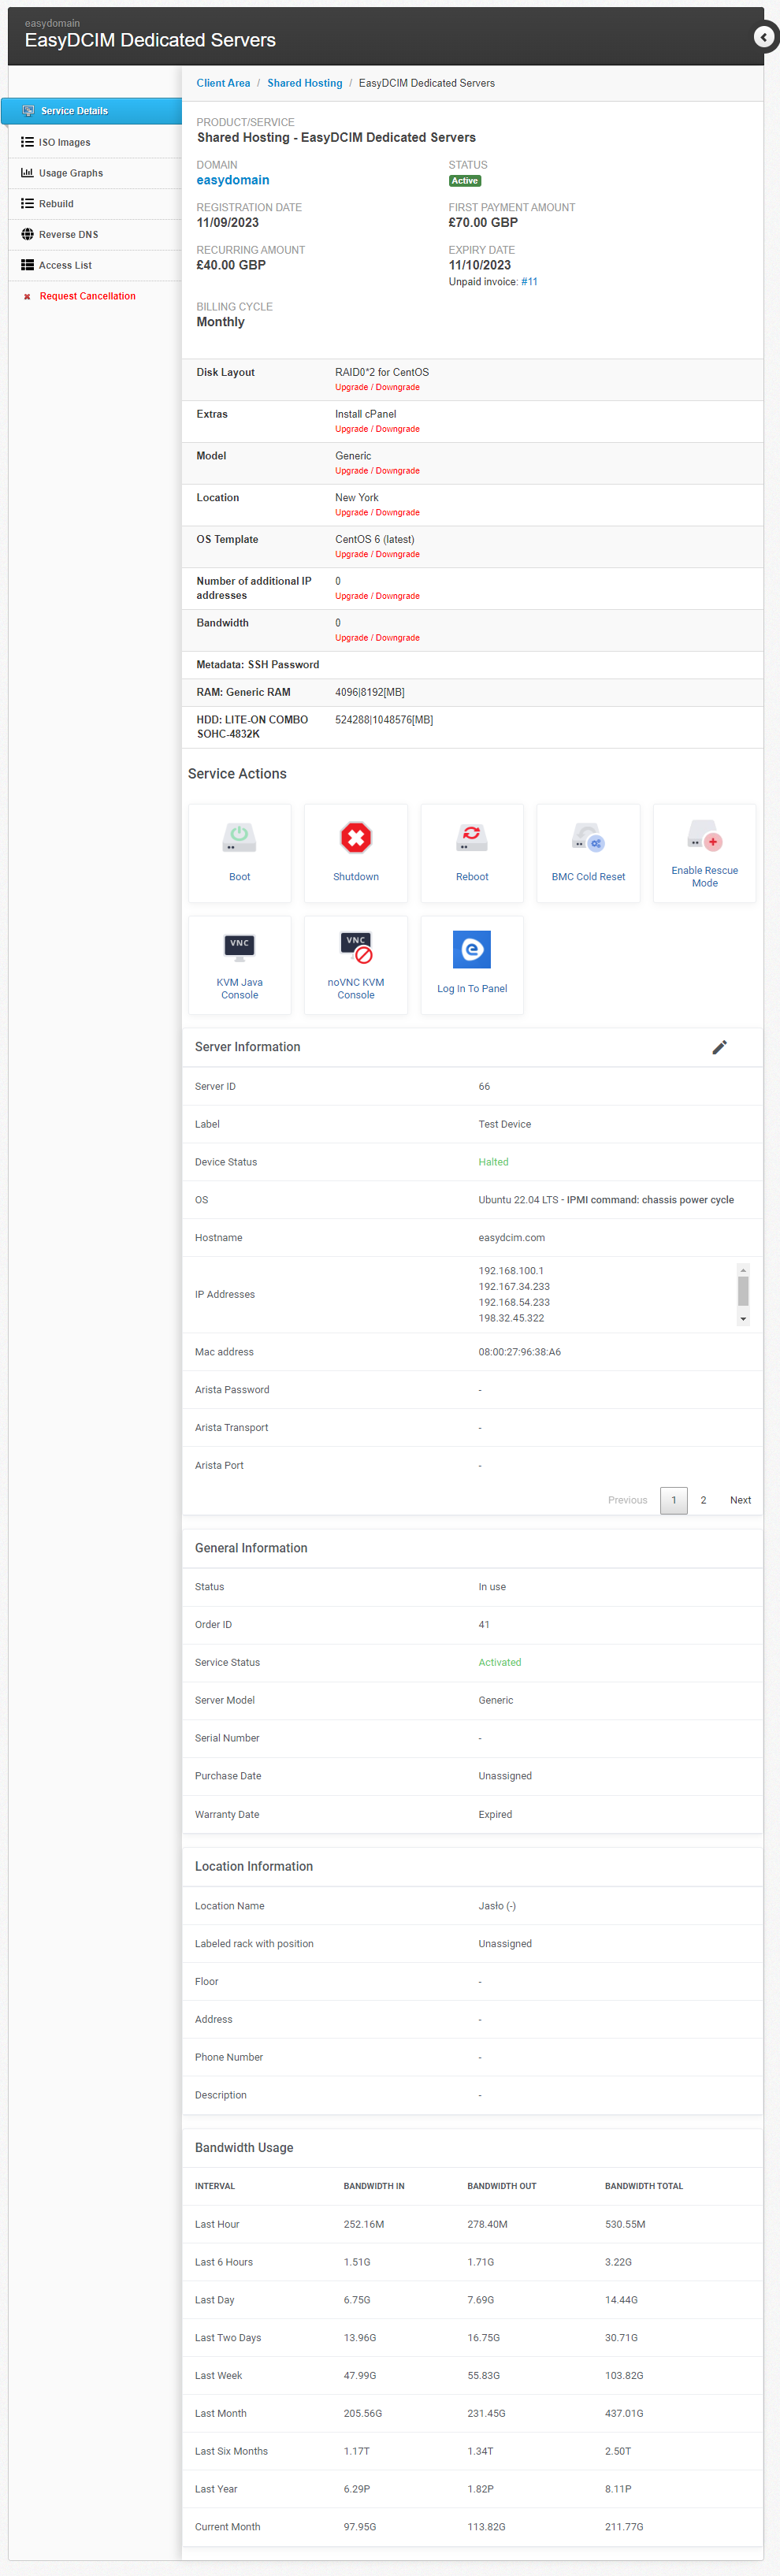
- View Server, General And Location Information:
- Change Server Hostname
- Change Server SSH Password Field
- View Bandwidth Usage
- View Server Resource Statistics:
- Aggregate Traffic
- Ping
- Status
- Add Custom ISO Images To Server
- Rebuild Server Using OS Templates And Your Own Credentials
- Manage Reverse DNS Records
- View Access List With Stored Passwords
- Configurable Options:
- Server Model
- Server Location
- OS Template
- Disk Layout
- Metadata
- Number Of Additional IP Addresses
- HDD Size (Of Any Additional Parts)
- SSD Size (Of Any Additional Parts)
- RAM Size (Of Any Additional Parts)
- CPU Cores (Of Any Additional Parts)
- Custom - To Be Displayed In EasyDCIM Service Configuration
- Supported Server Manufacturers:
- AMI
- Dell
- HP
- Supermicro
- General Info:
- Multi-Language Support
- Supports EasyDCIM v1.9.6 And Later
- Supports PHP 8.1 Back To PHP 7.4
- Supports HostBill Themes “Nextgen Clean” And “2019”
Installation and configuration
This tutorial will show you how to successfully install and configure EasyDCIM Dedicated Servers For HostBill. We will guide you step by step through the whole installation and configuration process.
Installation
- Download your module package directly form our repository. It is highly adviced to always choose the newest version, which is the one at the top of the list.
- Once you have the package, extract the files.
- Copy folder “easydcim” to
/includes/modules/Hostingdirectory. - Log into the HostBill admin portal.
- Move to Settings → Modules → Hosting Modules, find the EasyDCIM module and activate it.
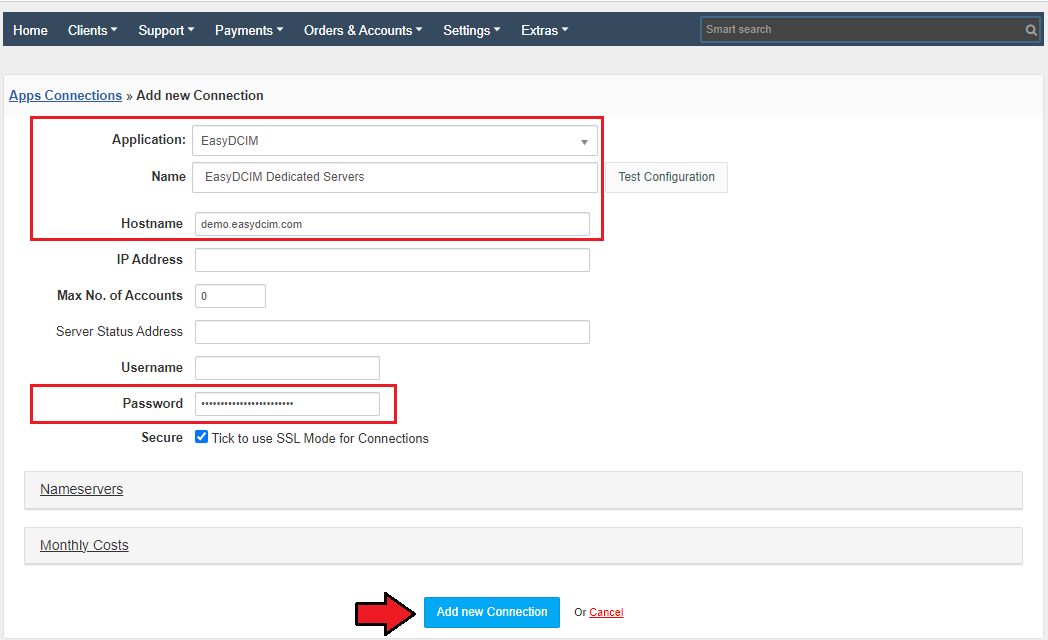
- Next, navigate to Settings → Apps Connections and add a new connection for “EasyDCIM Dedicated Servers” application. Fill out the connection details, please enter the API Key in the “Password” field to connect with EasyDCIM and press the “Add new Connection” button to confirm.
Configuration
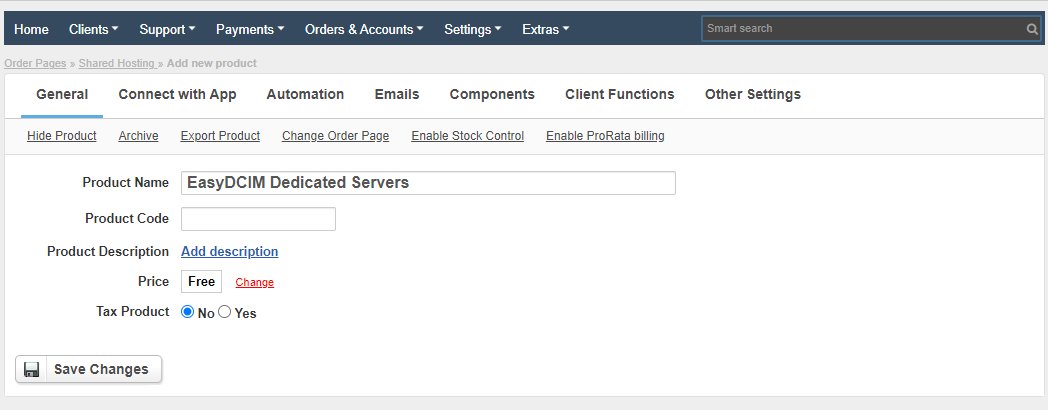
Proceed to Settings → Products & Services → Order Pages. There find “Shared hosting” group of products, open it and add a new product within that group. Fill out the required fields to successfully create a new product.
General:
- Product Name - name your newly created product. (Note that the remaining fields in this section are not required at this step to continue.)
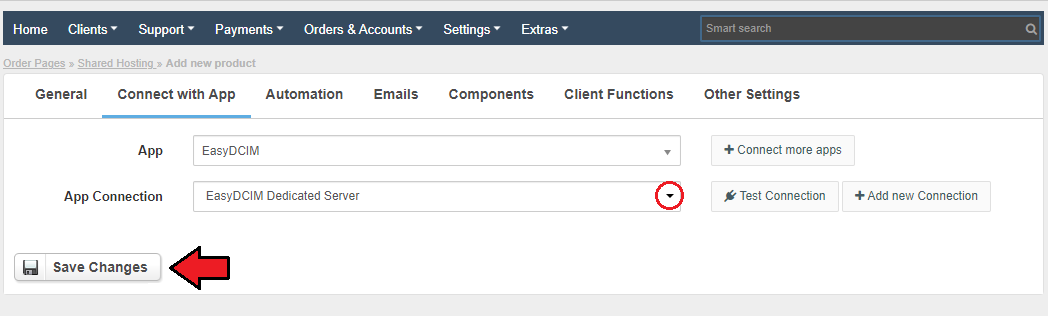
Connect with App:
- App - choose the “EasyDCIM” application from the dropdown menu.
- App Connection - choose the created in step 5th connection.
Now, you can save the changes. At this point you are able to configure the module, just proceed again to the created product’s details → “Connect with App” tab. See the screens below to check an exemplary configuration of the product.
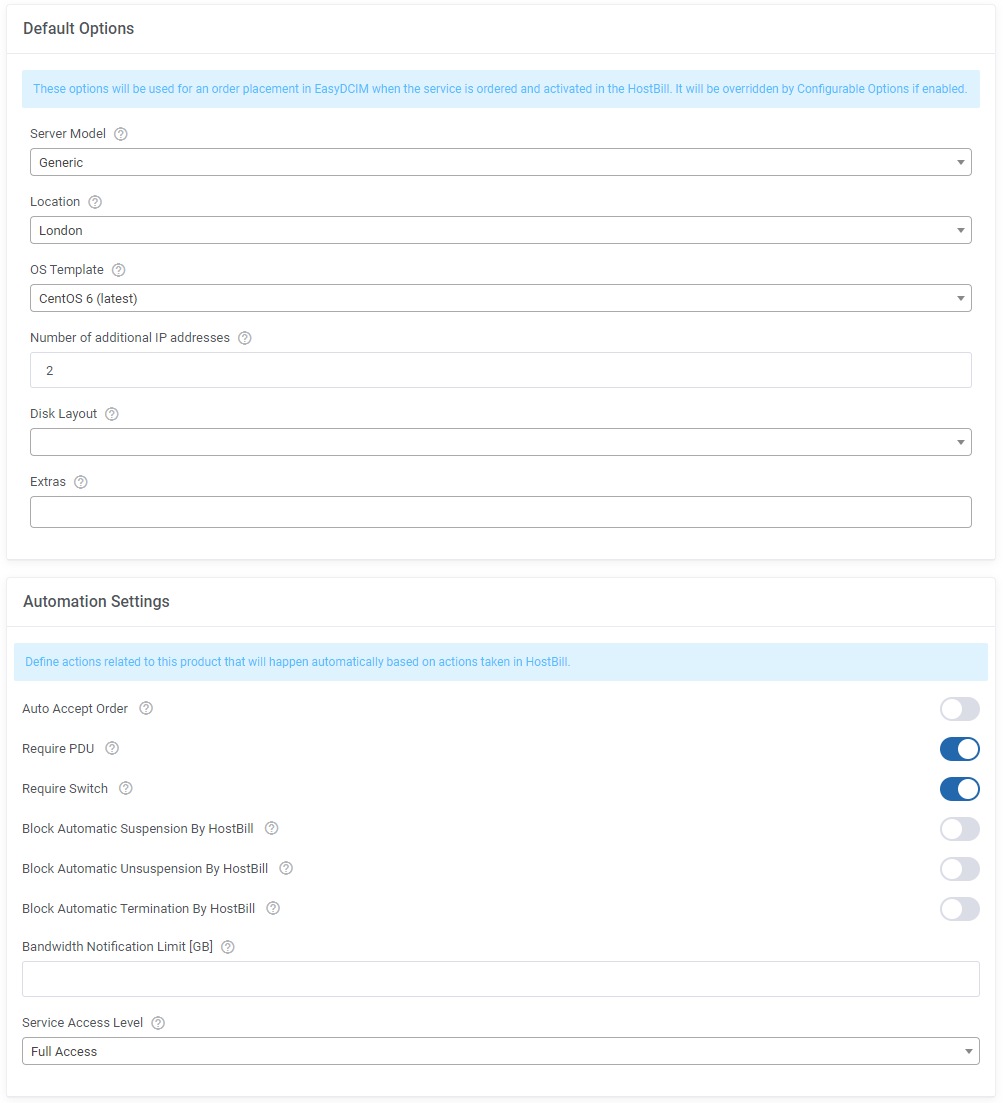
Default Options
These options will be used for an order placement in EasyDCIM when the service is ordered and activated in HostBill:
- Server Model (required) - the EasyDCIM server model
- Location (required) - a desired server location
- OS Template - reinstall server with a chosen OS template before delivering it to client
- Number of Additional IP Addresses - the number of additional IP addresses assigned to a server
- Disk Layout - choose the disk layout addons for the chosen template and location
- Extras - choose additional addons for the chosen template and location
Automation Settings
Define actions related to this product, they will be executed automatically based on the actions taken in HostBill:
- Auto Accept Order - automatically run server matching, server will be provisioned in a few moments
- Require PDU - the provisioned server has to be connected to a PDU device
- Require Switch - the provisioned server has to be connected to a Switch device
- Block Automatic Suspension/Unsuspension/Termination By HostBill - if enabled, the dedicated action will NOT be performed automatically after being triggered in HostBill panel, only an email notification sent to the admin
- Service Access Level - configure the access level to control the features available to your clients. These levels and features are defined in your EasyDCIM at ‘Clients’ → ‘Services’ → ‘Access Level’ tab.
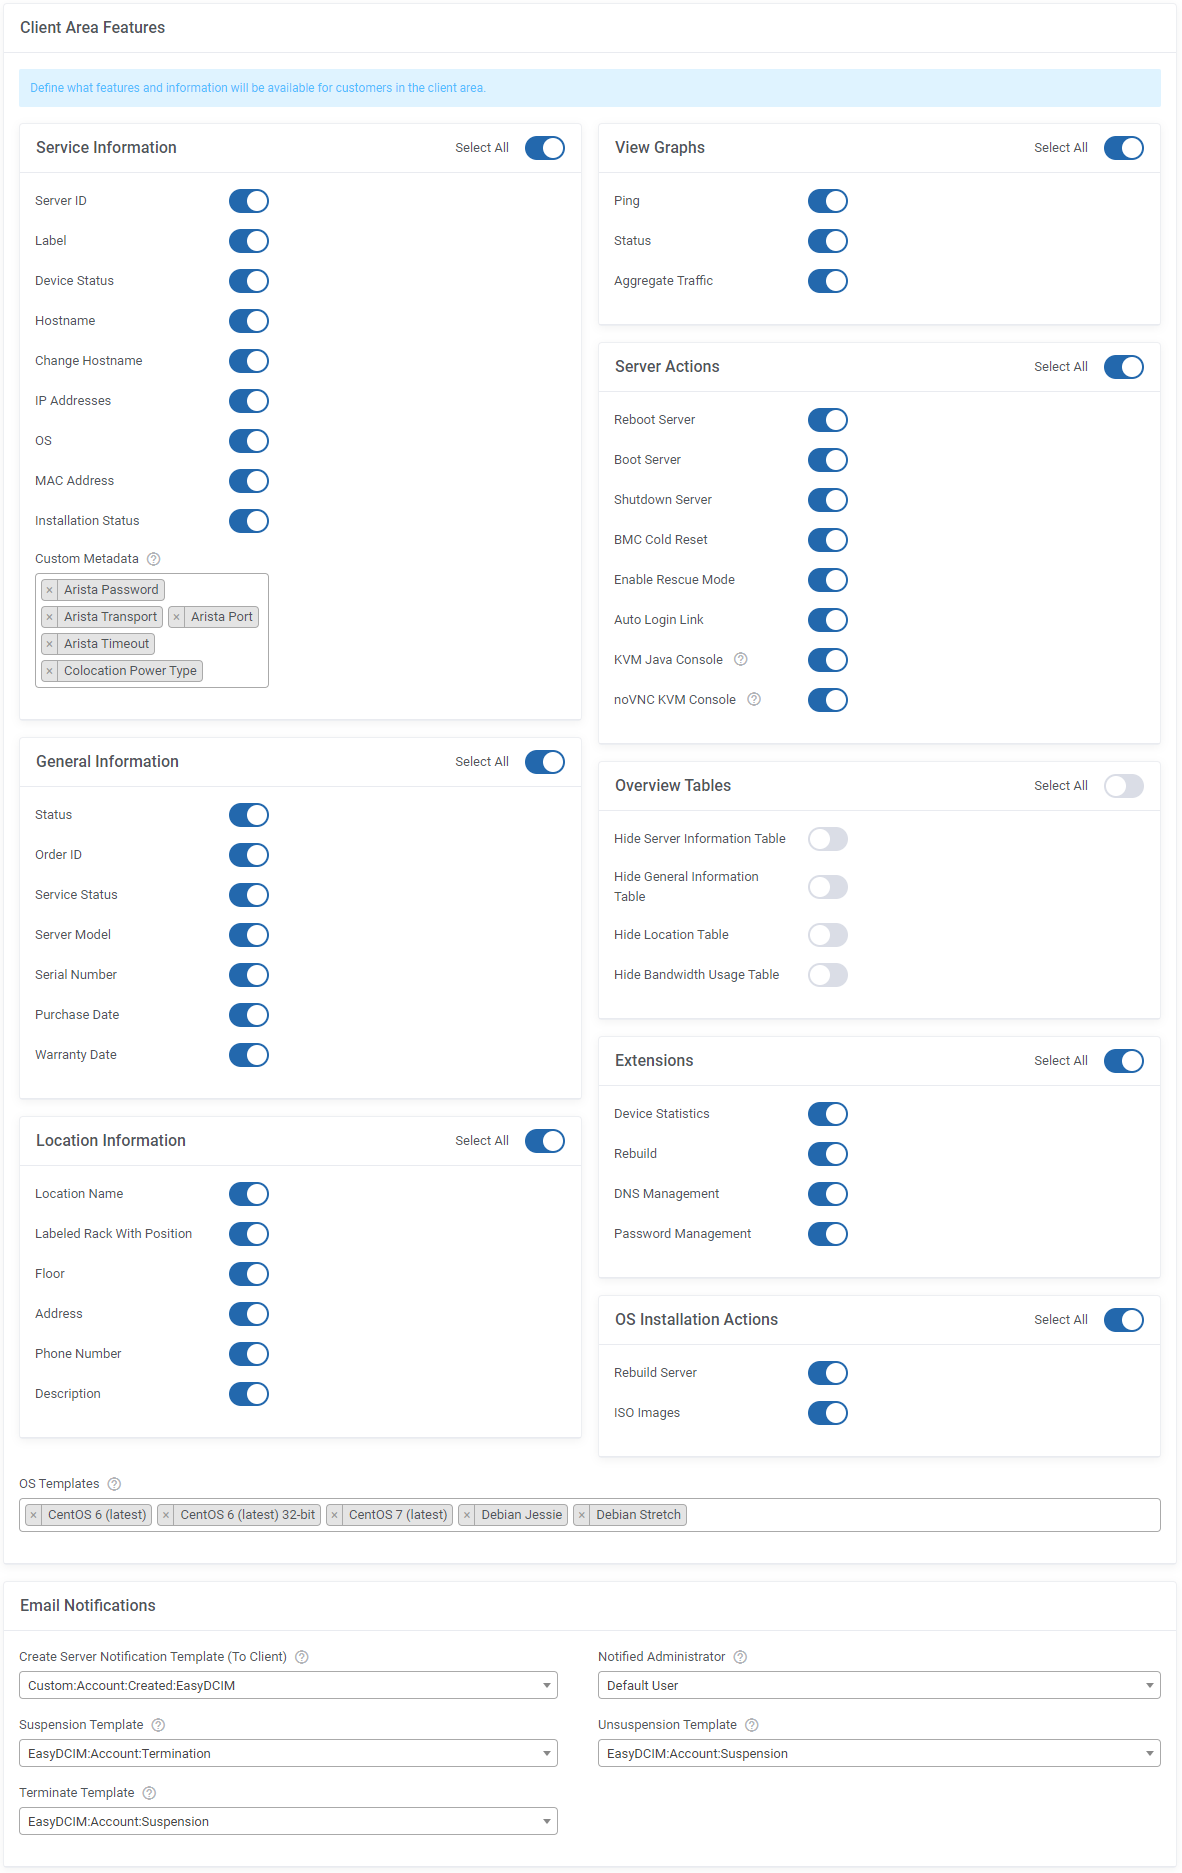
Client Portal Features
Define the features and information that will be available for customers in the client portal. Select elements for every section in the client portal that will be available to your customers:
- Service Information
- General Information
- Location Information
- Graphs
- Server Actions
- Overview Tables
- Extensions
-
OS Installation Actions
-
OS Templates - selects the OS Templates that will be available for clients to choose from when reinstalling the server
Email Notification
- Create Server Action Notification (To Client) - Choose the email template that will be sent to the client when creation of the ordered server is finished.
- Notified Administrator - Choose the HostBill administrator who will receive the below described notifications about certain actions performed on the services.
- Suspend Action Notification - Select the email template that will be used to notify about suspending the service.
- Unsuspend Action Notification - Select the email template that will be used to notify about unsuspending the service.
- Terminate Action Notification - Select the email template that will be used to notify about terminating the service.
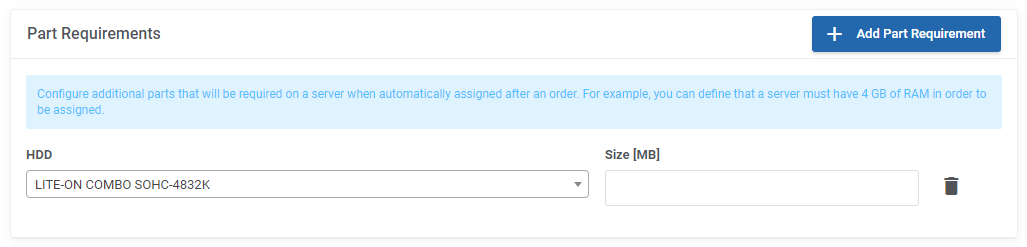
Parts Management
Choose parts from the dropdown menu and provide their values. They will be available for clients while placing an order.
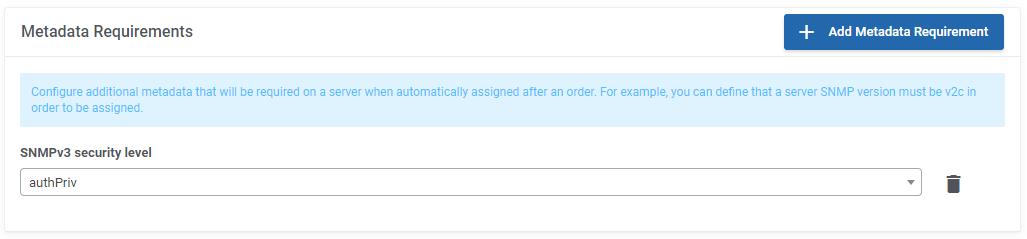
Metadata Management
Alike parts, you may configure extra metadata that will be required to choose for clients while placing an order.
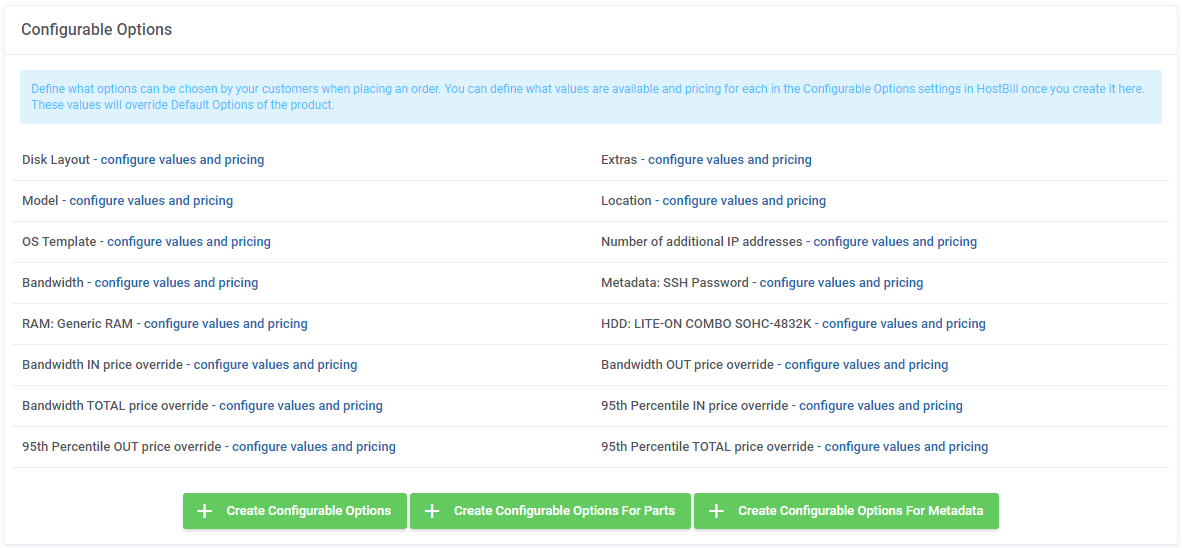
Configurable Options
You can optionally generate the default configurable options to allow placing orders tailored to your customers’ needs.
We recommend viewing and modifying them to fit your provisioning capabilities.
Note: You can also add your own configurable options which will be then displayed under ‘Service Configuration’ in your EasyDCIM backend.
Important: Any configurable option will overwrite its counterpart from the product settings.
Important: If you create general configurable options, remember to refresh the page in order to successfully assign the newly generated configurable options to a product and then to be able to generate and allow configurable options to additional parts and/or metadata.
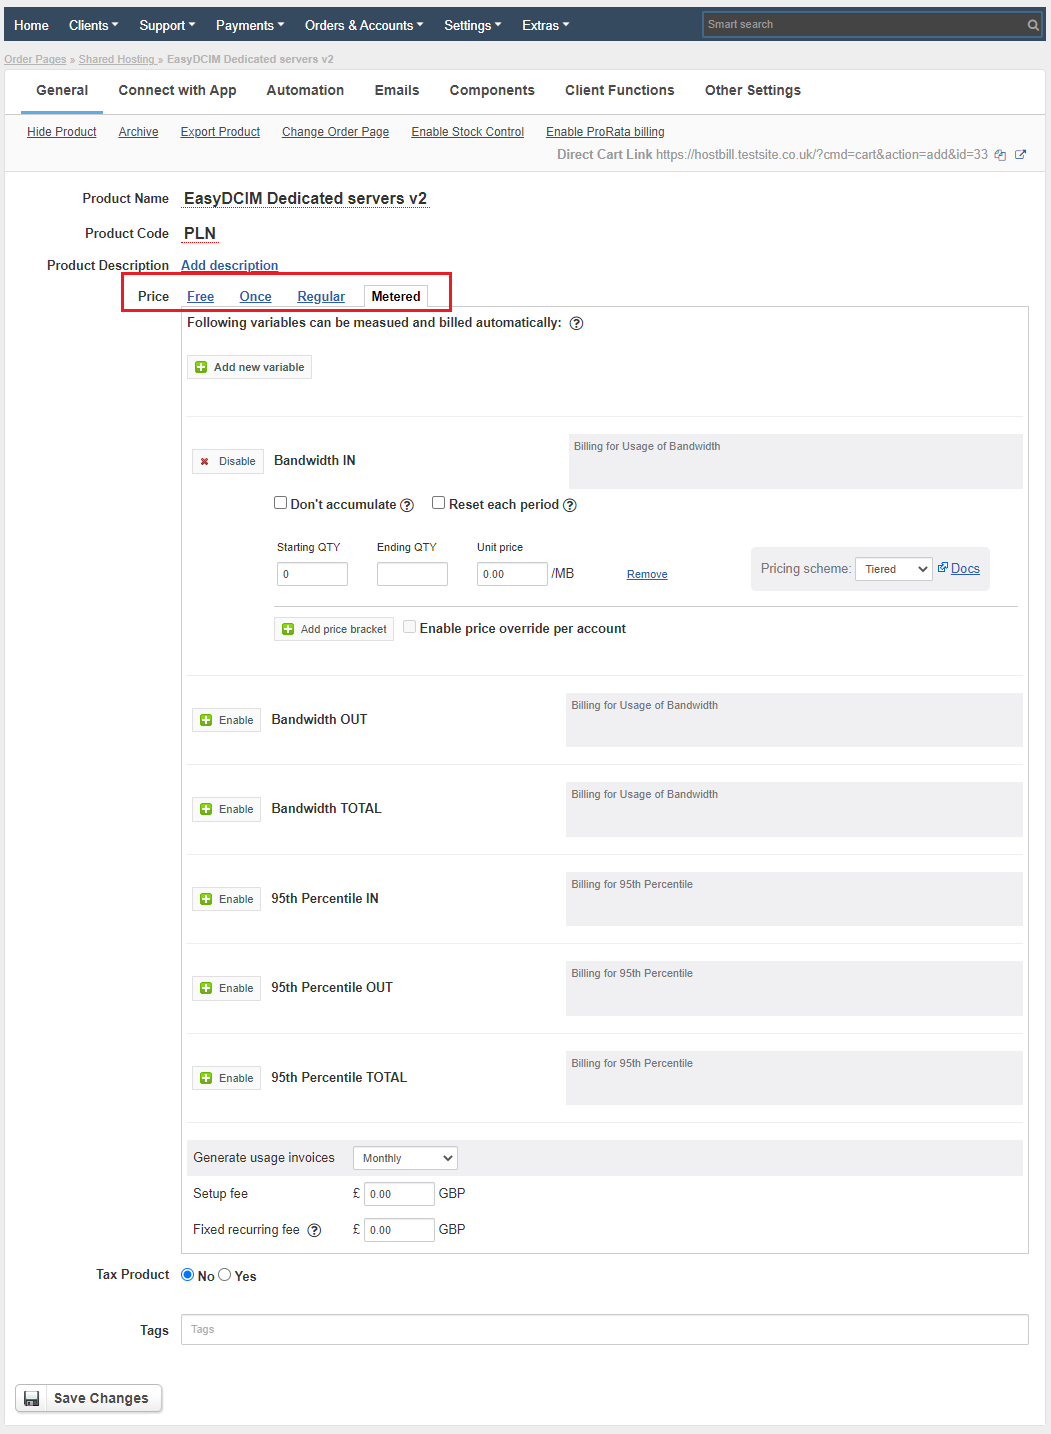
Under the “General” tab you may configure Bandwidth and 95th Percentile billing. Define Price as “Metered”, available options will appear. Enable variables visible on the screen below.
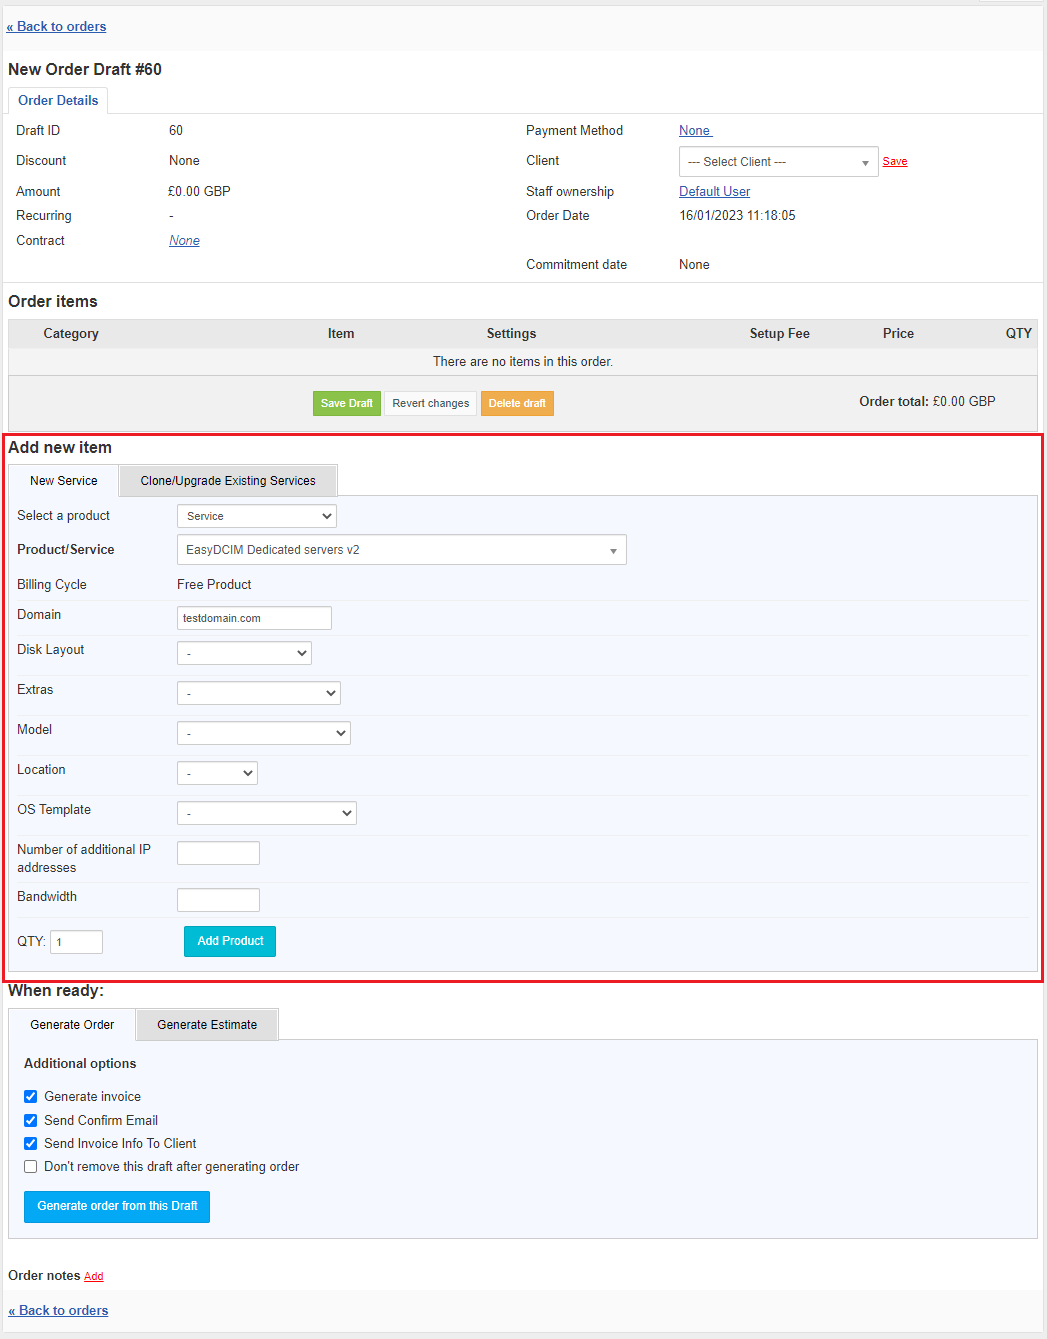
Next, navigate to: Order & Accounts → Orders → Create Order. Find the “Add new item” section:
- “Select a product” - pick “Service”. A new line will appear
- “Product/Service” - choose your previously created product (step 6).
- “Domain” - type in the domain
Press Add Product to complete this step. Generate the order form the draft.
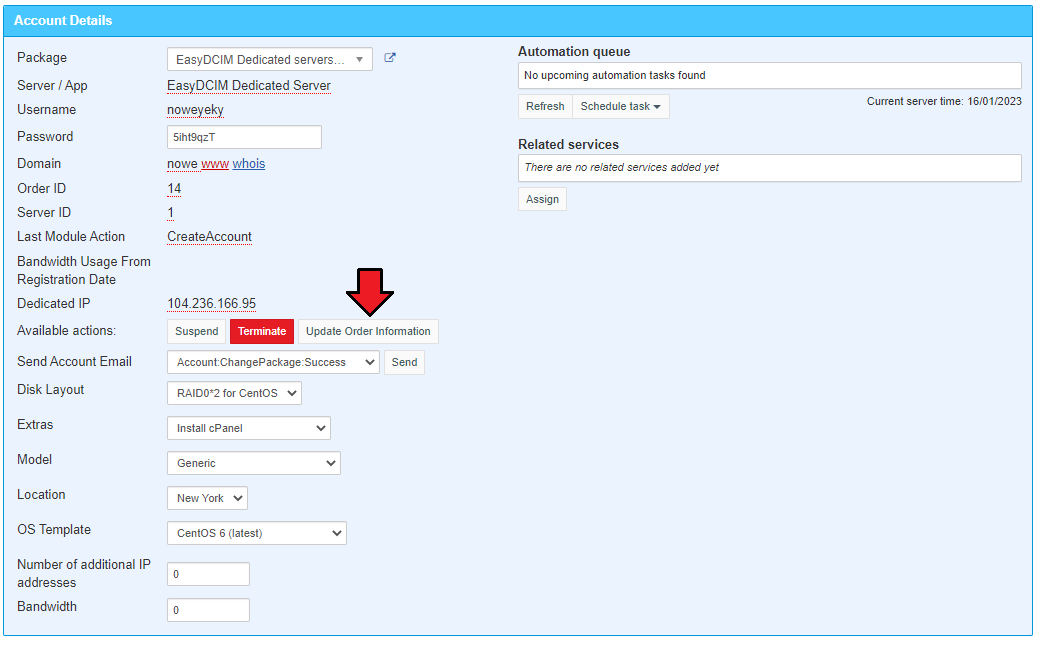
When ready, move to the Order & Accounts → Orders section and open the account that you have ordered in the previous step.
- In the “Account Details” enter the Username and the Password
- Press “Create” to continue
- Now you will have to wait until the module cron synchronization, the ServerID will be completed automatically and then you will be able manage the service.
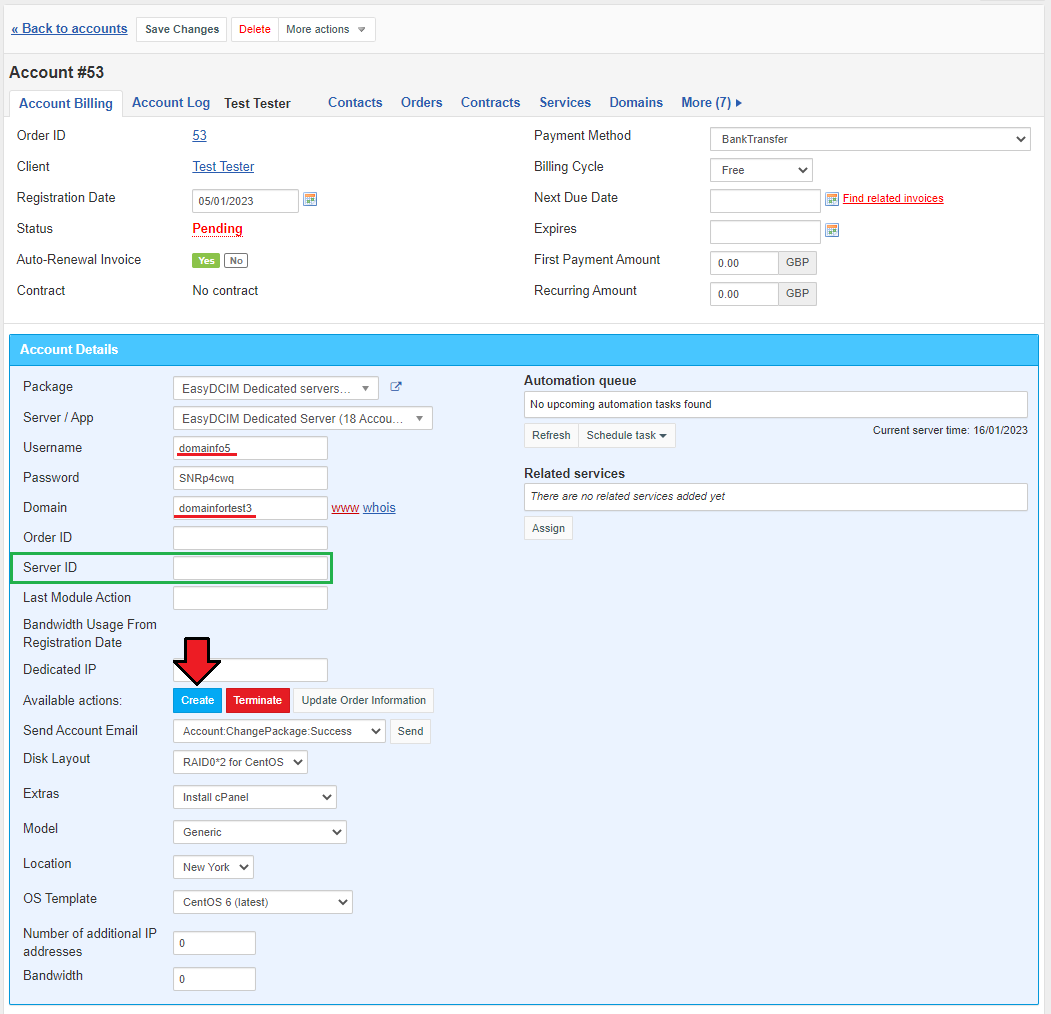
Manual Synchronization
It is possible to perform the synchronization manually, you will not have to wait until the cron is executed. To do that, simply press “Update Order Information” button. That is one of the allowed actions that can be executed on the account, you will find it in the account’s details section → “Available actions”.
Management
In this section we will show you all functionalities of EasyDCIM Dedicated Servers For HostBill. Our module allows you to offer and manage EasyDCIM servers right in your HostBill system.
Admin Portal
As soon as you set up an account for a client, you can perform various actions and view server details in the HostBill admin portal. After a successful cron synchronization, you will be able to manage and control the service from “Details” section. Take a look at the below screens to see all the available for the admin options.
Our module allows you to:
- Start/stop/reboot server
- Force BMC cold reset of the server
- Enable rescue mode
- Use KVM Java console/ noVNC KVM console
- Log into EasyDCIM Panel
- View server information
- View general and server location information
Below the mentioned functions, there are various usage graphs and statistics available at your disposal.
Client Portal
In the client portal your customers can view all details concerning their servers, manage their status remotely as well as log in to their EasyDCIM control panel with a single click. Other available actions on the server: Start, Stop, Reset, BMC Cold reset, Enable Rescue Mode.
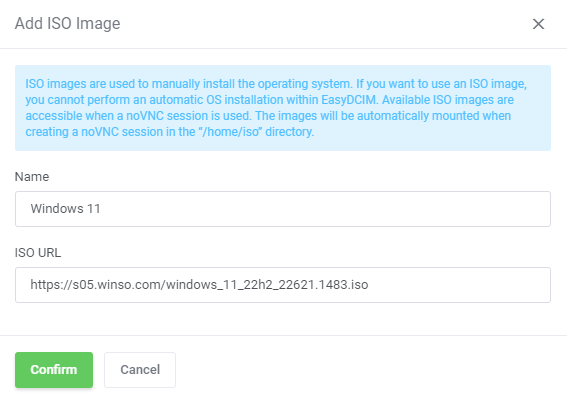
ISO Images
In the “ISO Images” section you may add custom ISO images to their servers.
Important: ISO images are used to manually install the operating system. If you want to use an ISO image, you cannot perform an automatic OS installation within EasyDCIM.
Available ISO images are accessible when a noVNC session is used. The images will be automatically mounted when creating a noVNC session in the “/home/iso” directory.
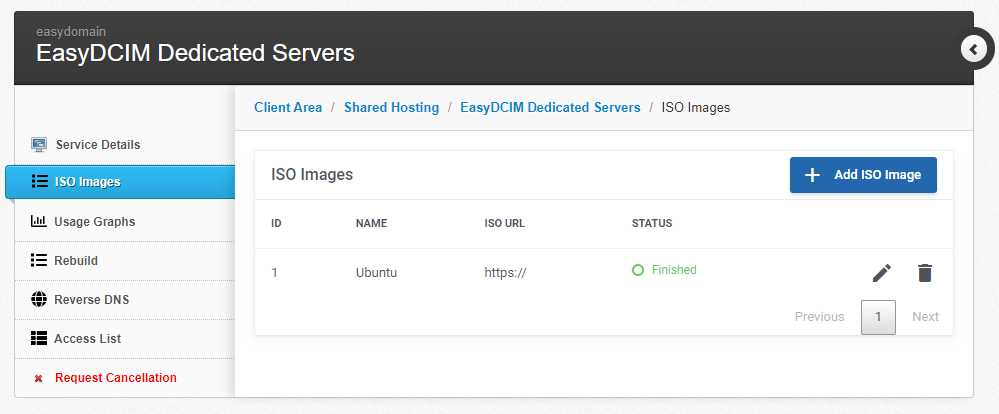
Type in your custom name of the ISO image and provide a direct URL to the .iso files. Press the adequate button to confirm the action.
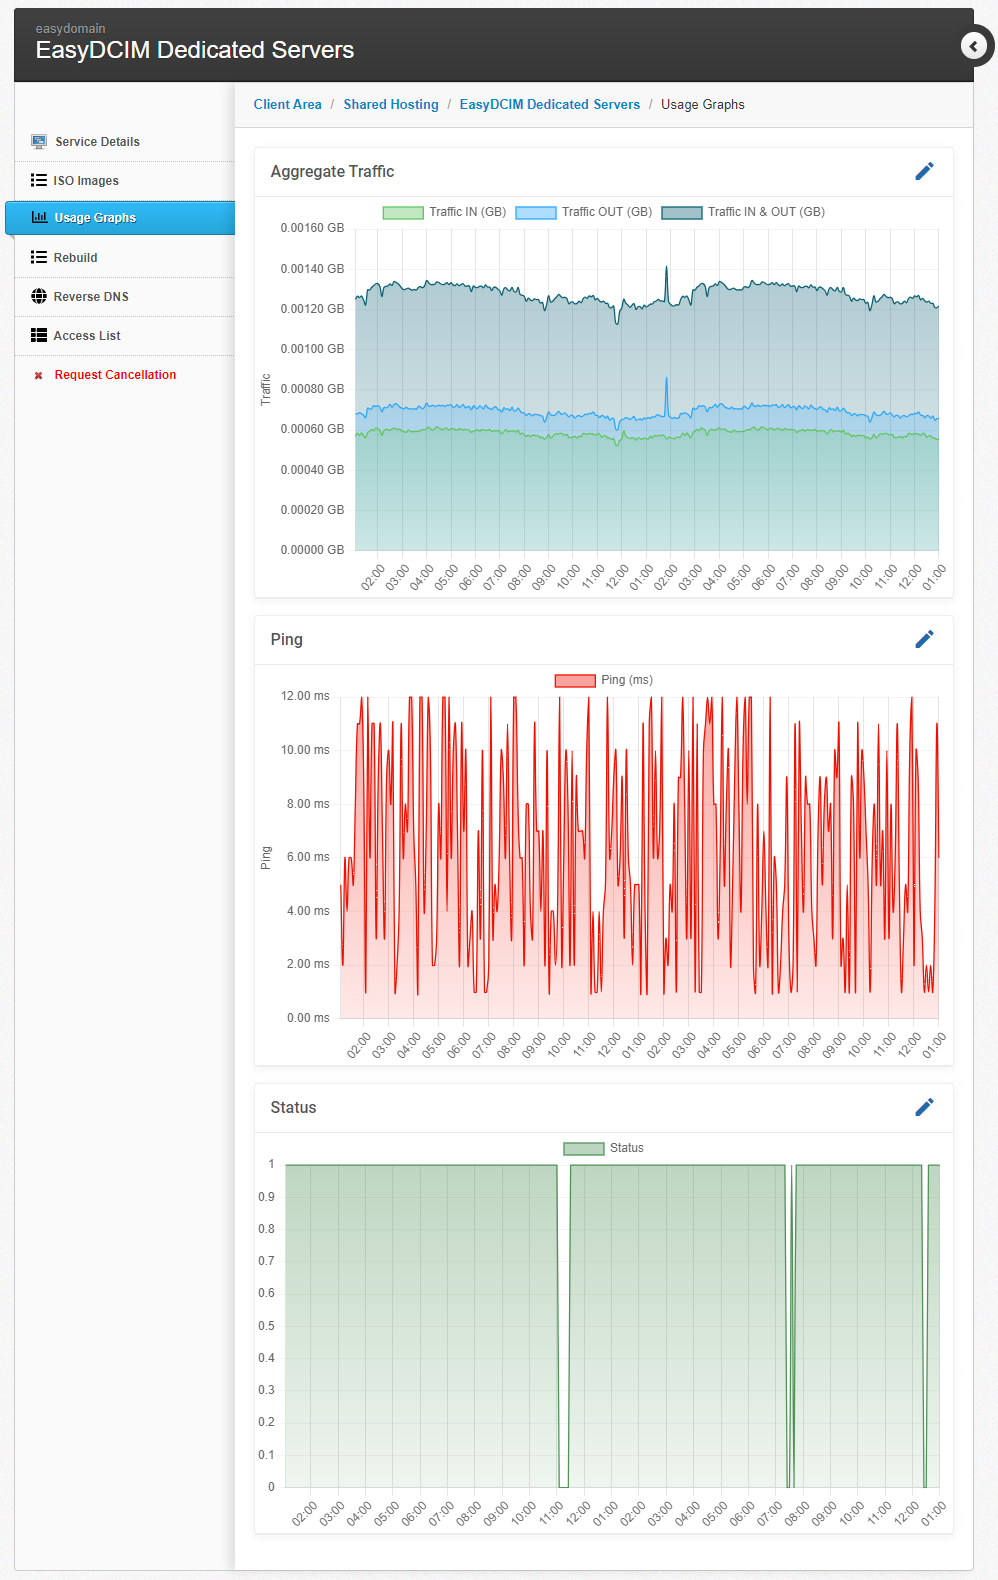
Usage Graphs
This section allows to view information on the total traffic on all of your devices in a form of a clear graph.
Note: Available time intervals depend on the date of the product registration.
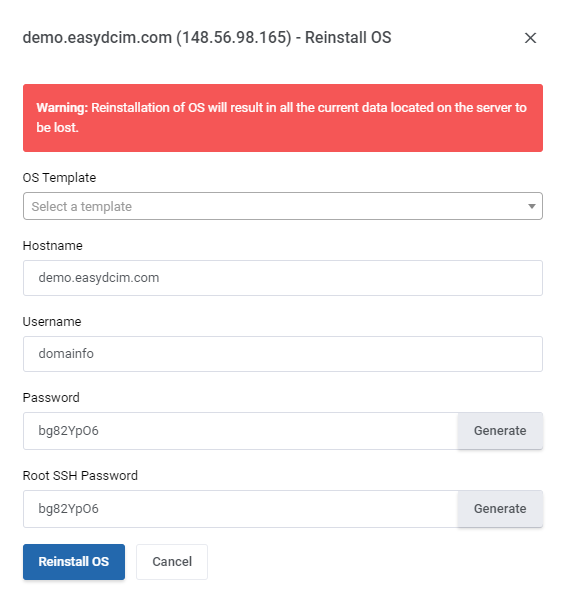
Rebuild
The “Rebuild” section gives the possibility to reinstall OS on the client’s server.
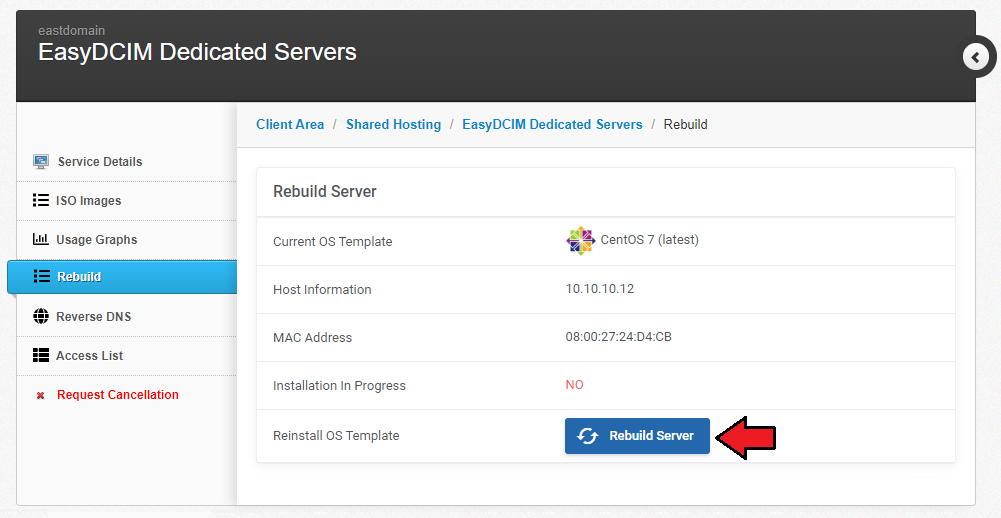
Select the OS template to reinstall and provide all the necessary details to proceed with the reinstallation. Confirm your decision in the end.
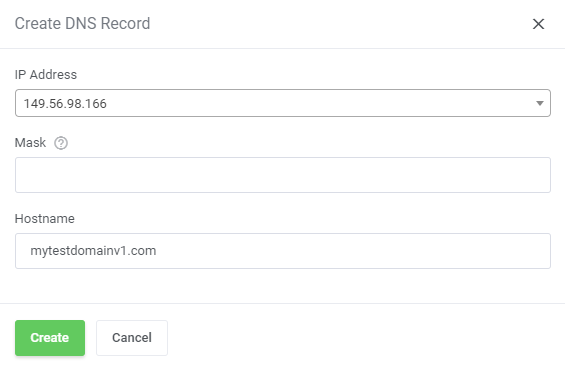
Reverse DNS
It is possible for your clients to control their reverse DNS. They can either edit the already existing records or create new ones.
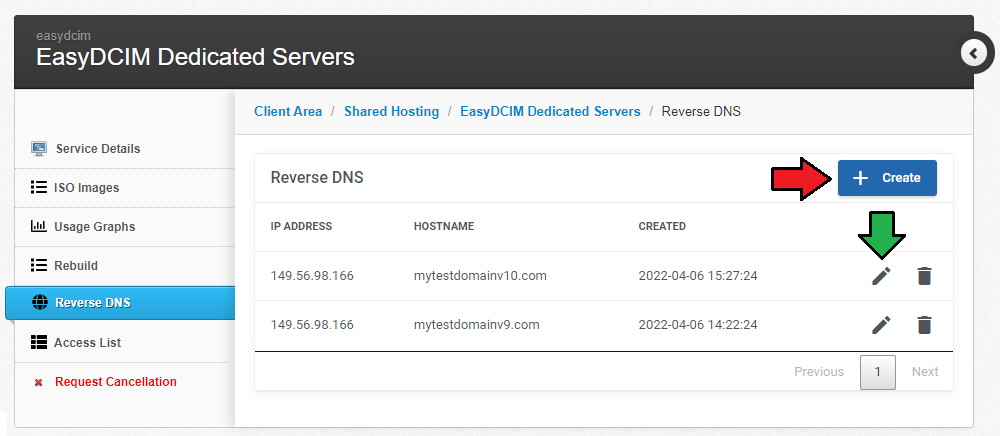
To create a record, all your clients need to do is fill in the necessary information. The newly created record will immediately appear on the list. If you want to create just one record, then please leave the “Mask” field empty.
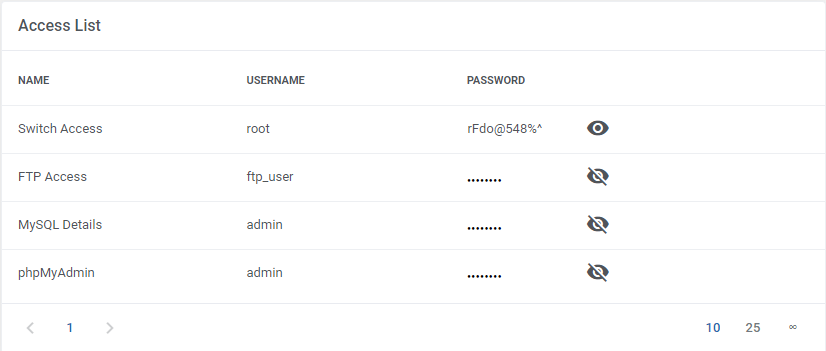
Access List
Move to the “Access List” section to see a full list of all stored passwords. Press the icon next to the password to show/hide it.